Zoom on the Apple TV provides up to 15X magnification for those who have low vision, but it can benefit anyone who has difficulty seeing the Apple TV interface on their TV. This accessibility feature should be familiar to low vision users of other Apple products. It has been available for some time on the Mac and on iOS devices, and it is also supported on the Apple Watch. With the release of the 4th Generation Apple TV, every Apple product that supports a display now also supports magnification for low vision users.
This video provides an overview of the Zoom accessibility feature. You will learn how to enable/disable Zoom in Settings, how to add Zoom to the Accessibility Shortcut for quick access, and some of the gestures supported by Zoom:
a light tap near any edge on the Siri remote will move the zoomed in area by one screen
dragging on the touch area of the Siri remote will allow you to pan in any direction (a two finger tap will stop/resume panning).
double-tapping and holding with two fingers, then dragging up/down without letting go will allow you to adjust the zoom level.
A nice feature built into Zoom is that you can double-tap the Siri remote at any time to hear the currently selected item read aloud. This works even if you are not currently zoomed in (Zoom just has to be enabled).
I was already happy with my third-generation Apple TV, but when I read that Apple was expanding the support for accessibility in the fourth generation model I knew I was going to pre-order the device as soon as it became available. Today, my 4th-generation Apple TV finally arrived, and it does not disappoint with regard to its accessibility. This post is not an in-depth review of the new Apple TV (there are plenty of those online already including a really nice one from iMore), but rather my first impressions of the set top box as someone with a visual impairment and a personal interest in accessibility. I will also just focus on the built-in features of the new Apple TV, rather than the apps that can now be installed on the device (that will make for a separate post as I explore the App Store further in the next few weeks and even more apps become available).
The new Siri remote.
In Summary
Nicely rounds out the support for accessibility across the Apple ecosystem by expanding on the support for VoiceOver in the previous model, adding Zoom and providing many of the same options for customizing the interface that are available on other Apple devices.
Major accessibility features such as VoiceOver and Zoom are responsive and perform well, with little lag.
The interface is cleaner and works better across the room: for example, it is now much easier for me to tell when an item has focus, something I struggle with on my third-generation Apple TV (especially on my smaller TV).
Other than the new Siri remote there are no other options for controlling the new Apple TV, which does have an impact on accessibility for some users. I hope this situation is addressed soon through a software update.
Setup and Interface
Setup for the new Apple TV couldn’t be easier. Once you have your power and HDMI cables connected and your new device has come on, you can triple-click the Menu button to turn on VoiceOver so that it can guide you through the rest of the setup. After you have selected your langauge and country/region, a brand new feature even allows you to place your iPhone (running iOS 9.1 or later) near the Apple TV to provide it with your network and Apple ID information.
The rest of the setup goes as expected, with selections for enabling location services and Siri, sending diagnostics data to Apple and developers, agreeing to the terms of service no one reads and so on.
Once the setup is complete, you will notice that the new interface is much brighter than the old one, with light gray backgrounds rather than black throughout.
Some people have complained about this, and I can see where it can be a problem if you have an Apple TV in your bedroom and want to use it while the other person (roommate or significant other) is trying to sleep. It would be nice to have the option of a dark theme like Invert Colors on iOS devices for those who prefer it.
Overall, I found the interface to be much easier for me to use. The item that has the focus pops out a bit, which is a more pronounced focus indidcator from in the older interface. Whether on the apps grid or in the menus I found this change made it easier for me to quickly know what item I had selected. The interface supports greater customization than on any previous Apple TV, thanks to an entire section labeled Interface in the Settings.
When you go into Settings, the first thing you will notice is that the Accessibility options are now near the top of the General pane. In fact, they are one of the first things you see, right after the optons for the screenreader. On the previous Apple TV model, you had to scroll quite a bit to locate Accessibility toward the bottom of the General pane.
Of course, you can still use the Accessibility shortcut to quickly enable and disable accessibility features without going into Settings. Whereas on the old Apple TV you invoked this Accessibility Shortcut (it was actually called the Accessibility Menu) by pressing and holding the Menu button, on the new one you do it by triple-clicking that same button (much like you triple-click the Home button on iOS devices to do the same thing). A nice touch is that VoiceOver will read the options shown by the Accessibility Shortcut even if you have it disabled in Settings.
In addition to the Accessibility Shortcut, the new Interface section of the Acccessibiliy pane includes a number of options for cusotmizing the appearance of the display (similar to options already found on iOS and Apple Watch), including:
Bold Text: a simple toggle that provides more weight to the text labels. Enabling this feature will require a quick restart just as it does on other Apple devices.
Increase Contrast: there are two options. The first reduces the transparency, while the second one changes the focus style by adding a thick outline around the currently selected item.
Reduce Motion: another toggle that removes animations throughout the interface for those who are sensitive to the extra motion.
Along with adjusting the appearance of the interface, the new Apple TV has retained the options for customizing closed captions that were available before. These are found in the Media section of the Accessibility pane, where you can also enable audio descriptions for programs that include them. In addition to turning on the captions, you can still customize the style by selecting Large Text and Classic options or creating your own style with many options for both the text and the background.
Siri
Updated 11/5/15: Siri is one of the major selling points of the new Apple TV and I’ve finally had a chance to play around with it as I have started to interact with content on the device. Apple TV’s Siri allows you to do a number of things using speech: search for movies (“show me movies with Penelope Cruz”), refine your search (“only her dramas from 2012”), navigate (“open Photos” or my favorite – “home screen”), and control playback (“pause this,” “skip forward 30 seconds,” etc.) From an accessibility perspective, it allows you to enable/disable VoiceOver, “Turn on closed captions” while you are watching content, and if you miss something you can just say “What did he/she say?” and the playback will rewind 15 seconds and temporarily turn n the captions. I love this feature because it highlights the usefulness of captions not just as an accessibility feature but as an example of design that benefits everyone (universal design). My only concern with Siri is that you have to hold down the button the entire time you are speaking your request. That could be an issue for some people with motor difficulties, especially as you start to use Siri all the time. I am hoping that eventually there is an always on feature like “hey Siri” on the iPhone.
VoiceOver and Zoom
These two features in the Vision section of the Accessibility pane are the biggest changes to the accessiiblity of the Apple TV in the new model. Zoom is brand new, and supports magnification up to 15X (the default is 5X). Once Zoom is enabled, you will zoom in and out by triple-clicking the touchpad on the new remote. While you are zoomed in, you can interact with Zoom in a variety of ways:
drag one finger over the touchpad to pan in any direction. As you pan, an overlay will let you give you an idea of what area of the interface you are zoomed in on (very similar to the indicator you get with Apple Watch when you use the Digital Crown to zoom by row).
stop panning by tapping the touchpad with two fingers. At that point, you will be able to use the usual flicking gestures to move from one item to the next without panning, but you can resume panning at any time with a second two-finger tap on the touchpad.
adjust the zoom level by double-tapping with two fingers, holding, and then swiping up or down with the two fingers without letting go. The maximum amount you can zoom will be determined by the value selected in Settings.
Update 11/5/15: In a previous version of this post I noted that I could get the labels read aloud each time I double-clicked the Siri button. The next day, I could not get my Apple TV to do it again and couldn’t figure out why. It turns out that this is a feature of Zoom. If Zoom is enabled, you can double-click the Siri button to hear an item read aloud.
VoiceOver was already available on the older model, but the touchpad allows it to be an even more robust solution on the new one. If you have used VoiceOver on an iOS device (or on a Mac laptop) you will already be somewhat familiar with how to interact with VoiceOver on the new Apple TV. However, if you do need some help, just know that you now have a VoiceOver Practice that is only shown when you have VoiceOver turned on (sound familiar, iOS users?).
VoiceOver supports the following gestures on the new Apple TV remote (all gestures are performed on the touchpad area of the new remote):
Move your finger around on the touchpad: move the focus to have VoiceOver speak the currently selected item aloud.
Flick in any direction with one finger: move the focus in a given direction.
Click on the touchpad: make a selection.
Flick down with two fingers: read from the current location to the bottom.
Flick up with two fingers: start reading from the top of the screen.
Two-finger tap: pause/resume speaking.
Again, these gestures should be familiar if you have used an iOS device or a Mac laptop with the Trackpad Commander turned on. Speaking of the Trackpad Commander, the rotor is also supported and, you guessed it, you turn the virtual dial clockwise or counter-clockwise with two fingers to select a rotor option and then flick up or down with one finger to adjust its value.
The rotor can be used to adjust the speech rate with more control (as opposed to the option in Settings that only allows you to select from a few preset values such as “Very Slow” or “Very Fast”). It also allows you hear items read by character or word, to enable or disable Direct Touch (where instead of flicking to navigate in a linear way you can just move your finger on the touchpad to move around the interface with more freedom) and more (I’m still trying to figure out a few of the options such as Navigate and Explore).
You can use Siri to turn on VoiceOver (just say “Turn VoiceOver on”) but for some reason you can’t do the same for Zoom and other settings. When I tried it all it did was open the Settings, but it didn’t take me to Zoom or turn on the feature as requested.
First Impressions
Overall, I like the new Apple TV from my limited exposure to it in the few hours since it arrived at my home. I like the updated interface, which is more cleanly laid out and designed for better visibility from across the room. From an accessibility perspective, I think Apple TV is the best game in town. None of the other set top boxes I have tried have the accessibility support Apple TV had even before the new model came out.
The new model ups the ante with more options for customizing the appearance of the interface, the addition of Zoom for those who have low vision, and an enhanced VoiceOver that is more than ready for use with apps (though how well that works will depend as always on how well developers incorporate accessibility support in their apps). Performance is a lot better too. I almost forgot just how much time I spent waiting on my older Apple TV until I switched back to compare some of the features. The new model is a lot more responsive and just performs better all around.
Having said all that, whether I end up liking this Apple TV as much as I have the previous model will depend on what happens in the next few weeks and months as updates to tvOS are released. As good as the accessibility features and performance of this new version are, there are still a number of issues that need to be addressed:
No Podcasts app: The company that basically brought us the podcast has launched a set top box without a dedicated podcast app (and as I write this, there are no Apple TV versions of Downcast or Overcast in the App Store). Aside from renting movies, podcasts are the next thing i consume the most on Apple TV. I can set them to play in the background while I do other things around the house, and I have a number of favorites I listen to on a regular basis. I’m hoping Apple is just taking a little bit more time to make sure the podcast app is done right when it is finally released.
No Remote app support: the current Remote app for iOS is not compatible with the new Apple TV. This means that someone with a motor difficulty is not able to use Switch Control on an iOS device to navigate the Apple TV interface through the Remote app. While the built in accessibility features of the new Apple TV do an excellent job of accommodating the needs of those with vision and hearing difficulties, it is important to address this omission to make sure switch users can enjoy the Apple TV along with the rest of us.
No support for external Bluetooth keyboards: Probably my biggest annoyance was having to go back to typing in user names and passwords with the onscreen keyboard. I have always used either the Remote app for iOS or an external keyboard connected over Bluetooth for this purpose, but both options are not possible at launch. Especially when entering complicated passwords, doing it on an external keyboaard is much faster and easier.
The remote: I generally like the new remote. It is lightweight and feels good in the hand. My issue is that I know there is good likelihood that I will lose the thing and it will cost me $79 to replace it (the previous remote was only $19 for comparison). I’m thinking I may buy a $25 tile and find a way to attach it to the remote just in case. I’m surprised Apple did not build the same Ping feature that is available between the Apple Watch and the iPhone, allowing us to quickly find a misplaced remote by emitting a loud ping sound. For now Tile may be my best bet ($25 is much better than $79). In the meantime, I have set up my existing TV remote to work with the Apple TV.
Most of these issues are easily fixable with a software update and as I went to publish this post I read that Apple had released a beta of tvOS 9.1, the first update for the new Apple TV. It is unclear whether this update will bring back some of the features listed above, or if it is just a bug fix release. Time will tell.
Are you planning to buy an Apple TV? If you already have it, what do you like about it? What do you think can be improved?
Last week, I had the privilege of once again attending the Closing the Gap Conference in Minnesota. This conference has a long tradition of bringing together thought leaders in the field of assistive technology from all sectors: education, rehabilitation, vocation and independent living. It is always great to see many of the people I follow and learn from online at this conference. This year, I had the pleasure of doing a two-block session with the amazing Diana Petschauer of Assistive Technology for Education, as well as several sessions with my friend and fellow Apple Distinguished Educator Mark Coppin of the Anne Carlsen Center. Diana and I did a two-block session, Apps Across the Curriculum, which was divided into two mini-sessions: one focusing on Chrome apps and extensions for supporting diverse learners, the other on the built-in accessibility features of iOS and iPad apps for providing access to the curriculum. The sessions with Mark ranged from one on the Apple Watch as a assistive technology, to one on the many third-party keyboards available for iOS. At that session we were joined by reps from AssistiveWare, TextHelp and Crick (a big thank you to all of them!) who demoed each of their respective keyboards. I really had a nice time and learned a lot during these sessions. That is the biggest benefit from doing a collaborative session rather than one where you are the only presenter. You get to learn from some of the best in the industry.
I had limited time on the exhibit floor this year, but what follows is a quick rundown of what I found to be the most interesting products.
Hardware
The Hook+ from AbleNet is quickly becoming a favorite switch interface of mine. Not only is it small and lightweight, but setting it up couldn’t be easier. You just plug it in and using Apple’s auto switch configurator feature it can automatically configure the iOS device to use single switch auto scanning or dual switch step scanning based on how many switches are connected. Since it is MFi (Made for iPhone) compliant, there is no error message on the screen when you first plug it into the iOS device. A nice touch is that there is a battery pass through so that you can charge the iOS device while using the Hook+, so that you don’t run out of juice at a critical time. Up to four switches can be connected to the Hook+.
Closing the Gap was my first chance to see the new Kinetic for iPad product from Pretorian Technologies. According to Pretorian, the idea for this product is to “put the fun back in learning” using the principles of kinesthetic learning. All of the work in the Kinetic is done by a gyroscope that detects changing in orientation, taps and movement. I saw two different demos of Kinetic: in one, the Kinetic was inserted into a big cube which could play a different message on the iPad depending on the cube face that was facing up; in the other, the Kinetic was placed into a smaller soft toy which could act as a switch when tapped, dropped or kicked. I would encourage you to check out the videos on the Pretorian site to get a better idea of how the Kinetic works.
Apps
Crick demoed its latest app, Clicker Communicator. This AAC app seeks, according to John Crick, to make communication “personal, meaningful and accessible.” Personal refers to how the symbols can be customized, which can include using a new painting tool to change their appearance. The app ships with 24,000 SymbolStix symbols and 2,500 Crick symbols, with PCS and Widgit symbol sets available as in-app purchases. Meaningful refers to the availability of a number of free Learning Grids vocabulary sets designed to be used in specific classroom lessons. Finally, accessible refers to the inclusion of the SuperKeys access method with the app. This causes the symbols to act in much the same way the keys do in the SuperKeys third party keyboard for iOS. Symbols are grouped into clusters on the screen. When a cluster is selected, the symbols in that cluster come to foreground and are presented much larger. The larger hit area is meant to make the symbols easier to select for those who have motor difficulties. Clicker Communicator is available for $159.99 (with in-app purchases of $49.99 for each additional symbol package). It is part of the Volume Purchasing Program which allows for a 50% discount with purchases of 20 or more copies of the app.
AssistiveWare’s Pictello now supports importing from Tar Heel Reader books, which is welcome news to those (like me) who are big fans of both tools. There is no need to update the Pictello app. Instead, a Tar Heel Reader Story Converter tool is available on the AssistiveWare website with the steps needed to convert a Tar Heel book so that it can be opened in Pictello. Basically all you need is the Tar Heel Reader book’s URL, which you then enter into the converter tool to get a Pictello file emailed to you. Once you receive this file, you can open it in Pictello and do anything you can do with the app: add video, use any of the high quality voices for text to speech, continue the story by adding pages and more.
Speaking of AssistiveWare: the company did a number of sessions focused on the 4.1 version of the Proloquo2Go app, which now supports usuarios bilingues como yo (bilingual users like me). You can read all about it on the AssistiveWare site.
There were a couple of other interesting AAC apps I saw on the exhibit floor for the first time this year. I would summarize Coughdrop as “Google apps for AAC.” The idea is that communication boards can be synced across multiple devices so that if one device breaks or runs out of battery, communication can be continued on a different device. The boards are actually stored offline on the device so that they can be used without a Wifi connection. Everything syncs up when a connection is available. Coughdrop is currently in beta and available as a free 2-month trial. After that it is available as a subscription of $3-10 per communicator (parents and therapists remain free).
Lectio is a new reading support app. Using the camera on an iOS device, the app recognizes individual words on the scanned page and turns them into yellow highlights that can be tapped to hear each word read aloud. Lectio is available for $4.99 on the App Store.
Did you attend this year’s Closing the Gap Conference? Are there any products you were able to check out that I have left off this roundup? I look forward to seeing you at CTG next year.
Over on my YouTube Channel, I have posted a few video tutorials focusing on the built-in accessibility features of Apple Watch.
I also discuss these accessibility features in more detail in my recently updated book on low vision supports for Apple users, Zoom In (available as a free download on the iBookstore). VoiceOver, Zoom and many of the accessibility features familiar to users of iOS devices are included in Apple Watch. These accessibility features ensure users with a variety of special needs can personalize and use their Apple wearables.
As with iOS devices, Apple Watch also supports apps that provide even more flexibility for users in how they can use the wearable. With the release of watchOS 2 these apps can now run natively on the device itself, promising faster loading times and better performance overall. More importantly, apps can now use many of the hardware features available on Apple Watch, such as the Taptic engine, the Digital Crown, the various sensors (heart rate sensor and accelerometer) and the microphone. Basically, apps can do much more than they could with the initial release of Apple Watch, opening the door for developers to be even more creative in how they address the needs of users who have special needs. This post focuses on my favorite apps for such users.
With any of the apps mentioned here, you will install the app from App Store just as you would do it for iPhone apps. You would then open the Watch app, go to My Watch, tap on the name of the app and make sure the toggle for “Show App on Apple Watch” is set to on. For some apps, you will also have an option to include it in Glances, the Apple Watch feature that allows you to access information with a swipe up from the current watch face.
For your convenience, I have collected all of the resources mentioned in this post into an AppoLearning Collection. Have anything to add (apps, ideas for use in the classroom)? Let me know and I can add you as a collaborator to this collection (a new feature available on Appo Learning).
Children with Autism: A Visual Schedule
Visual schedules are supports that allow children and adults with autism and related disabilities to better handle transitions in their daily routines. These schedules use pictures to indicate to learners what they are to do and where they are to go next, helping to ease anxiety around transitions and building their ability to act independently. According to developer Enuma (formerly Locomotion Apps), Visual Schedule ($12.99) is the first picture-based scheduler for the Apple Watch.
On the Apple Watch, the app will display each activity as it is happening, with a progress indicator to let the learner know how much time is left before transitioning . Swiping up on any activity will display any associated tasks so that they can be checked off. Swiping to the left will then show what activities come next.
Building the visual schedules themselves takes place on the paired iPhone, where most of the work is done through a drag and drop interface. From the Today view, tapping Edit in the upper right corner will display icons for 14 preset activities on the right side of the screen.
You can also tap Add (+) at the bottom of the list to create your own custom activity (which can use a photo from your Camera Roll as its icon). For each activity, you can double-tap its icon in the Edit view to specify the color of the label as well as any associated tasks.
To build the visual schedule itself, you drag the activity icons onto the Today view and use the provided handles to adjust the activity’s duration .
Proloquo2Go
Proloquo2Go ($249.99) is a robust symbol-based communication app that has been available for iOS devices for some time. The price listed is not for the Apple Watch app itself, but rather for the communication app that runs on iOS and which includes an Apple Watch component. Developer AssistiveWare originally created the Apple Watch app when the watch was announced and at that time the app only allowed the wearable to be used as a switch for a paired iPhone running Proloquo2Go. With watch OS 2, Proloquo2Go now also provides basic communication capabilities on the Apple Watch app.
When you first launch Proloquo2Go on the Apple Watch you will be prompted to select the mode you want the app in: Switch or Communication. To change the mode after the initial selection, you will have to go into the Proloquo2Go options on the paired iPhone and change it there. You can see how the Switch feature works in a video I have posted on my YouTube channel.
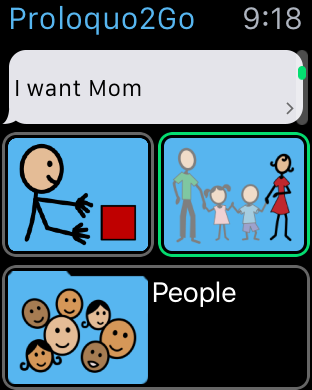
The new Communication option works by providing a basic set of phrases to start, then a Builder which can be accessed through a Force Touch to build new phrases. The Builder works very much in the same way you customize the various Complications on the Apple Watch faces. The window is divided into three cells. You use the Digital Crown to select a sentence starter from the first cell, then repeat the process to select a noun or adjective from one of the available categories to complete the phrase (again, using the Digital Crown to navigate the choices). When the sentence is selected, it is displayed upside down so that the Apple Watch can be shown to the other person. I found this to work out best when I turned off the option for “Wake Screen on Wrist Raise” on the Apple Watch settings. Otherwise, the screen would go to sleep as soon as I turned my wrist to display the message. Hopefully in the future the Apple Watch app can include text to speech, which according to AssistiveWare is a limitation imposed by Apple.
Proloquo4Text
Proloquo4Text ($119.99) is a text-based communication app from AssistiveWare that, like Proloquo2Go, includes an Apple Watch component. However, unlike the Proloquo2Go Apple Watch app, this one does not include a phrase builder. You can choose to store a number of phrases into a special Apple Watch folder on the iOS app, and these phrases are then available for selection on the Apple Watch. As with the phrase builder in the Proloquo2Go app, the phrases are displayed upside down when selected.
Wunderlist
For learners who have executive functioning challenges that make it difficult to stay organized, a good to do list app with reminders can be a helpful support. Surprisingly, there is no Reminders app for Apple Watch, though you can use Siri to create a new reminder that shows up on the Reminders app on a paired iPhone.
Wunderlist (free) is an option if you would like to both create and view reminders on the Apple Watch. It is a free service for accessing to dos from just about any device (a full list of supported platforms is available on the Wunderlist site). On Apple Watch, the Wunderlist app provides a simple Home View with four options for viewing to dos: Inbox, Today, Starred and Surp to Me. The Glances feature is also supported so you can access your to dos for the current day with a quick swipe up from the watch face.
To create a new to do item, you use the Force Touch feature of Apple Watch. You press and hold firmly to reveal the Add (+) button, then use your voice to dictate the text for the new to do and tap Done when you’re finished.
On the companion iPhone app you can then add details such as the due date, set up a reminder (which will use the Taptic Engine on the Apple Watch to get your attention with a gentle tap) and organize the to dos into lists that can be accessed by scrolling with the Digital Crown on the Apple Watch. The idea is that the Apple Watch app is an interface for creating quick to dos and checking them off as they are completed, while the iPhone app provides more options for managing said to dos.
Evernote
Evernote (free) is one of my favorite apps for collecting random bits of information before it can get lost. It has become my replacement for all the post it notes I used to keep around my desk. With the Apple Watch app, you can create quick notes, use your voice to search through all the notes you have on your account, and see a list of recently viewed or updated notes. Like Wunderlist, Evernote supports reminders for notes that are time sensitive. However, with Evernote you can indicate the time for the reminder right on the Apple Watch itself as you create the note (though the options are limited to “this evening,” “tomorrow,” “next week” and “next month”). I find Evernote to be a nice compliment to Wunderlist and I use both: Wunderlist for to dos and Evernote for quick notes I will need to refer to at a later time but don’t necessarily have to act on right away. Together the two apps are great supports for staying organized and minimizing the risks of losing important information.
Just Press Record
Just Press Record ($4.99) is a new audio recording app that is made possible by the access developers now have to the microphone with watchOS 2. Just Press Record can record audio directly from the Apple Watch’s microphone and play it back with the built-in speaker. The interface couldn’t be simpler: a nice big microphone button you press to start your recording. A nice touch is that you can see the wave form as you record, and when you are finished you can preview the recording before you choose to save the file to your iCloud account. You can even record when your iPhone is not within range of the Apple Watch (the recording will be synced the next time you connect the two devices). This app is useful as another option for students to capture their thoughts and ideas using just speech. It could even be used for students to reflect on their progress at regular intervals (at the end of each
day or week). Recordings can be shared with the teacher from the iCloud account the app uses to store the recordings.
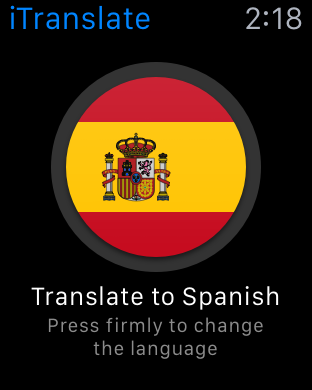
iTranslate
iTranslate (free, in-app purchase) is a nice app to have if you have English Language Learners in your class and your command of their native language is not as strong as you would like it to be. When the app launches, you can use Force Touch to change the language (more than 90 are supported). Once you have set your language, tap the middle of the screen and use your voice to speak the phrase you want translated. You can then play the translation back using the Apple Watch speaker. This is not the fastest app (especially at launch) but hopefully it will continue to improve on performance over time.
The number of apps for Apple Watch will continue to grow as developers become more comfortable with the device. What is exciting to me is the ability for developers to tap into the hardware features of the device with watch OS 2. I look forward to how the developer community will take advantage of the microphone and I hope that soon text to speech is made available to third-party apps as well. That would make many of these apps even more useful. What do you think?
With iOS 9, Apple has added a new option for selecting text to the onscreen keyboard. Using a two-finger drag gesture, it is now much easier (at least for me) to place the cursor right where I want it. Another two-finger tap selects the word closest to the cursor, and another two-finger drag makes a selection.
I have found this method of text selection to be much faster than the old one where you had to tap and hold to get a magnifying glass which allowed you to place the cursor and then select from editing options from a popover menu. The new gestures work very well with the new Shortcut Bar that appears above the onscreen keyboard on the iPad. This Shortcut Bar provides shortcuts for editing and formatting options such as cut, copy, past, bold, underline and italicize. Finally, if you use Zoom, you can have it follow the cursor as you move within the text area by making sure Follow Focus is enabled in the Zoom settings (General > Accessibility > Zoom).
Here is a brief video showing the new cursor movement and text selection gestures for the iPad in action. At the end of the video I show how these gestures can work with Zoom.
With iOS 9, Apple continues to refine the user experience for those who have disabilities or just need additional supports to effectively interact with their iPhones and iPads. While there are only two new accessibility features in iOS 9 (Touch Accommodations and a new Keyboard pane for improved support of external Bluetooth keyboards), the existing features have received a number of enhancements. Probably the one that received the most attention in this update is Switch Control, which now includes a new scanning style, the ability to set separate actions for long presses, and Recipes for more easily performing repetitive actions such as turning the pages in a book in iBooks.
The first change you will notice when you go into the Accessibility pane in Settings is that things have been moved around just a bit. Really the only change is that the options for Interaction now follow those for Vision. Everything else then follows the same order as before. I like this change as I think both VoiceOver and Switch Control significantly change how the user interacts with the device and this change should make it easier to navigate to Switch Control in the Accessibility pane. The change also works to highlight the new Touch Accommodations feature by placing it near the top of the Accessibility pane.
This post is a short summary of each accessibility feature that is either brand new or enhanced in iOS 9, starting with the new Touch Accommodations feature.
Touch Accommodations
This brand new feature is largely targeted at people with motor difficulties who may have problems with the accuracy of their touches as they interact with the touchscreen on an iOS device. Touch Accommodations consists of three options: Hold Duration, Ignore Repeat and Touch Assistance. Before you start experimenting with these options, I would recommend setting up your Accessibility Shortcut so that Touch Accommodations is the only option listed. This way if you get stuck while using Touch Accommodations you can quickly triple-click the Home button on your device to exit out of the feature.
Hold Duration will require the user to touch the screen for a given duration before a touch is recognized. This can be helpful for someone who struggles with accidental presses. When Hold Duration is turned on, touching the screen will display a visual cue with a countdown timer. If the user lifts the finger before the countdown runs out, the touch is not recognized. With Ignore Repeat, multiple touches within the specified duration are treated as a single touch. This can be specially helpful when typing with the onscreen keyboard. A user with a tremor may end up tapping repeatedly on the same spot, resulting in many unwanted keypresses.
Tap Assistance can be set to use the Initial Touch Location or the Final Touch Location. The two options determine the spot on the screen where the touch is performed when you let go with your finger. With Initial Touch Location, you can tap and then move your finger around on the screen while a timer is displayed. If you let go with your finger during the countdown (which you can customize using the Tap Assistance Gesture Delay controls) the tap is performed where you first touched the screen. After the countdown expires, you can perform a gesture (a flick, swipe and so on) the way you are used to with iOS. With Final Touch Location, the touch is performed at the spot where you let go as long as you do it within the countdown time. This can be a different spot than where you first touched the screen.
Additions to Switch Control
Switch Control is an iOS feature introduced in iOS 7 that provides access to touchscreen devices for a number of people who rely on external assistive devices. My friend Christopher Hills, with whom I am co-authoring a book on this feature (stay tuned on that front), is a good example of an expert user of Switch Control. Christopher has cerebral palsy and uses external switches to perform many of the gestures someone with typical motor functioning could do with their fingers on the touchscreen.
In iOS 9, Apple has continued the development of Switch Control with a number of new features:
A new Single Switch Step Scanning style: this new style requires the switch source to be continuously pressed until the user gets to the desired item. Letting go of the switch then will highlight that item and give it focus. With the default tap behavior, the next tap will bring up the scanner menu then within the scanner menu letting go of the switch will immediately select the option that has focus. A Dwell Time timing option determines how long it will take before an item is highlighted and the user can make a selection.
A new Tap Behavior: the Always Tap option is similar to Auto Tap in that it allows the user to make a selection with the first tap of the switch. However, with Always Tap, the scanner menu is available from an icon at the end of the scanning sequence instead of through a double-tap of the switch.
A Long Press action: the user an specified a separate action that can be performed when the switch is held down for a specified duration. This is a great way to exit out of the Recipes feature.
Recipes: the user can invoke a special mode for Switch Control where each press of the switch can perform the same action. A couple of actions are already included, such as tapping the middle of the screen or turning the pages in a book. These are primarily intended for use in iBooks. Creating a new recipe is as easy as giving it a name, assigning the switch that will be used to perform the action that will be repeated with each press, and choosing one of the built in actions or creating a custom one. Custom actions for Recipes can include a series of gestures and their timings. To exit out of the Recipe, the user has two options: setting a timeout after which the recipe will be ended if no switch presses take place, or setting the action for a long press of the switch to Exit Recipe.
A new option allows the switch user to combine tap behaviors when using the onscreen keyboard. With the Always Tap Keyboard Keys option, the keys will be selected with a single press of the switch even if the tap behavior is set to the default of showing the scanner menu at the first tap of the switch.
Customizable AssistiveTouch Menu
The layout of the AssistiveTouch menu can now be customized, with options for changing the number of items that appear on the top level shown and swapping out icons for features on secondary menus that are used more often. The number of icons on the top level menu can be set to as few as one and as many as eight. Tapping on any of the icons in the Customize Top Level Menu pane will open a list of all of the features supported by AssistiveTouch. Selecting an item from the list will move that option to the top level menu. Change your mind? No problem, a Reset option is available (in fact, I would love to see similar Reset options for other features such as VoiceOver and Switch Control).
Better Support for Bluetooth Keyboards
Under Interaction, you will find a new Keyboard option. Tapping that option will open a separate pane with options intended for those who use an external Bluetooth keyboard with their iOS devices:
Key Repeat: turns off the key repeat (it is enabled by default) in order to prevent multiple characters from being entered when a key is held down on the keyboard. The options for customizing this feature include adjustments for the delay before a key that is held down starts repeating, as well as how quickly the key repeat will take place.
Sticky Keys: allows the user to press the modifier keys for a keyboard shortcut in sequence rather than having to hold them down all at once. The options for this feature include a quick way to turn it on by pressing the Shift key quickly five times, as well as playing a sound to alert the user when it has been turned on.
Slow keys: changes how long the user has to hold down a key before it is recognized as a keypress (essentially a hold duration). The only option for this feature is to adjust the length the key has to be pressed before it is recognized.
The one option for the onscreen keyboard in the Keyboard pane addresses a usability problem by making the switch between lower case and upper case more prominent. By default, the keys on the onscreen keyboard are in lower case and only switch to uppercase when the shift key is pressed.
Tweaks to VoiceOver and Zoom
The Rotor in iOS 9 has two new options available: Text Selection and Typing Mode. The former is not a new feature or input mode, it just now can be changed through the rotor. With the latter, the user can more easily select text by character, word, line, or page (or select all) by flicking up or down with one finger after selecting Text Selection in the Rotor. A flick to the right will then select the text by the chosen granularity (word, line, etc.).
A new option allows the users of external Bluetooth keyboards to change the VoiceOver keys from Control + Option to the Caps Lock. Finally, users can now adjust the Double-tap Timeout at the bottom of the VoiceOver settings pane. This feature may be helpful to a VoiceOver user who also has motor difficulties and can’t perform the double-tap as quickly.
For Zoom, the only change is that the option for choosing different Zoom Filters is now available from the Zoom settings panel where before it could only be selected from the Zoom menu available after tapping the controller or the handle on the Zoom window.
Other Options
iOS 9 includes options for disabling the Shake to Undo feature as well as all system vibrations, both of which can be found under Interaction in the Accessibility pane.
As is often the case with iOS updates, a number of features that are not explicitly labeled as a accessibility features can benefit those who use assistive technologies. One example is the new Siri suggestions feature, which can be displayed with a swipe to the right from the Home screen. The suggestions include frequently contacted people, recently used apps, locations and more. Anything that puts less distance between users of VoiceOver and Switch Control and the information they need is a good thing in my book.
That’s it for this high level overview of the major (and some minor) changes in iOS 9 that impact those who rely on the accessibility features. I hope you have found it helpful.
Out of all the amazing accessibility features built into my Apple devices, the ones that are most meaningful to me are those that are intended for people with low vision. These are the features I use most frequently since I still have some vision left and I am not a full time VoiceOver user.
To share what I have learned about these features with the rest of the educational technology and assistive technology communities, I have authored a new multi-touch book: Supporting Students with Low Vision with Apple Technology. I had hoped to have the book available on the iBookstore in time for Global Accessibility Awareness Day, but with more than 25 videos that needed captioning it took longer than I expected. I am providing a sneak peek of a work in progress available for download from my Dropbox account. A word of caution: the file is 345 MB due to the videos.
The book explores the concept of an ecosystems approach to accessibility which I discussed in my Global Accessibility Awareness Day post. It focuses not only on the accessibility features found throughout the Apple ecosystem (on iOS, Mac, Apple TV and even Apple Watch), a number of apps to designed to meet the needs of those with low vision, and techniques for creating more accessible content for low vision readers.
I hope you like this multi-touch book and I welcome any feedback related to it: things I missed, things that need to be clearer, any feedback you wish to provide. Here is the intro video I created for it with PowToon:
On the occasion of Global Accessibility Awareness Day, I am excited about the many online and face to face events that will mark this important step toward ensuring a more accessible and inclusive environment for those of us who have special needs. I will be presenting a session on the use of photography as a tool for disability advocacy as part of Inclusive Design 24, a free 24-Hour event sponsored by The Paciello Group and Adobe Systems. Photography has long been a passion of mine, and I welcome any opportunity to share how I use it as an educator and advocate to challenge perceptions of ability/disability. I will also be sharing resources and insights during a #GAADILN twitter chat sponsored by the Inclusive Learning Network of the International Society for Technology in Education (ISTE).
I love Global Accessibility Awareness Day (or GAAD as I will refer to it from now on) but if there is one thing that I would change is the name of the event. To me it should be Global Accessibility Action Day. With many of these types of events the focus is on raising awareness of the needs of people of disabilities, as if we have not been asking for our rights for decades now (the ADA is more than two decades old, you know). GAAD gets it right by focusing on action. Organizations such as Shaw Trust Accessibility Services, Deque Systems and Accessibility Partners are offering a number of free services such as document audits, app accessibility consultations and website user testing. Many others are providing webinars and live presentations that aim at more than raising awareness by providing practical information on how to make documents, website and apps more accessible. A review of the full list of events available on the GAAD website makes it clear that this event is about more than just awareness, it is about taking the next step for accessibility.
In my own field of education, I see much progress being made but I also see a need for a more ecosystems approach to inclusion and accessibility. When I think of ecology I think about systems that have a number of parts working together as one, with the sum of these parts being greater than they are on their own. When it comes to students with disabilities, a number of technologies are now available as built-in options on the mobile devices many of them own. While I am a witness to the impact these technologies can have on the lives of students with disabilities (having been one who used these technologies myself) I believe their impact is limited by their use in isolation rather than as part of a more comprehensive system.
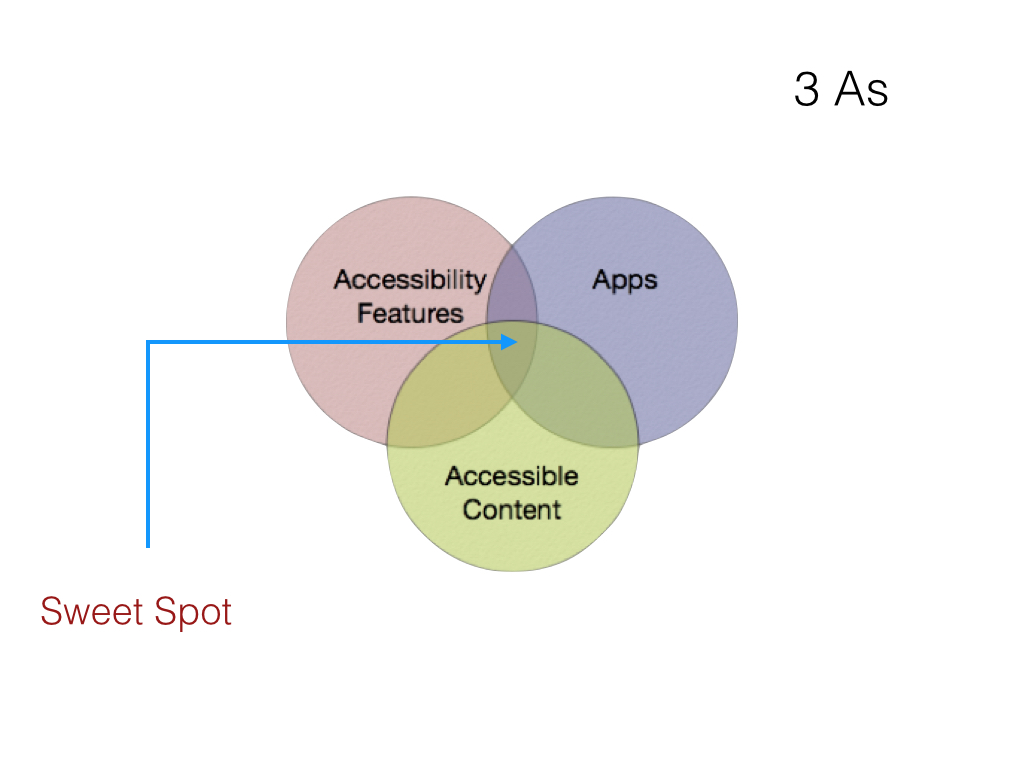
What I would like to see is a change in thinking to focus on a systems approach that addresses what I see as the three As of accessibility:
Accessibility Features: companies such as Apple now include a comprehensive toolkit for accessibility that is built into the core of the operating system. This means that when I take my new Mac, iPhone or Apple Watch out of the box it will be ready for me to use without the need to purchase or install additional software. Not only that but as my vision gets worse I know that I will be able to take my device out of the box and set it up independently, without having to wait for someone with better eyesight to help me. These built-in accessibility features have been life-changing for me. Without them I’m not sure I would have been able to pursue higher education and complete my master’s and doctoral studies. I also would not be able to do my photography that brings so much joy and beauty into my life. Unfortunately, not all educators know about even the most basic of these features that are built into the technology their districts have spent so much money to purchase. I am often surprised when I do presentations around the country (and sometimes in other parts of the world) by how little awareness there is among educators of the potential they hold literally in their hands to change a student’s life. We need to do better in this area of professional development to allow these tools to have an even greater impact on education for all students, not just students with disabilities but any student who struggles with the curriculum and needs additional support.
Accessibile Apps: the built-in accessibility features provide a great baseline for addressing the needs of people with disabilities, but they can’t do it all. There is just too much diversity and variability for that to be the case: not just in the traits and needs of users, but in the settings and tasks where technology is used. For this reason, it is often necessary to extend the capabilities of the built-in accessibility features by installing apps that provide greater customization options. A great example is the Voice Dream Reader app. While iOS has a robust text to speech feature with word highlighting that now supports a high quality Alex voice, Voice Dream Reader allows for even greater customization. The user can adjust the color of both the word and sentence highlighting, something which cannot be done with the built-in Speak Selection feature of iOS. For those who are blind and use the VoiceOver screen reader, the developer has done an excellent job of labeling all of the app’s controls. A companion Voice Dream Writer app even provides a special mode for VoiceOver users to make it easier for them to enter and edit text, showing an strong commitment to usability for all users on the part of this developer. Other examples of developers who are doing exemplary work when it comes to creating accessible apps include AssistiveWare ( developers of Proloquo2Go, Proloquo4Text and Pictello, all apps with excellent support for VoiceOver and Switch Control) and Red Jumper (developers of the popular Book Creator app). The latter added an Accessibility option for images and other objects to help students and educators create accessible content with the app. Unfortunately, these developers are still the exception rather than the rule. With too many apps, swiping through with VoiceOver results in hearing “button” over and over with no indication of what the button actually does. Worse, many of the buttons for key actions sometimes can’t even be selected. Without attention to accessibility from app developers, the accessibility features can’t work to their full potential. No matter how good the voice built into VoiceOver is (and Alex is pretty good) it does me no good if I can’t select the buttons within an app and determine what they do.
Accessible Content: the same problems that exist with apps that are inacessible comes into play with much of the content that is available online for students. Too many videos lack captions (or include only automatic computer generated captions that contain too many errors to be useful), and too many ebooks include images that are not labeled with accessibility descriptions for those who can’t see them. Without these accessibility descriptions, which can be easily added in authoring tools such as iBooks Author, a blind student taking a science class or an economics class will not be able to access the diagrams and other graphics that are so often used in these fields. Again, adding in features such as accessibility descriptions allows the built-in accessibility feature, in this case VoiceOver, to work to its full potential. There are many wonderful examples of books that include accessibility, as well as resources to help educators develop their own accessible books with easy to learn and use tools such as iBooks Author. These include Creating Accessible iBooks Textbooks with iBooks Author from the National Center for Accessible Media and Inclusive Design for iBooks Author by my friend and fellow Apple Distinguished Educator Greg Alchin. For a great example of an engaging and accessible book, one need not look any further than Reach for the Stars, a multi-touch book from SAS that makes astronomy come alive not only for blind students but anyone who wants to learn about our universe using all of their senses.
As shown by the following diagram, when the three components are present (robust accessibility features, accessible apps, and accessible content) we get a synergy that results in an even greater impact than each tool or feature can have on its own: this is the sweet spot for accessibility in education.
To ensure accessibility in education we all must work together to realize the advantages of an accessibility ecosystem: companies such as Apple and others who are building accessibility into their products, app developers and content authors. As AssistiveWare’s David Niemeijer so nicely stated in his own GAAD post when we take accessibility into account we really are designing for everyone because we all one day get old and require the ability to customize the text size and other features of our devices to account for our aging vision and hands.
Furthermore, to quote from a recent Apple commercial, “inclusion promotes innovation.” Thinking about accessibility from the start, in line with the principles of universal design, requires us to be even more creative as we seek to solve problems of access that may someday result in usability improvements for everyone.
A great example of that is the recently released Apple Watch. Since it has a small screen that makes it difficult to enter text, much of the interaction with the Apple Watch takes place through the Siri personal assistant. The voice recognition technology that makes Siri possible actually had its origins in the disability community, but now it can be used to account for the constraints of a smart watch and its small screen.
The Apple Watch is also a great example of an ecosystems approach to accessibility and its benefits. This device includes many of the same accessibility features that are available on the iPhone and the iPad, which are the same features I can use on my Mac. What this means is that if I get a new Apple Watch I will already know how to use these features, with a few modifications to account for the smaller screen. Similarly, a blind student who has been using his or her iPhone can easily transfer the use of many VoiceOver gestures to the trackpad built into Mac laptops or the Magic Trackpad used on iMacs.
Why is an ecosystems approach like this so important? Ultimately it is because I as a person with a disability need accessibility 24/7, 365 days a year, most likely for the rest of my life (unless a cure is found for my condition). My need for accessibility doesn’t stop when I get up from my desk at home and walk out the door. I need accessibility as I order a ride from a ride sharing service from my smart phone (which has Zoom and VoiceOver built in) , as I take and share the photos that bring so much joy to my life and capture the beauty I encounter in the places I am lucky to visit (through accessible apps such as Instagram) and as I continue to develop my skills and knowledge base by reading ebooks about my field I download from the iBookstore and read with iBooks (accessible content) . For someone like me, accessibility is needed across a number of settings and situations if I am to be independent and continue to make a valuable contribution to society. Only an ecosystems approach can provide the kind of comprehensive accessibility I and many others who have disabilities need to live a fulfilling life.
I love my Apple TV and use it not just for entertainment purposes but also as a learning tool that allows me to subscribe to a number of podcasts in order to stay up to date with the world of technology. Apple TV includes two great accessibility/universal design features found under Settings > General > Accessibility:
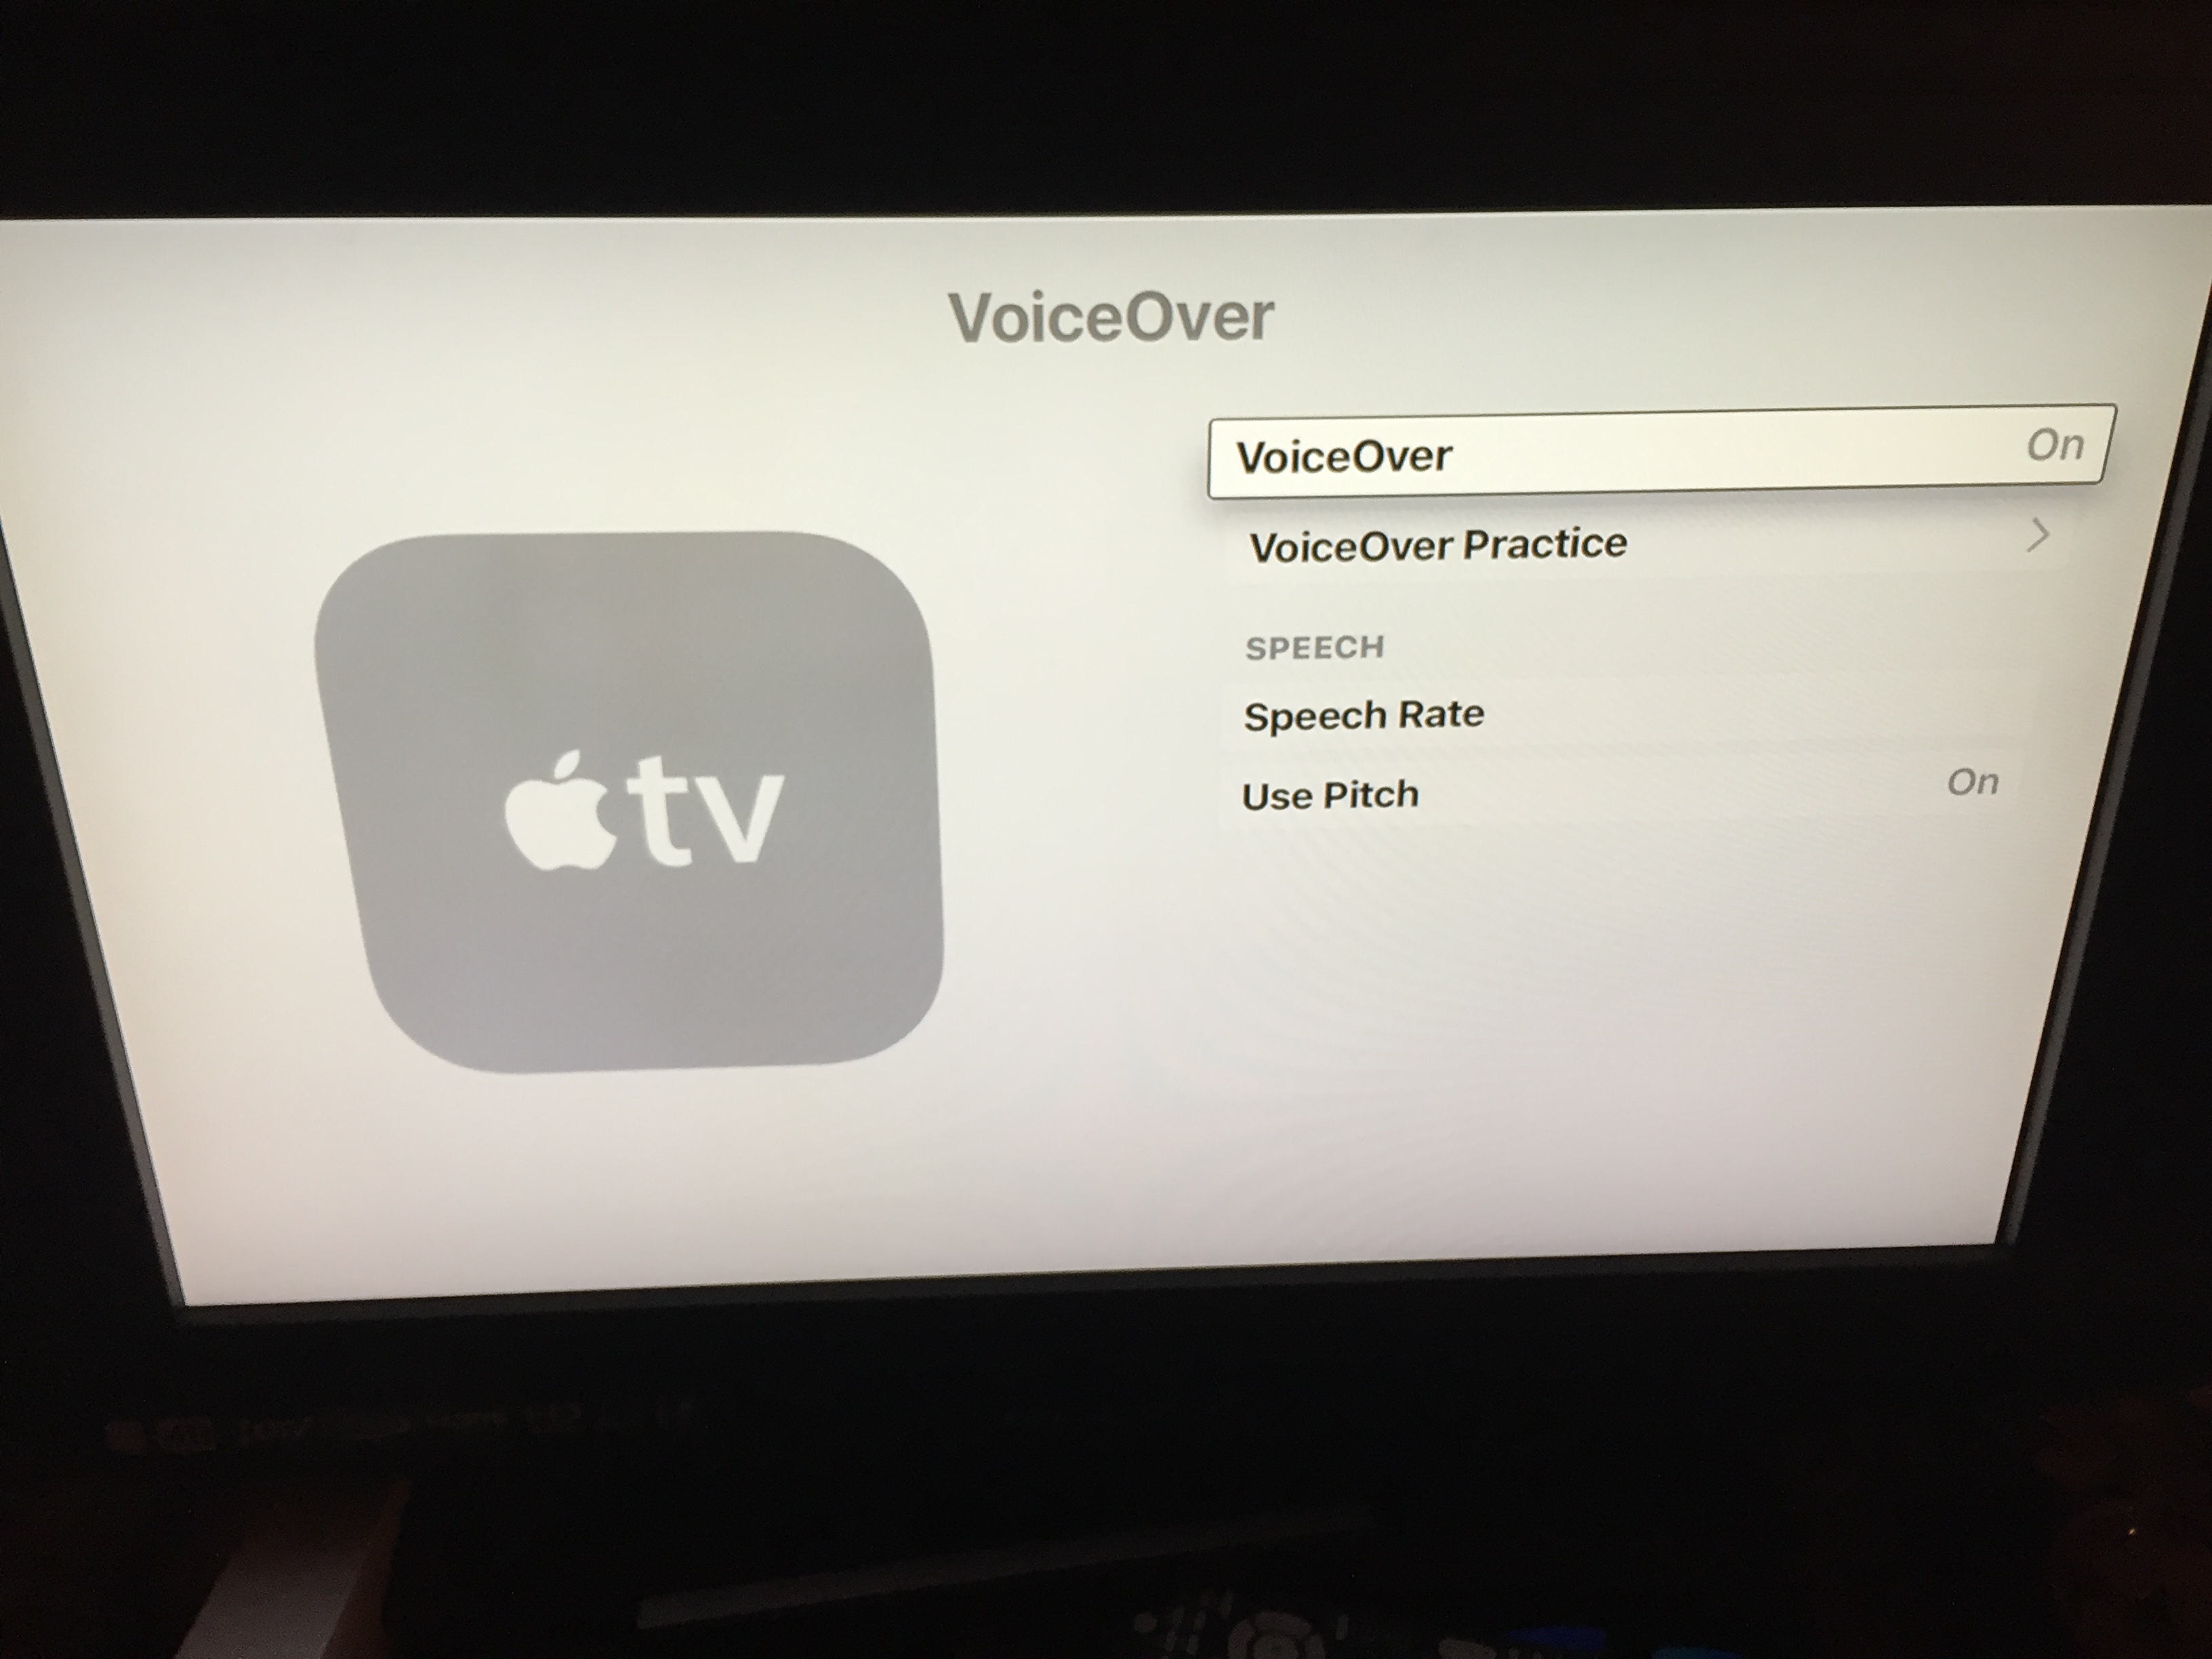
VoiceOver: the same screen reader that ships with Macs and iOS devices (and the recently released Apple Watch) is included with the Apple TV to provide spoken menus for someone who is blind or has low vision. You can adjust the speaking rate of VoiceOver, or set it to use a pitch change to indicate when you are navigating within the same screen or moving away to a different screen.
Closed Captions: as on iOS and OS X, the captions can even be customized with either preset styles or by creating your won custom styles. You can customize the text (font, color, text size), background (color and opacity) and even add special text styles such as highlighting or a drop shadow.
An accessibility menu is available as a shortcut for turning these features on and off without having to go back into Settings. Once you enable it in the accessibility settings, this accessibility shortcut involves holding down the Menu button on the Apple TV remote until the menu pops up on the screen with options for VoiceOver and Closed Captions (as well as the usual function which is to Return to the main menu).
In addition to the included remote with tactile buttons, Apple TV can be controlled with the free Remote app for iOS. This app supports the VoiceOver and Switch Control accessibility features for iOS. You can even have VoiceOver with Alex(male voice) on the iOS device and Samantha (female voice) on the Apple TV so you can tell them apart.
Here is a video from my YouTube channel that provides an overview of the accessibility options included with Apple tV:
This week, Winston Chen and the Voice Dream team released a new Voice Dream Writer app,. I am highlighting the new app here not only because Voice Dream Reader is one of my favorite apps for students who need reading supports such as text to speech, word highlighting and customized text, but also for the attention to accessibility from the Voice Dream team in this new app. Not only are the controls and the interface in the app nicely labeled for VoiceOver users, but there are even a few features specially designed to make things easier for VoiceOver users.
When VoiceOver is turned on the app can recognize this and adds three buttons for editing text to the interface (they appear in the toolbar located just above the onscreen keyboard, on the left side). These buttons are:
Cursor: allows the user to move the cursor by flicking up or down with one finger.
Cursor movement unit: changes how the cursor movement takes place by allowing the user to choose from characters, words or sentences.
Select text: selects text based on the cursor movement unit. For example, flicking up with sentences as the cursor movement unit will select the text one sentence at a time.
All of these controls are adjustable. A flick up or down with one finger will change the value (for the cursor movement unit) or navigate to/select the next item (for the cursor and select text buttons).
A three-finger swipe gesture is also supported for cursor movement and selection: a three-finger swipe up will move the cursor to the beginning of the document and a three-finger swipe down to the end, and three-finger swipes up or down will select the text from the cursor position to the beginning or end of the document.
Another nice feature of the app is the way it makes it easy to find misspelled words by opening Tools in the upper right and choosing Find Misspelled Words. You can then flick down with one finger to navigate the misspelled words in your document. When you get to a word you want to fix you have two options: you can double-tap with one finger to edit it with the onscreen keyboard or you can swipe from the right with three fingers to use the Word Finder with a phonetic search. The phonetic search will bring up a list of words that closely match the one that is misspelled in your document. You can then choose the correctly spelled word from the list and double-tap with one finger to make the correction.
I did a short video to demonstrate some of these options in the Voice Dream Writer app. I hope you find it helpful. For more information about the app, make sure to check out the Voice Dream website.


 On the Apple Watch, the app will display each activity as it is happening, with a progress indicator to let the learner know how much time is left before transitioning . Swiping up on any activity will display any associated tasks so that they can be checked off. Swiping to the left will then show what activities come next.


