On the occasion of Global Accessibility Day (GAAD), Apple has created a series of videos highlighting the many ways its iOS devices empower individuals with disabilities to accomplish a variety of goals, from parenting to releasing a new album for a rock band. Each of the videos ends with the tagline “Defined for” followed by the name of the person starring in the video, closing with “Designed for Everyone.” In this brief post, I want to highlight some of the ways in which this is in fact true. Beyond the more specialized features highlighted in the video (a speech generating app, the VoiceOver screen reader, Made for iPhone hearing aids and Switch Control), there are many other Apple accessibility features that can help everyone, not just people with disabilities:
Invert Colors: found under Accessibility > Display Accommodations, this feature was originally intended for people with low vision who need a higher contrast display. However, the higher contrast Invert Colors provides can be helpful in a variety of other situations. One that comes to mind is trying to read on a touch screen while outdoors in bright lighting. The increased contrast provided by Invert Colors can make the text stand out more from the washed out display in that kind of scenario.
Zoom: this is another feature that was originally designed for people with low vision, but it can also be a great tool for teaching. You can use Zoom to not only make the content easier to read for the person “in the last row” in any kind of large space, but also to highlight important information. I often will Zoom In (see what I did there, it’s the title of one of my books) on a specific app or control while delivering technology instruction live or on a video tutorial or webinar. Another use is for hide and reveal activities, where you first zoom into the prompt, give students some “thinking time” and then slide to reveal the part of the screen with the answer.
Magnifier: need to read the microscopic serial number on a new device, or the expiration name on that medicine you bought years ago and are not sure is still safe to take? No problem, Magnifier (new in iOS 10) to the rescue. A triple-click of the Home button will bring up an interface familiar to anyone who has taken a photo on an iOS device. Using the full resolution of the camera, you can not only zoom into the desired text, but also apply a color filter and even freeze the image for a better look.
Closed Captions: although originally developed to support the Deaf and hard of hearing communities, closed captions are probably the best example of universal design on iOS. Closed captions can also help individuals who speak English as a second language, as well as those who are learning how to read (by providing the reinforcement of hearing as well as seeing the words for true multimodal learning). They can also help make the information accessible in any kind of loud environment (a busy lobby, airport, bar or restaurant) where consuming the content has to be done without the benefit of the audio. Finally, closed captions can help when the audio quality is low due to the age of the film, or when the speaker has a thick accent. On Apple TV, there is an option to automatically rewind the video a few seconds and temporarily turn on the closed captions for the audio you just missed. Just say “what did he/she say?” into the Apple TV remote.
Speak Screen: this feature found under Accessibility > Speech are meant to help people with vision or reading difficulties, but the convenience it provides can help in any situation where looking at the screen is not possible – one good example is while driving. You can open up a news article in your favorite app that supports Speak Screen while at a stop light, then perform the special gesture (a two finger swipe from the top of the screen) to hear that story read aloud while you drive. At the next stop light, you can perform the gesture again and in this way catch up with all the news while on your way to work! On the Mac, you can even save the output from the text to speech feature as an audio file. One way you could use this audio is to record instructions for any activity that requires you to perform steps in sequence – your own coach in your pocket, if you will!
AssistiveTouch: you don’t need to have a motor difficulty to use AssistiveTouch. Just having your device locked into a protective case can pose a problem this feature can solve. With AssistiveTouch, you can bring up onscreen options for buttons that are difficult to reach due to the design of the case or stand. With a case I use for video capture (the iOgrapher) AssistiveTouch is actually required by design. To ensure light doesn’t leak into the lens the designers of this great case covered up the sleep/wake button. The only way to lock the iPad screen after you are done filming is to select the “lock screen” option in AssistiveTouch. Finally, AssistiveTouch can be helpful with older phones with a failing Home button.
While all of these features are featured in the Accessibility area of Settings, they are really “designed for everyone.” Sometimes the problem is not your own physical or cognitive limitations, but constraints imposed by the environment or the situation in which the technology use takes place.
How about you? Are there any other ways you are using the accessibility features to make your life easier even if you don’t have a disability?
The 10th anniversary of the iPhone announcement in 2007 was mentioned on a number of podcasts I listen to this past week, and this got me into a reflective mood. I can remember vividly where I was when the announcement took place. At the time I was a graduate student at the University of South Florida, and I watched the announcement on the big screen in the iTeach Lounge where I worked as a graduate assistant.
I must admit that at first I was a bit skeptical. The first version of the iPhone was pretty expensive, and it took me a year after the launch to decide that I wanted to get in on the fun. If I remember correctly, it cost me $399 for 8GB of storage when I bought my first iPhone from Cingular Wireless (remember them?). As cool as that first iPhone was, it took two important developments to make me a true believer. The first one was the release of the App Store in 2008, which opened up a world of possibilities only limited to developers’ imagination. The second was the accessibility support announced with the release of the iPhone 3GS. After my first iPhone contract with Cingular was up, I actually returned to a traditional flip phone for a little while for my next phone. Once the accessibility support was announced, though, I was locked in. I have been an iPhone owner ever since.
In addition to the App Store and the built-in accessibility support, there are three other important ways in which the iPhone has disrupted my life in significant ways that go beyond just being able to have access to information and communication on the go.
A Better Set of Eyes
The iPhone couldn’t have come at a better time for me. At the time, my vision loss was getting the point where using a traditional DSLR camera was becoming harder and harder. As I detailed in an article for the National Federation of the Blind’s Future Reflections magazine, the built-in accessibility features of the iPhone have allowed me to continue with my passion for capturing the beauty in the world around me. The way I see it, the iPhone is now “a better set of eyes” for me. Most of the time, I can’t be sure that I have actually captured a decent image when I aim the phone at a scene. It is not until later, when I am reviewing the images more carefully at home, that I notice small details I didn’t even know were in the frame. You can see some examples of my photography on my Instagram page.
Going forward, this idea of the iPhone as my “best set of eyes” is going to be important to me beyond photography. As my vision loss progresses, I will be able to rely on the iPhone’s ever improving camera to recognize currency, capture and read aloud the text in menus, business cards and more, and tell me if my clothes are exactly the color I intended. I have no doubt that “computer vision” will continue to get better and this gives me hope for the future. Already, the VoiceOver screen reader can recognize some objects in your images and describe them aloud. This technology was developed to make searching through large image libraries more efficient, but it will be helpful to people with visual impairments like me as well.
Independence at the Touch of a Button
The second major way the iPhone has disrupted my life for the better is by giving me back my independence in a big way, through apps such as Uber and Lyft. Now, I know you can use these apps on other smartphones, so they are not exclusive to the iPhone. However, when you really think about it, no iPhone means no App Store. No App Store means there is no incentive for other companies to copy what Apple did.
Uber has replaced the many frustrations I had with public transportation (lateness, high taxi fares) with a much more convenient and less expensive solution. Yes, I know some of my blind friends have had a number of issues with Uber (such as outright discrimination from drivers who are not comfortable with a guide dog in their vehicles), but this would probably happen with taxicabs too.
My own experience with Uber has been mostly positive, and the service allows me to easily get to doctor’s appointments, and provides me with a reliable way to get to the airport so that I can do my work of spreading the message of accessibility and inclusive design for education to a broader audience beyond my local area. Uber and Lyft, and the iPhone as the platform that made them possible, have really opened up the world to me.
Can You Hear Me Now?
One of the big trends at the Consumer Electronics Show (CES) this year was the presence of Alexa, Amazon’s voice assistant, on all kinds of consumer appliances. Alexa joins Apple’s Siri, Microsoft’s Cortana and Google’s Assistant in heralding a future where voice and speech recognition replace the mouse and the touch screen as the primary input methods for our computing devices. We are not quite there yet, but the accuracy of these services will continue to improve and I am already seeing the potential with some of the home automation functions that are possible with the existing implementations (having my lights be automatically turned on when I arrive at home, for example).
Here, again, the iPhone deserves quite a bit of credit. The release of Siri as part of the iPhone 4S in 2011 brought the idea of speech recognition and voice control to the mainstream. Previously, its use was limited mostly to individuals with motor difficulties or niche markets like the medical and legal transcription fields. Siri helped popularize this method of voice interaction and made it more user friendly (remember when you had to sit for several minutes training speech recognition software to recognize just your voice?).
Looking Ahead
The smartphone is a mature technology and some have questioned whether it has reached its apex and will soon give way to other options for content consumption and communication. One possibility would involve virtual, augmented or even mixed reality. Given the visual nature of AR and VR this gives me some cause for concern just like I had at the release of the iPhone back in 2007. However, just like Apple took a slab of glass and made it accessible when few people thought it could, with some creativity we can make AR and VR accessible too.
We have come a long way in just 10 years (sometimes I find it hard to remember that it has only been that long). In that time, Apple has shown that “inclusion promotes innovation.” Accessible touch screens, voice controlled assistants, ride sharing services, are just a few of the innovations that have developed within an accessible ecosystem started with the iPhone. Thank you Apple, and congrats on the 10th anniversary of iPhone.Here’s to the next 10, 20 or 30 years of innovation and inclusion.
HazeOver is a $4.99 Mac app marketed as a distraction aid. The idea is that it dims all other windows so you can focus on the content in the foreground window (a blog post like this one, a paper you are drafting for school, etc.). The developers have prepared a short demo video that shows how the app works.
While that may be a good way to use this utility, for me it has become a helpful low vision aid as well. I often have a difficult time finding the mouse cursor and popup windows if they are out of my field of view (currently about 7 or 8 degrees depending on the day). I have been using Mousepose to help with the mouse cursor problem. Even with the mouse cursor set to the largest size it allows in Mac OS, I still have a difficult time locating it on the screen, especially when I have a dual monitor setup. I have found that the spotlight Mousepose puts around the mouse cursor when I press a special key (I have set to F1) makes this task much easier.
HazeOver does pretty much the same thing but for popup windows. When one of these windows pops up on the screen, the focus is assigned to it and all other windows are dimmed. In the HazeOver preferences, you can determine whether you want just one window to be highlighted or all front windows within the active app. I find the one window setting to be the most helpful with popups. You can adjust the level of dimming at any time using a slider that can be accessed by clicking the Menu Bar icon. For the best performance, HazeOver asks to get access to Mac OS as an assistive device.
A free trial of HazeOver is available from the developer’s site if you want to try it out first before you buy it on the Mac App Store.
Book Creator for iPad recently added a new Read to Me text to speech feature that allows learners to hear their books read aloud within the app (without having to transfer the book to iBooks first). The feature also supports accessibility in two other ways:
all embedded media can be played automatically. This is great for those with motor difficulties, and it also creates a better flow during reading (no need to stop and start the text to speech to hear the embedded media).
automatic page flips: again this is a great feature for those who can’t perform the page flip gesture to turn the pages in a book.
These options can be configured through a Settings pane where it is possible to change the voice (you can choose any voice available for Speech in iOS), slow it down, or remove the word by word highlighting that goes along with it. For better focus, it is also possible to show one page at a time by unchecking the “Side by side pages” option under Display.
I created a short video to show how the new feature works (with a bonus at the end: how to fix the pronunciations with the new pronunciation editor built into the Speech feature in iOS 10).
Amazon describes the Echo as a hands-free, voice-controlled device that uses Alexa (Amazon’s answer to Siri, Cortana and other voice assistants) to play music, control smart home devices, provide information, read the news, set alarms, and more. I had been wanting to try the Echo since its launch, but I was just not willing to pay the $180 for the original version of this device.
When Amazon announced a smaller version of the Echo, the Echo Dot, for $50 in the spring of this year, I saw this as a perfect opportunity to try it. The smaller version includes a lower quality speaker than its larger cousin, but since I have a number of Bluetooth speakers already this is not a major issue. Other than the speaker, the rest of the device performs similarly whether you are using the $180 model or the $5o dollar one. Unfortunately, the original Echo Dot was originally released in limited quantities and quickly sold out before I could get my hands on one.
I had to wait until this fall, when Amazon released a second generation Echo Dot, at the same $50 price point. I quickly ordered one to see how I could use it as a person with a visual impairment. I am intrigued by the use of speech as an interface. I am excited by the prospect of a future where my interactions with my computing devices and even my home become even more seamless – with no buttons to find and press, no specific commands to memorize. We are not there yet (the speech recognition still has some limitations), but devices like the Echo make me hopeful about the future.
What Is It?
The Echo Dot is shaped like a large hockey puck. It is basically the equivalent of taking the top inch and a half or so from the cylinder-shaped original Echo (the part above the speaker). Around the top edge of this hockey puck are the seven microphones it uses to recognize your voice commands, and a ring light used to provide visual feedback when a command has been recognized. On top of the hockey puck are the few buttons you can use:
On/Off button (3 o’clock): the only indication the device has turned on/off is the ring light around the top edge coming on. A tone or other audio feedback would have been helpful.
Volume buttons (12 o’clock and 6 o’clock): As you press these buttons, the ring light around the top of the device will let you know the volume level (and you will also get some audio feedback in the form of a tone that will become louder or softer was you press the buttons).
Mute button (9 o’clock): Pressing this button will mute the Echo’s 7 microphones so that it temporarily stops recognizing your commands. The ring light on top of the device will turn red to let you know it is muted. This may come in handy if you are plan on watching TV for a while and don’t want the Echo to be triggered by the series of Amazon commercials featuring the trigger word.
Basically, you have to say a trigger word before the Echo will recognize a command. By default, this trigger word is “Alexa” but you can change it by going into the Alexa app on your mobile device. I have mine set to “Echo” (to avoid my device being triggered by Amazon’s commercials) but “Amazon” is also an option.
The Alexa app is how you first set up your Echo Dot and adjust its settings. It is also how you download and install Skills (the Echo equivalent of apps). These Skills basically expand the range of commands you can use with your Echo. Overall, Amazon has done a nice job of making the Alexa app for iOS VoiceOver compatible. I had no major issues with unlabeled buttons and the like as I interacted with it.
Ask and You Should Receive (An Answer)
The most basic use of the Echo is to ask it questions it can answer by searching on the Web. This ranges from simple math (“Alexa, what is 125 times 33?”), to unit conversion (“Alexa, how many pounds are in 40 kilograms?”), to spelling and definitions (“Alexa, what is the definition of agoraphobia?”, “Alexa, how do you spell pneumonia?”).
My favorite use of this feature is to ask for updates about my favorite sports teams: “Alexa, how are the Giants doing?” or “Alexa, when do the Giants play next?” To help Echo provide more accurate responses, I have specified my favorite teams in the Alexa app for iOS (Settings > Sports Update). In case you are wondering, I love the New York Giants and Mets!
I have set my Echo as my primary alarm to help me get up in the morning (“Alexa, wake me up at 7 am.” or “Alexa set an alarm for 7 am.”). Once I have set an alarm with my voice, I can open the Alexa app and use it to change the alarm sound (Nimble is currently my favorite), or delete the alarm if I no longer need it (I can also do this with just my voice by saying “Alexa, cancel my alarm for 7 am.”) I can just say “Alexa, snooze” if I want to get a few more minutes of sleep before I start my day.
Following my alarm, I have set up a number of Skills that provide me with a nice news summary to start the day (“Alexa, give me my Flash Briefing?”). Right now, I have the following Skills set up for my Flash Briefing: CNET (for the latest tech news), NPR (for a nice summary of national and international news) and Amazon’s Weather Skill (for a nice summary of current weather conditions). Some of these skills (CNET, NPR) play a recording of the content, while others (Amazon’s Weather) use synthesized speech (which is quite pleasant on the Echo if I may add).
To install a Skill, you will open the hamburger menu (located on the left side of the Alexa app if you are using it on iOS), then choose Skills. You can browse or search until you find the Skills that match your needs. Tapping Your Skills in the upper right corner will show you all of your installed skills. You can tap the entry for any of the listed skills to disable (delete) it. If you just want to temporarily disable the skill, you can go to Settings > Account > Flash Briefing and use the on/off toggles to disable or enable a skill (again, you will first have to tap the hamburger menu in the Alexa app to access Settings).
Manage Your Life
In addition to alarms, the Echo supports timers which can be helpful for cooking (we don’t want that casserole to be overcooked, do we?). To set a timer, just say “Alexa, set a timer for 10 minutes?”
Timers can also be helpful for individuals who have executive functioning challenges. Executive functioning is the ability to self regulate, which includes the ability to stay on task and manage and keep time. For someone with this kind of challenge, you can set multiple timers with your Echo. For example, you can set a timer for someone to do an activity for one hour (“Alexa, set a timer for one hour”) then set a second timer for each separate step that needs to be completed to accomplish the assigned task during that hour. For example, I can say “Alexa, set a second timer for 25 minutes” to have someone read for 25 minutes as part of a larger one hour block of study time. When that 25 minute timer ends I can have the person take a five minute break then repeat the steps to set up a second timer for another 25 minutes of work.
You can also manage your to do list with Alexa: just say “Alexa, add (name of to do item) to my to do list” or “Alexa, remind me to (name of task).” You can review your to do list with Alexa (“Alexa, what’s on my to do list?”) but you can’t remove or edit to do items with your voice – for this you have to go into the Alexa app on your mobile device. Personally, I prefer to use other tools to manage my to do list (Reminders for iOS, Google Keep) but the Echo to do list feature can be helpful for to do lists that are more relevant for the home (cleaning supplies, groceries, etc.).
In the Alexa app, you can also set up any calendar in your Google account as the destination where any events created with the Echo will be added. For example, I can say “Alexa, add (event name) to my calendar,” respond to a few prompts, and that event will be created in the Google calendar I have specified. I can then check what I have scheduled for a given day by saying “Alexa, what’s on my calendar for (today, tomorrow, Friday, etc.).” Again, the ability to stay organized and follow up on appointments and due dates is something most of us take for granted but is a skill that is not as well developed in some people. Any kind of environmental support for these skills, such as what the Echo can provide, is helpful.
A New Way to Read
The Echo is a great way to listen to your books as they are read aloud with either human narration or synthesized speech. This can be a great way to take advantage of the Echo in a classroom setting. Since Amazon owns Audible, you can access any audiobook on your Audible account through the Echo. Just say “Alexa, play (book title) on Audible.” and the Echo will fetch the book and start reading it. You can then use the commands “Alexa, stop” and “Alexa, resume my book” to control playback. You can also navigate the book’s chapters by saying “Alexa, next (or previous) chapter.” Finally, you can set a sleep timer for the current book with the commands”Alexa, set a sleep timer for (x) minutes” or “Alexa, stop playing in (x) minutes.”
Many Kindle books can also be read aloud. To see a list of the books you have purchased that support reading on the Echo, visit Music & Books on the Alexa app, then choose Kindle Books. To start listening to a book, just say “Alexa read (title of the book).” The expected playback commands, “Alexa, stop,” “Alexa resume my Kindle book” and so on are supported for books that can be read aloud.
Let There Be Light
Echo can be a great way to control lights and other appliances using just your voice. This can be especially helpful for those who have motor difficulties that make interaction with with these features of the home a challenge. As a person with a visual impairment, I use my smart lights to ensure my home is well lit when I get home. I set this up as a “Coming Home” routine in the app for my Hue lights. Using geofencing, the app determines when I am close to my home and automatically turns on the lights and sets them to a specified scene (a preset brightness and color). No more fumbling to find my way around a dark home when I come home! Similarly, I can set up a “Leaving Home” routine to make sure the lights automatically turn off if I leave them on by mistake. How-to Geek has a nice article detailing how to set up and configure Hue lights.
By installing the Hue Skill, you can get basic voice control of your lights through the Echo. This Skill gets information about the rooms and scenes (presets for sets of lights with predetermined brightness levels/colors) you have set up from the Hue app installed on your mobile device. The first step in getting your Echo to control your lights then is to get all of your Hue rooms and scenes recognized. You will do this by going to the Smart Home section in the Alexa app, then scrolling down to Your Devices and selecting “Discover Devices.” You may have to tap the circular button on your Hue bridge to get everything recognized. If everything is recognized correctly, you should see every scene and room you have set up in the Hue app listed as an individual device in the Alexa app. Although I only have three Hue lights (two white and one color) I have 30 devices recognized by my Alexa app (one device for each individual light, room and scene).
The next step is to set up your Groups in the Alexa app. This is done by choosing “Create group” in the Smart Home section. To give you an idea of my setup, I have the following groups set up: All Lights, Living Room and Office. For each group, I have then enabled the lights, scenes and rooms I want it to include. For example, for my Living Room group I have the following items enabled: Living Room Color and Bookshelf (the names I assigned to the two individual lights I own), Living Room (the room containing the two lights together), and the different Scenes (presets) I have created. These presets are assigned to the room and are currently “Bright in Living Room,” “Dimmed in Living Room” and my favorite “Florida Sunset in Living Room.” For this last one, I was able to choose a nice photo of a sunset I took at the beach and the Hue app automatically picked sunset colors for the scene!
With my current configuration, I can use the following commands to control my lights:
“Alexa, turn on (or off) all the lights”: As expected, this turns on/off all of my connected lights using the All Lights group I set up in the Alexa app, which includes a single device called All Hue Lights.
“Alexa, turn on the Living Room (or Office) lights”: this commands turns all of the lights assigned to a specific room on or off at once.
“Alexa, turn on (or off) the Bookshelf light”: this command turns on or off the individual light called Bookshelf, a single soft white bulb I have set up near my bookshelf.
“Alexa, set the Bookshelf light to 50%” or “Alexa, set the Living Room (or Office) lights to 50%: I can control the light level of any individual light or room.
“Alexa, turn on Florida Sunset (or any of my named scenes)”: this will turn on my Florida Sunset scene which configures the main living room light to a nice red/orange shade selected from a photo in the Hue app.
Echo is not the only way I can control my lights. Because I have a version of the Hue lights that is HomeKit compatible, I can also use Siri on my iOS devices. In fact, I find the voice control provided by Siri to be not only more intuitive and easier to set up, but also to offer better performance (quicker response). If you have an old iPhone 6s just lying around, you could set it up with “hey Siri” so that it works pretty much like an Echo as far as light control goes. Another thing I like about the Siri control is that I can use my voice to change the color of my lights by saying “set the (light name) to blue (or any of the basic colors).
Finally, I have a Wemo switch I am using to control my Christmas tree lights over the holidays. I have set up this Wemo switch with a rule to automatically turn on the Christmas tree every day at 5:30 pm (around the time when sunset takes place for us in Florida) and then turn it off at 11 pm. I can also just say “Alexa, turn the Christmas tree on (or off) at any time for more manual control. Unfortunately, the Wemo does not work with Siri like the Hue lights. It is limited to the Echo for voice control.
There is a lot more you can do with your lights with the help of the online automation service IFTT, which has an entire channel dedicated to Hue lights. For example, you can say “Alexa, trigger party time” to have your lights set to a color loop. I am still looking for an IFTT trigger that turns my lights blue each time the Giants win.
Are You Entertained?
Ok, so you are not impressed by voice controlled lights? Well, there is more the Echo can do. By far, the most common way I use this device is as a music player. What can I say, whether studying or working out, music is a big part of my life. I have my Echo paired with a nice Bluetooth speaker for better sound than what the built-in speaker can produce. If Bluetooth is not reliable enough for you, you can directly connect the Echo to any speaker that accepts the included 3.5 mm audio cable.
Echo supports a number of music services, including Prime Music (included with Amazon Prime), Spotify (my favorite), Pandora, iHeartRadio and TuneIn. The following commands are supported for playback:
“Alexa, play (playlist name) on Spotify”: play songs from any playlist you have set up on Spotify. My favorite is the Discover Weekly playlist released each Monday. This isa collection of songs curated by the Spotify team and a great way to discover new music.
Alexa, play (radio station name) on Pandora (or TuneIn or iHeartRadio)”: if you have any of these services set up in the Alexa app, the Echo will start playing the selected station.
“Alexa, like this song (or thumbs up/down)”: assign a rating to a song playing on Pandora or iHeartRadio.
“Alexa, next”: skip to the next song. Saying “Alexa, previous” will work as expected (at least on Spotify).
“Alexa, stop” or “Alexa, shut up”: stop music playback. Saying “Alexa, resume (or play)” will get the music going again.
“Alexa, what’s playing?”: get the name of the song and artist currently playing.
“Alexa, set the volume to (a number between 1 and 10)”: control the volume during playback.
Update: In the first version of this post, I forgot to mention podcasts. The Echo Dot supports podcasts through the TuneIn service, which does not require an account. The Echo could be an excellent podcast receiver, but it is limited by the fact that podcast discovery is not that great on TuneIn. The first thing you need to do is look to see that your favorite podcast is available on TuneIn.
You do this through the Alexa app, by going into Music and Books and selecting TuneIn, then Podcasts. If your podcast is available on TuneIn, make a note of the name it is listed under. You can then say “Alexa, play the (name of podcast) podcast on TuneIn” and you should be able to listen to the most recent episode of the podcast if you got the name correctly. This was hit or miss in my experience. For podcasts with straightforward names (Radiolab, the Vergecast) I was able to get my Echo to play the latest episode with no problems, but for others it got confused and instead played a song that closely matched my request.
Spotify also supports podcasts now, but I was not able to access them through my Echo. I hope Spotify adds better support for this type of content in a future update. I really enjoy podcasts because they allow me to access content without having to look at a screen, which is tiring to my eyes.
While the Echo does not control playback on a TV (it is limited to music), it can at least help with information about the program you are watching. For example, you can ask “Alexa, who plays (character name” in (movie or TV show)?” or “Alexa, who plays in (movie or TV show)?” to get a full cast list.
Out and About
While there has been some valid criticism of ride sharing services for refusing rides to people who use guide dogs, these services are an improvement over the taxi services many of us have had to rely on due to our disabilities. This is case with me. My visual impairment prevents me from safely driving a car, so I have to rely on other people to drive me or I have to use public transportation (which is not very reliable where I live). Uber and Lyft have been a Godsend for me: I use them to get me to the airport and any meetings or appointments. Most of the time I will request a ride through an iPhone app, but with Echo I can do it with a simple command as well: “Alexa, ask Uber to request a ride” or “Alexa, ask Lyft for a ride.”
Uber and Lyft are both Skills you have to install on your Echo. Once you have them installed, you will also have to set up a default pickup location the first time you launch the skill. After requesting a ride, you will be prompted a couple of times to make sure you really want to order a ride. Once your ride is on its way, you can say “Alexa, ask Uber (or Lyft) where’s my ride” to get a status.
Before you go out, why not make sure you are dressed for the weather – whether that be snow in more northern parts of the country or rainstorms in the part of the country where I live (Florida). You can just ask “Alexa, what’s the weather like?” or “Alexa, is it going to rain today?” or even “Alexa, will I need an umbrella today?” You can get an idea of the traffic to your destination by saying “Alexa, what’s the traffic like?” This requires you to enter your home address and a destination you visit frequently in the Alexa app (this can be your work address or, in my case, my local airport).
There is a lot more you can do with Echo. I have just scratched the surface with some of the things I myself have been able to try out. For example, I would love to install a Nest thermostat so that I can use my voice to control the temperature (“Alexa, set the temperature to 75 degrees.” – hey, I am from the Caribbean, you know). Other smart home applications include controlling locks and even your garage door. I am not quite ready to trust my home security to my Echo, but it’s nice to know these options exist for those who need them as a way to make their homes more universally designed and capable of meeting their accessibility needs.
If you are a person with a disability (or even if you are not), how are you using your Amazon Echo? If you don’t have one, is this something you are considering?
Bonus: Can’t speak the commands needed to interact with the Echo? No problem. Speech generating devices to the rescue. I have been using the Proloquo4Text app on my iOS device to send commands to my Echo with no problems. I created an Echo folder in Proloquo4Text that has the commands I would use most frequently. Here is a quick demo:
I finally had a chance to stop by an Apple Store to give the new MacBook Pro with the Touch Bar a try with VoiceOver. What follows is a summary of my initial experience, rather than a comprehensive review. If you do want to read a comprehensive review of these new Touch Bar MacBook Pros from a non-accessibility perspective, there are several of those around, including this excellent one by Jason Snell at Six Colors.
Your first question when you try out this new laptop for the first time is probably going to be: how do I perform the Command F5 shortcut to turn VoiceOver on without the hardware function keys? Well, if you have been using an iOS device, the answer will sound familiar. It involves a triple-click of the Touch ID button located on the right side of the Touch Bar (this button doubles as the power button for the laptop as well). This is similar to how you use the Home button on iOS devices for the Accessibility Shortcut. The only difference on the Mac is that you have to hold down the Command key as you perform the triple-click on the Touch ID button. The Touch ID/power button is the only part of the Touch Bar that can click with a press. It is separated from the rest of the Touch Bar by a small gap that feels like a notch. I tried to take a photo in the bright lighting of the Apple Store.
By default, the Touch Bar will display a set of five buttons on the right side. This is known as the Control Strip, a set of the most frequently used items that is similar in function to the Dock on an iOS device. From right to left, the buttons shown by default are: Siri, Mute, Volume, and Screen Brightness. A fifth narrower button expands the Control Strip and shows more options. When the Control Strip is expanded, it pretty much mirrors the media keys previously available on a laptop with physical keys – with options such as keyboard brightness, Mission Control, Exposé, and media playback (Play/Pause, Previous and Next). The Close (X) button found on the left edge of the Touch Bar will collapse the Control Strip from its expanded state. The Control Strip is user-configurable, meaning you can swap out the default buttons for other options you use more often.
If you are a fan of the Escape key, you will be happy to know it is still around, just in a different form. You will usually find it on the left side of the Touch Bar (at times it may be replaced by a Close (X) button).
Interacting with the Touch Bar’s software buttons while VoiceOver is turned on will again seem familiar for iOS users. Just like on an iPhone or iPad, you can move your finger over different areas of the Touch Bar to hear each key or button spoken aloud as you go over it with your finger, or you can use flick gestures to move the VoiceOver cursor from item to item. Once the desired item has focus, you can then double-tap anywhere on the Touch Bar (or even Split Tap) to make a selection.
With many of the buttons on the Touch Bar, selecting them will open a slider for adjusting the values for a given setting (volume, screen brightness, and so on). You will need to use a special gesture to interact with that slider. This gesture consists of a double-tap and hold followed by sliding your finger over the Touch Bar without letting go, which will adjust the value of the slider. When you let go with your finger, the slider may close automatically, or you can use the Close (X) button to its right. The special gesture for interacting with a slider is required because of the limited vertical space on the Touch Bar. On an iOS device, you would typically move the VoiceOver cursor to the slider and then flick up or down with one finger to adjust its value.
As with the Escape key, the Function keys are still around as well, but they are only accessible when you Hold down the Function key on the keyboard. I recorded a short clip to show that in action.
Any of the VoiceOver keyboard shortcuts that use the Function keys still work, you just have to add one more key (Function) to the shortcut and then select the desired function key on the Touch Bar using an iOS-style double-tap. For example, to bring up the VoiceOver Utility, the keyboard shortcut is VO (Control + Option) F8. With the Touch Bar, you will press and hold VO (Control + Option) along with the Function key, then select F8 on the Touch Bar as you would on an iOS device (by double-tapping once it has focus). It took me a few minutes to get the hang of this, but I’m sure it will become more ingrained with practice if I ever get one of these machines and use it day in day out.
Note: As noted by @IAmr1A2 on Twitter, you can also use the number keys to perform a VoiceOver command that uses the function keys. For example, the command mentioned above would be VO + Function + 8.
The real power of the Touch Bar lies in the fact that it can morph into a variety of controls depending on the app that is open. Due to time constraints, I was not able to try the Touch Bar with as many apps as I would have liked during my visit. That will have to wait for another time. I did open up GarageBand and had no problems accessing any of the items on the Touch Bar with VoiceOver. With Photos, the only item I could not access was the slider for scrubbing through the photos collection.
Apple has made available a knowledge base article with additional information on using not only VoiceOver but also Zoom and Switch Control with the Touch Bar. I especially look forward to trying out Zoom on a future visit to the Apple Store, as I already know I will probably need to use this feature quite often due to the small size and dim appearance of the Touch Bar (especially when options are dimmed).
For the first few minutes using the Touch Bar, it felt like I was using two devices side by side as I interacted with the new MacBook Pro with VoiceOver, each with its own already familiar interaction model: the keyboard input method laptops have used for decades, and the touch input method more recently introduced with iOS devices such as the iPhone. While these two input methods were each already really familiar to me, putting them together into a seamless interaction with the new laptop took me a little while. As with any new interaction method, I know it will take me some time to build the same kind of muscle memory I have developed with the now familiar Trackpad Commander feature (which allows me to use iOS-style gestures performed on the Trackpad as alternatives to many VoiceOver keyboard shortcuts). For now, I am happy to see that the Touch Bar is as accessible as Apple’s other interfaces, but I will need more time experimenting with it on a variety of apps before I can decide that it is an essential tool that justifies the higher price of the models that include it.
I was pleasantly surprised when I recently updated my Chromebook to the latest version of Chrome OS (version 54 at the time of writing). Whenever I do an update, one of the first things I do is go into the accessibility settings to see if any new options have been added. In the latest version of Chrome OS, Google has provided a number of visual supports that I am finding helpful as a person with low vision. For example, there is now the option to enable additional highlighting (a red circle) when the mouse cursor moves. This kind of additional visual cue makes it much easier for me to use the interface.
To enable the new highlight options, go to Settings > Show Advanced Settings > Accessibility. The new options are as follows:
Highlight the mouse cursor when it’s moving: the cursor will be surrounded by red circle whenever it moves. There is already an option to enable a large cursor, but that can cause problems whenever you are trying to check a small box (as often happens on dialog boxes). With this additional highlighting added to the mouse cursor I can still find it on the screen even if I need to temporarily set it to its default size.
Highlight the object with keyboard focus when it changes: this is really helpful when interacting with form fields. Whenever a text field or other form element gets focus it is surrounded by a thick yellow border.
Highlight the text caret when it appears or moves: adds a blue circle around the text caret. I did not find this setting as useful, maybe because there is not much space between the text caret and the highlight.
New animation for auto-click: as the circles get smaller, this indicates how much time is left before the auto-click takes place.
There is some room for improvement with these visual supports (for example, the option to change the colors), but overall I think this is a good addition to Chrome OS. The options for highlighting the moving cursor and keyboard focus are going to always be turned on on my Chromebook.
Apple today released iOS 10, the latest version of its operating system for mobile devices such as the iPad and iPhone. This post is a quick review of some of the most significant enhancements to the accessibility support in iOS 10, starting with a brand new feature called Magnifier.
Magnifier
With Magnifier, users who have low vision can use the great camera on their devices to enlarge the text in menus, pill bottles, and other items where they might need a little support for their vision to read the content. Magnifier is found alongside Zoom (which enlarges onscreen content) in the Accessibility Settings. Once it is enabled, you can activate the Magnifier by triple-clicking the Home button.
While a number of existing apps such as Vision Assist and Better Vision provide similar functionality, having this functionality built into the OS should improve performance (through faster focusing, better clarity made possible by accessing the camera’s full native resolution, etc.). Magnifier has the following options:
a slider for adjusting the zoom level (or you can pinch in and out on the screen)
a shutter button that freezes the image for closer inspection – you can then pinch to zoom in on the captured image and drag on the screen with one finger to inspect a different part of it
a button for activating the device flash (on devices that have one) in torch mode so that you get a bit more light in a dark environment
a button for locking the focus at a given focal length
a button for accessing a variety of filters or overlays
The available filters include: white/blue, yellow/blue, grayscale, yellow/black, and red/black. For each of these, you can press the Invert button to reverse the colors, and you can do this while in the live view or with a frozen image. Each filter also provides a set of sliders for adjusting the brightness and contrast as needed.
Display Accommodations
Display Accommodations is a new section in the Accessibility Settings that brings together a few existing display options (Invert Colors, Grayscale, Reduce White Point) with a couple of new ones (Color Tint and and options for three different types of color-blindness).
For those who have Irlen Syndrome (Visual Stress) there is a new option in iOS for adding a color tint over the entire display. Once you choose this option, you will be able to use a slider to specify the intensity and hue of the filter.
Speech Enhancements
In addition to word by word highlighting, the text to speech options in iOS 10 (Speak Selection and Speak Screen) will now provide sentence by sentence highlighting as well. By choosing Highlight Content in the Speech Settings you can configure how the highlighting takes place: you can have only the words highlighted, only the sentences, or both, and you can choose whether the sentence highlight will be an underline or a background color (though you still can’t choose your own color).
A new Typing Feedback setting can help you if you find you are often entering the wrong text. You can choose to hear the last character or word you typed (or both). For the character feedback, you can specify a delay after which the character will be spoken and even whether a hint (“t, tango”) is provided. An additional setting allows you to hear the QuickType suggestions read aloud as you hover over them, to make sure you are choosing the right prediction.
The entire Speech system also can take advantage of some additional high quality voices: Allison, Ava, Fred, Susan, Tom and Victoria for U.S. English. Some of the voices (such as Allison) have both a default and an enhanced version as has been the case with previously introduced voices, and you preview each voice before downloading it by tapping a play button. An edit button allows you to remove voices you are not using if you are running low on space (you can always download them again).
VoiceOver Pronunciation Editor and New Voices
I’m sure the team at AppleVis will do a complete rundown of VoiceOver in iOS 10, so here I will just highlight one feature that I am really happy about: the new Pronunciation Editor. After all this time, I can finally get VoiceOver to get a little bit closer to the correct pronunciation for my name (the accent in Pérez still throws it off a little).
The Pronunciation Editor is found under VoiceOver > Speech > Pronunciations. Once there, you will press the Add (+) button, enter the phrase to be recognized and then either dictate or spell out the correct pronunciation. You can restrict the new pronunciation to specific Languages, Voices and apps or choose All for each option for a more global availability.
In addition to the pronunciation editor, VoiceOver can take advantage of all the new voices for the Speech system in iOS 10: Allison, Ava, Fred, Susan, Tom and Victoria for U.S. English (each with an enhanced version). Like the Alex voice, you will have to download each of these new voices before you can use it, but you can preview each voice before downloading it.
These are just a few of the new accessibility features in iOS 10. Others include:
the ability to auto-select the speaker for a call when you are not holding the iPhone to your ear.
an option for routing the audio for VoiceOver: you can hear the speech on one channel and the sound effects in the other when wearing headphones.
Switch access for Apple TV which will allow you to navigate the interface of the Apple TV using the Switch Control feature on your iOS device.
a new option for Switch Control Recipes that will allow to create a hold on point action right from the scanner menu. Before you could only crate a tap action in this way.
And of course, there are other enhancements to the rest of the Apple ecosystem which I will cover in their own blog posts as they become available: Siri for the Mac, Taptic Time for Apple Watch, new activity settings on Apple Watch for wheelchair users, and more.
Finally, there is the new hardware Apple just announced last week, which will soon be shipping. Apple Watch has a faster processor and a better display (helpful for those with low vision), and the iPhone 7 and 7 Plus come with even better cameras (12 MP, with two cameras for 2X zooming on the larger model). As both a visually impaired photographer and as someone who focuses on accessibility features that use the camera (Magnifier, Optical Character Recognition apps to convert print into digital content) this is very exciting.
What are your thoughts on Apple’s recent announcements? Are you upgrading to the new devices? Which features have you most excited?
In my last post I focused on Recipes, a feature of Switch Control for iOS devices that can help switch users more efficiently perform repetitive actions such as flipping the pages of a book. This week, I will focus on how to set up these Recipes with step by step directions.
The first step to get the most of recipes is to connect a switch interface to your device. While iOS allows you to use the screen as a switch source (tapping on the screen will be recognized as a switch press), having a switch interface with at least two switches will provide more options: for example, you can set up one switch to flip the page in one direction, the other to flip it in the opposite direction. Some of my favorite switch interfaces are as follows:
Each of these switch interfaces will allow you to connect at least two switches (typically a round button you press to perform an action on your device). The wireless switch interfaces will connect to your device over a Bluetooth connection. Pairing instructions will vary by device, but if you have paired a Bluetooth keyboard or headset to your device before the steps will be familiar. The wired switch interfaces will typically use a Lightning connection.
Once you have your switch interface connected and you have configured at least two switch sources, you can proceed to create a new Recipe for flipping the pages in a book (Important: I highly recommend setting up the Accessibility Shortcut before trying these steps – this will allow you to triple-click the Home button if you get stuck at any time and need to turn off Switch Control):
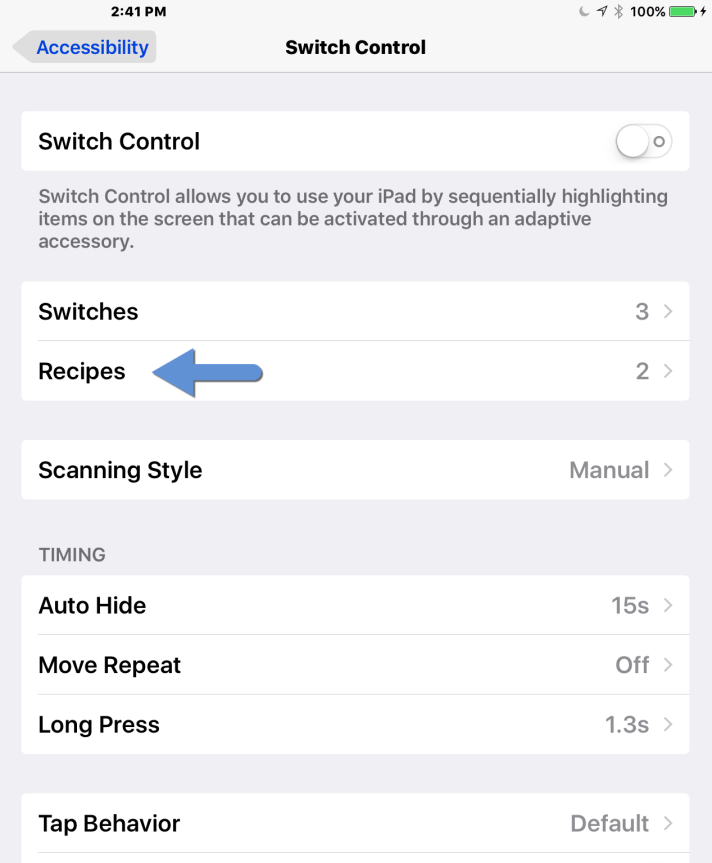
Go to Settings > General > Accessibility and choose Switch Control (under Interaction).
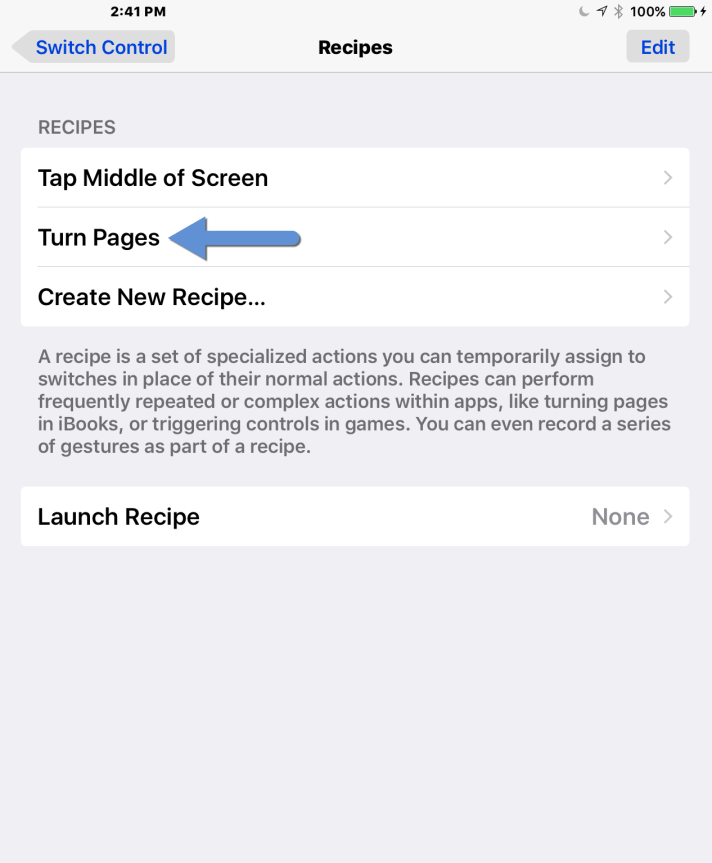
Tap Recipes and choose the Turn Pages option.
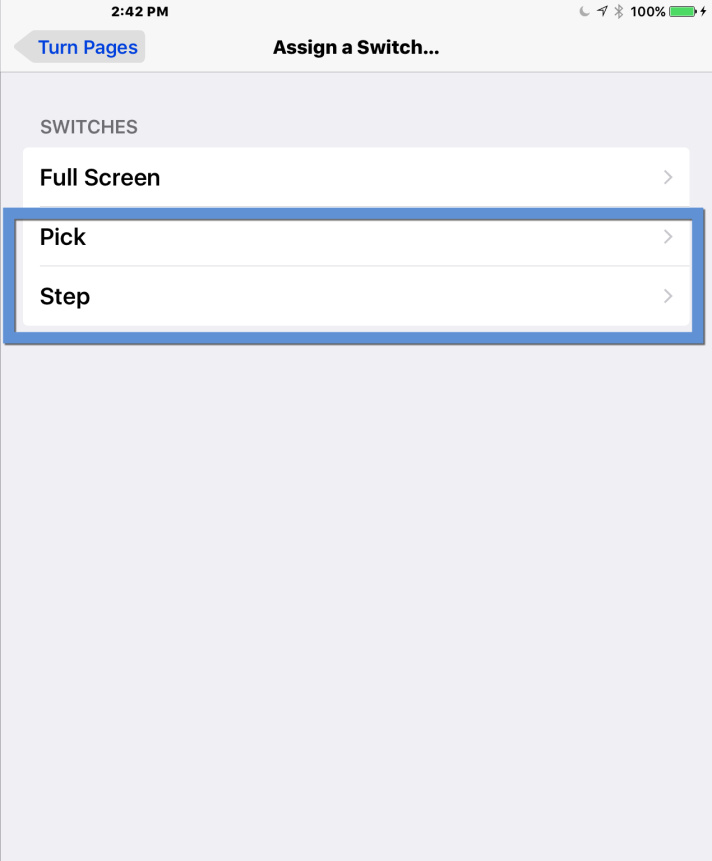
Tap Assign a Switch and follow the onscreen prompts to select one of your switches and assign the desired action (a Right to Left Swipe or a Left to Right Swipe).
Repeat step 3 to assign the second action to a different switch (a swipe in the opposite direction).
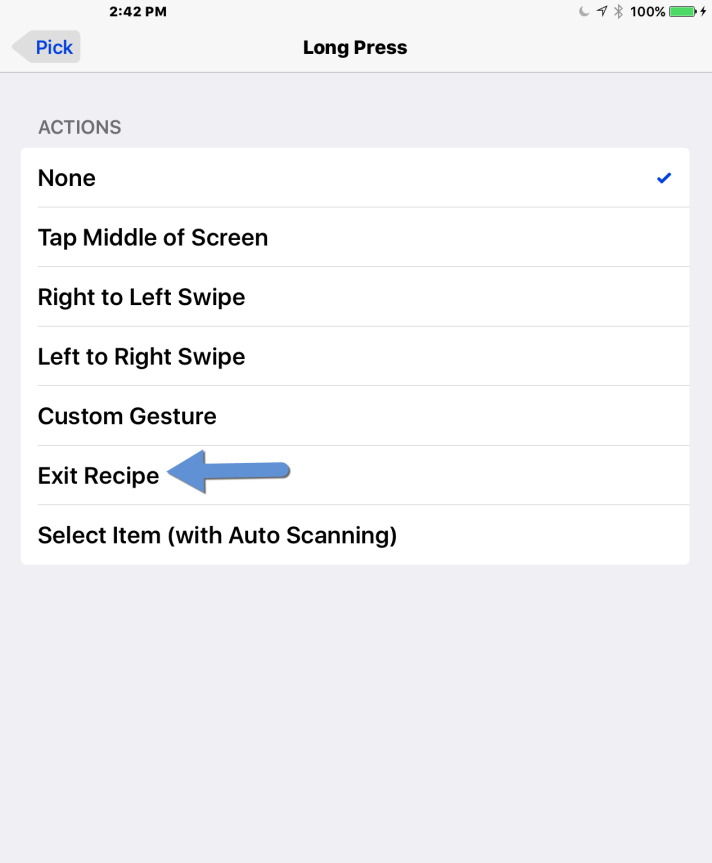
Navigate back to the screen listing your switches and their actions, then choose one of the switches and assign its Long Press action to Exit Recipe. This will allow you to switch back to the typical mode of operation for Switch Control when you are ready to step out of the Recipe.
That’s it. Your switches will be ready to use. Recipes are accessed through the Scanner Menu that pops up by default when you make a selection. You can review last week’s post to see this Recipe in action.
Want to learn more about Switch Control? You should really check out Handsfree on the iBookstore. This is a book I co-authored with switch master Christopher Hills. The book has more than 20 closed captioned videos and step by step instructions for every aspect of using Switch Control for access and inclusion.
Sometimes accessibility is about making small changes that bring about a big impact in people’s lives. Take the act of flipping the pages in a book. This is probably an action most of us take for granted. For some people with motor challenges, though, the ability to flip the pages of a book is the difference between being able to enjoy a favorite book or being locked out of that experience.
In the past, the only way to accomplish this action (flipping the page of a book) was through the use of a cumbersome mechanical device. My friend and colleague Christopher Hills illustrates the use of such a device in a short YouTube video.
Description: As dramatic music plays, the video begins with the words “In the not too distant past…” then cuts to Christopher sitting in his powered wheelchair while a relative reads a book next to him. As Christopher looks on, his dad Garry brings in a large, industrial looking device that needs to be wheeled into the room. Garry proceeds to plug in the device and place a book on it. An external switch box has options for the various page flip actions. Christopher flips the pages of the book with this device, which uses a roller to turn the pages each time Christopher presses a head mounted switch that is connected to the external switch box. The video then cuts to “Now…” and we see the same relative as in the opening scene sitting down at the kitchen table with his iPad, ready to read a book. With an over the shoulder shot, we see the relative turn the pages on his iPad as Christopher performs the same action next to him by pressing a head mounted switch that is connected to his iPad via Switch Control.
With digital content and assistive technology, the cumbersome, mechanical device shown in Christopher’s video is no longer needed. Devices like the iPad now include built-in switch access (Switch Control) that can be combined with external switches to make flipping the pages of a book a much simpler task. In the embedded video, I demonstrate the use of Recipes to flip the pages of a book I created with the Book Creator app on my iPad. The book is I Am More Powerful Than You Think.
Want to learn more about Recipes and Switch Control? You should check out a free book I co-authored with Christopher Hills – Handsfree: Mastering Switch Control on iOS . This interactive book has more than 20 closed captioned videos that go over every aspect of using Switch Control – from how to connect a switch interface to your iOS device, to how to control your Apple TV with a switch.