On the occasion of Global Accessibility Day (GAAD), Apple has created a series of videos highlighting the many ways its iOS devices empower individuals with disabilities to accomplish a variety of goals, from parenting to releasing a new album for a rock band. Each of the videos ends with the tagline “Defined for” followed by the name of the person starring in the video, closing with “Designed for Everyone.” In this brief post, I want to highlight some of the ways in which this is in fact true. Beyond the more specialized features highlighted in the video (a speech generating app, the VoiceOver screen reader, Made for iPhone hearing aids and Switch Control), there are many other Apple accessibility features that can help everyone, not just people with disabilities:
Invert Colors: found under Accessibility > Display Accommodations, this feature was originally intended for people with low vision who need a higher contrast display. However, the higher contrast Invert Colors provides can be helpful in a variety of other situations. One that comes to mind is trying to read on a touch screen while outdoors in bright lighting. The increased contrast provided by Invert Colors can make the text stand out more from the washed out display in that kind of scenario.
Zoom: this is another feature that was originally designed for people with low vision, but it can also be a great tool for teaching. You can use Zoom to not only make the content easier to read for the person “in the last row” in any kind of large space, but also to highlight important information. I often will Zoom In (see what I did there, it’s the title of one of my books) on a specific app or control while delivering technology instruction live or on a video tutorial or webinar. Another use is for hide and reveal activities, where you first zoom into the prompt, give students some “thinking time” and then slide to reveal the part of the screen with the answer.
Magnifier: need to read the microscopic serial number on a new device, or the expiration name on that medicine you bought years ago and are not sure is still safe to take? No problem, Magnifier (new in iOS 10) to the rescue. A triple-click of the Home button will bring up an interface familiar to anyone who has taken a photo on an iOS device. Using the full resolution of the camera, you can not only zoom into the desired text, but also apply a color filter and even freeze the image for a better look.
Closed Captions: although originally developed to support the Deaf and hard of hearing communities, closed captions are probably the best example of universal design on iOS. Closed captions can also help individuals who speak English as a second language, as well as those who are learning how to read (by providing the reinforcement of hearing as well as seeing the words for true multimodal learning). They can also help make the information accessible in any kind of loud environment (a busy lobby, airport, bar or restaurant) where consuming the content has to be done without the benefit of the audio. Finally, closed captions can help when the audio quality is low due to the age of the film, or when the speaker has a thick accent. On Apple TV, there is an option to automatically rewind the video a few seconds and temporarily turn on the closed captions for the audio you just missed. Just say “what did he/she say?” into the Apple TV remote.
Speak Screen: this feature found under Accessibility > Speech are meant to help people with vision or reading difficulties, but the convenience it provides can help in any situation where looking at the screen is not possible – one good example is while driving. You can open up a news article in your favorite app that supports Speak Screen while at a stop light, then perform the special gesture (a two finger swipe from the top of the screen) to hear that story read aloud while you drive. At the next stop light, you can perform the gesture again and in this way catch up with all the news while on your way to work! On the Mac, you can even save the output from the text to speech feature as an audio file. One way you could use this audio is to record instructions for any activity that requires you to perform steps in sequence – your own coach in your pocket, if you will!
AssistiveTouch: you don’t need to have a motor difficulty to use AssistiveTouch. Just having your device locked into a protective case can pose a problem this feature can solve. With AssistiveTouch, you can bring up onscreen options for buttons that are difficult to reach due to the design of the case or stand. With a case I use for video capture (the iOgrapher) AssistiveTouch is actually required by design. To ensure light doesn’t leak into the lens the designers of this great case covered up the sleep/wake button. The only way to lock the iPad screen after you are done filming is to select the “lock screen” option in AssistiveTouch. Finally, AssistiveTouch can be helpful with older phones with a failing Home button.
While all of these features are featured in the Accessibility area of Settings, they are really “designed for everyone.” Sometimes the problem is not your own physical or cognitive limitations, but constraints imposed by the environment or the situation in which the technology use takes place.
How about you? Are there any other ways you are using the accessibility features to make your life easier even if you don’t have a disability?
A new Apple TV Remote app is now available for download from the App Store. The main difference between this new app and the existing Remote app (which you can still use to control your Apple TV) is the addition of Siri functionality. With the 4th generation Apple TV, you can press and hold an onscreen Siri button in the app to speak Siri requests on your iOS device that will be understood by your Apple TV. This works just like it does when you press and hold the physical button on the 4th generation Apple TV Siri remote.
Setup
Setup was a pretty simple process. Upon launching the app, it quickly recognized all of the Apple TVs on my Wifi network (I have one of each generation) and showed them as a list. After I tapped on the device I wanted to control, I was prompted to enter a four digit code shown on the Apple TV (and automatically read aloud by VoiceOver) and that was it: my iPhone was paired to control my Apple TV.
The App Layout
The app has a dark theme, with great contrast, throughout. As someone with low vision I can say the the options on the app are much easier for me to see than the dimly labeled buttons on the physical Apple TV remote.
The screen is divided into two sections: the top two thirds make up a gesture area that simulates the touch pad on the physical remote, while the bottom third includes onscreen options for the buttons. If you can see the screen on your device, right away you will notice the Menu button is much bigger than the other buttons. This is actually a welcome design touch, as the Menu button is one of the most frequently used options for controlling the Apple TV. Below the Menu button, you will find options for Play/Pause, Home, and Siri from left to right.
I tried to test the app with Dynamic Text (large text) enabled. This only made the text in the devices list (which lists all of your Apple TVs) bigger. It would be nice if Dynamic Text worked on the label for the Menu button as well, but with the bigger button and high contrast look, this is just a minor point.
You control the Apple TV by performing touch gestures in the gesture area at the top of the screen. When you come across a text entry field, the onscreen keyboard will come up automatically to let you enter the text (same as on the older Remote app). If you tap Done to dismiss the onscreen keyboard, you can bring it back by tapping the keyboard icon at the top of the screen.
With games, you can tap a game controller icon at the top of the screen to change the layout of the app for game play. With the iPhone in the landscape orientation and the Home button to the right, the left two thirds of the screen will be a gesture area and the right one third will include Select (A) and Play/Pause (X) buttons – surprisingly these are not labeled for VoiceOver. Tapping Close in the upper right corner will exit out of the game controller mode to the standard layout.
From the one game I tried with the app, Crossy Road, I don’t think it will be a good replacement for a dedicated controller. There was just too much lag, probably due to the Wifi connection the app uses to communicate with the Apple TV. It may work with some games where timing is not as crucial, but definitely not Crossy Road.
Zoom
Zoom will work just like it does when using the physical remote: a quick triple tap on the gesture area will zoom in and out. The one issue is that the gesture area on the app does not accept two finger gestures. As a result, you will not be able to:
turn panning on/off: this requires a two finger tap.
change the zoom level: this requires you to double-tap and hold with two fingers then slide up or down to adjust the zoom level.
VoiceOver
The same limitations hold for VoiceOver. You will not be able to access the Rotor gesture on the Apple TV Remote app. Furthermore, the following gestures will not be available:
pause/resume speech: this requires a two finger tap.
read all from the top/current location: this requires a two finger swipe up/down.
If you have used VoiceOver with the older Remote app, then you will be familiar with how navigation works in this new app. With VoiceOver turned on in both the iOS app and the Apple TV, select the gesture area on the iOS app. As you flick or explore by touch in the gesture area, VoiceOver will announce the item in the VoiceOver cursor on the TV. You can then double-tap anywhere on the gesture area to make a selection.
For Siri, you will have to perform a standard gesture (double-tap and hold) so that you can speak your Siri request.
One interesting thing about using VoiceOver with the new app is how you access the Accessibility Menu. When you select the Menu button it will announce “actions available.” With a one finger flick up or down you can access the two actions: the default, which is “activate item” or “accessibility menu.” Depending on how you have your Accessibility Shortcut set up in the Apple TV settings, selecting the “accessibility menu” option will either toggle on/off one of the features or bring up the accessibility menu to allow you to choose.
Switch Control
I was not able to use the new app to control my Apple TV with Switch Control. The problem is that when Switch Control goes into the gesture area it does not recognize my input as I try to select one of the direction arrows to move the cursor on the Apple TV. This could very well be a bug that is fixed in a future update. In the meantime, you can continue to use the older Remote app if you need Switch Control to use your Apple TV.
In any case, Apple has promised to include Switch Control when tvOS is updated in the fall. This will be different from the current implementation in that the scanning cursor will actually show up on the TV and the iOS device will act as a switch source (at least as I understand it from my online reading, I have not been able to update my Apple TV to the latest beta).
Conclusion
To be honest, I don’t use the included physical remote for my Apple TV all that much. It is just too small and easy to misplace for me. I actually have my existing TV remote (which I am very familiar with) set up to control my Apple TV, and I also often use the older Remote app on my iPhone for the same purpose. With those two methods I was not able to use Siri, but now that has changed. I see myself using Siri a lot more with this new app, especially for searching on the Apple TV.
There are a few limitations that keep this app from being a full time replacement for the physical remote if you use Zoom and VoiceOver, but I anticipate that those will be addressed in future updates.
Are you using the new app? Let me know your experience in the comments, especially if you are using it with Zoom or VoiceOver. I would love to hear how it has worked out for you.
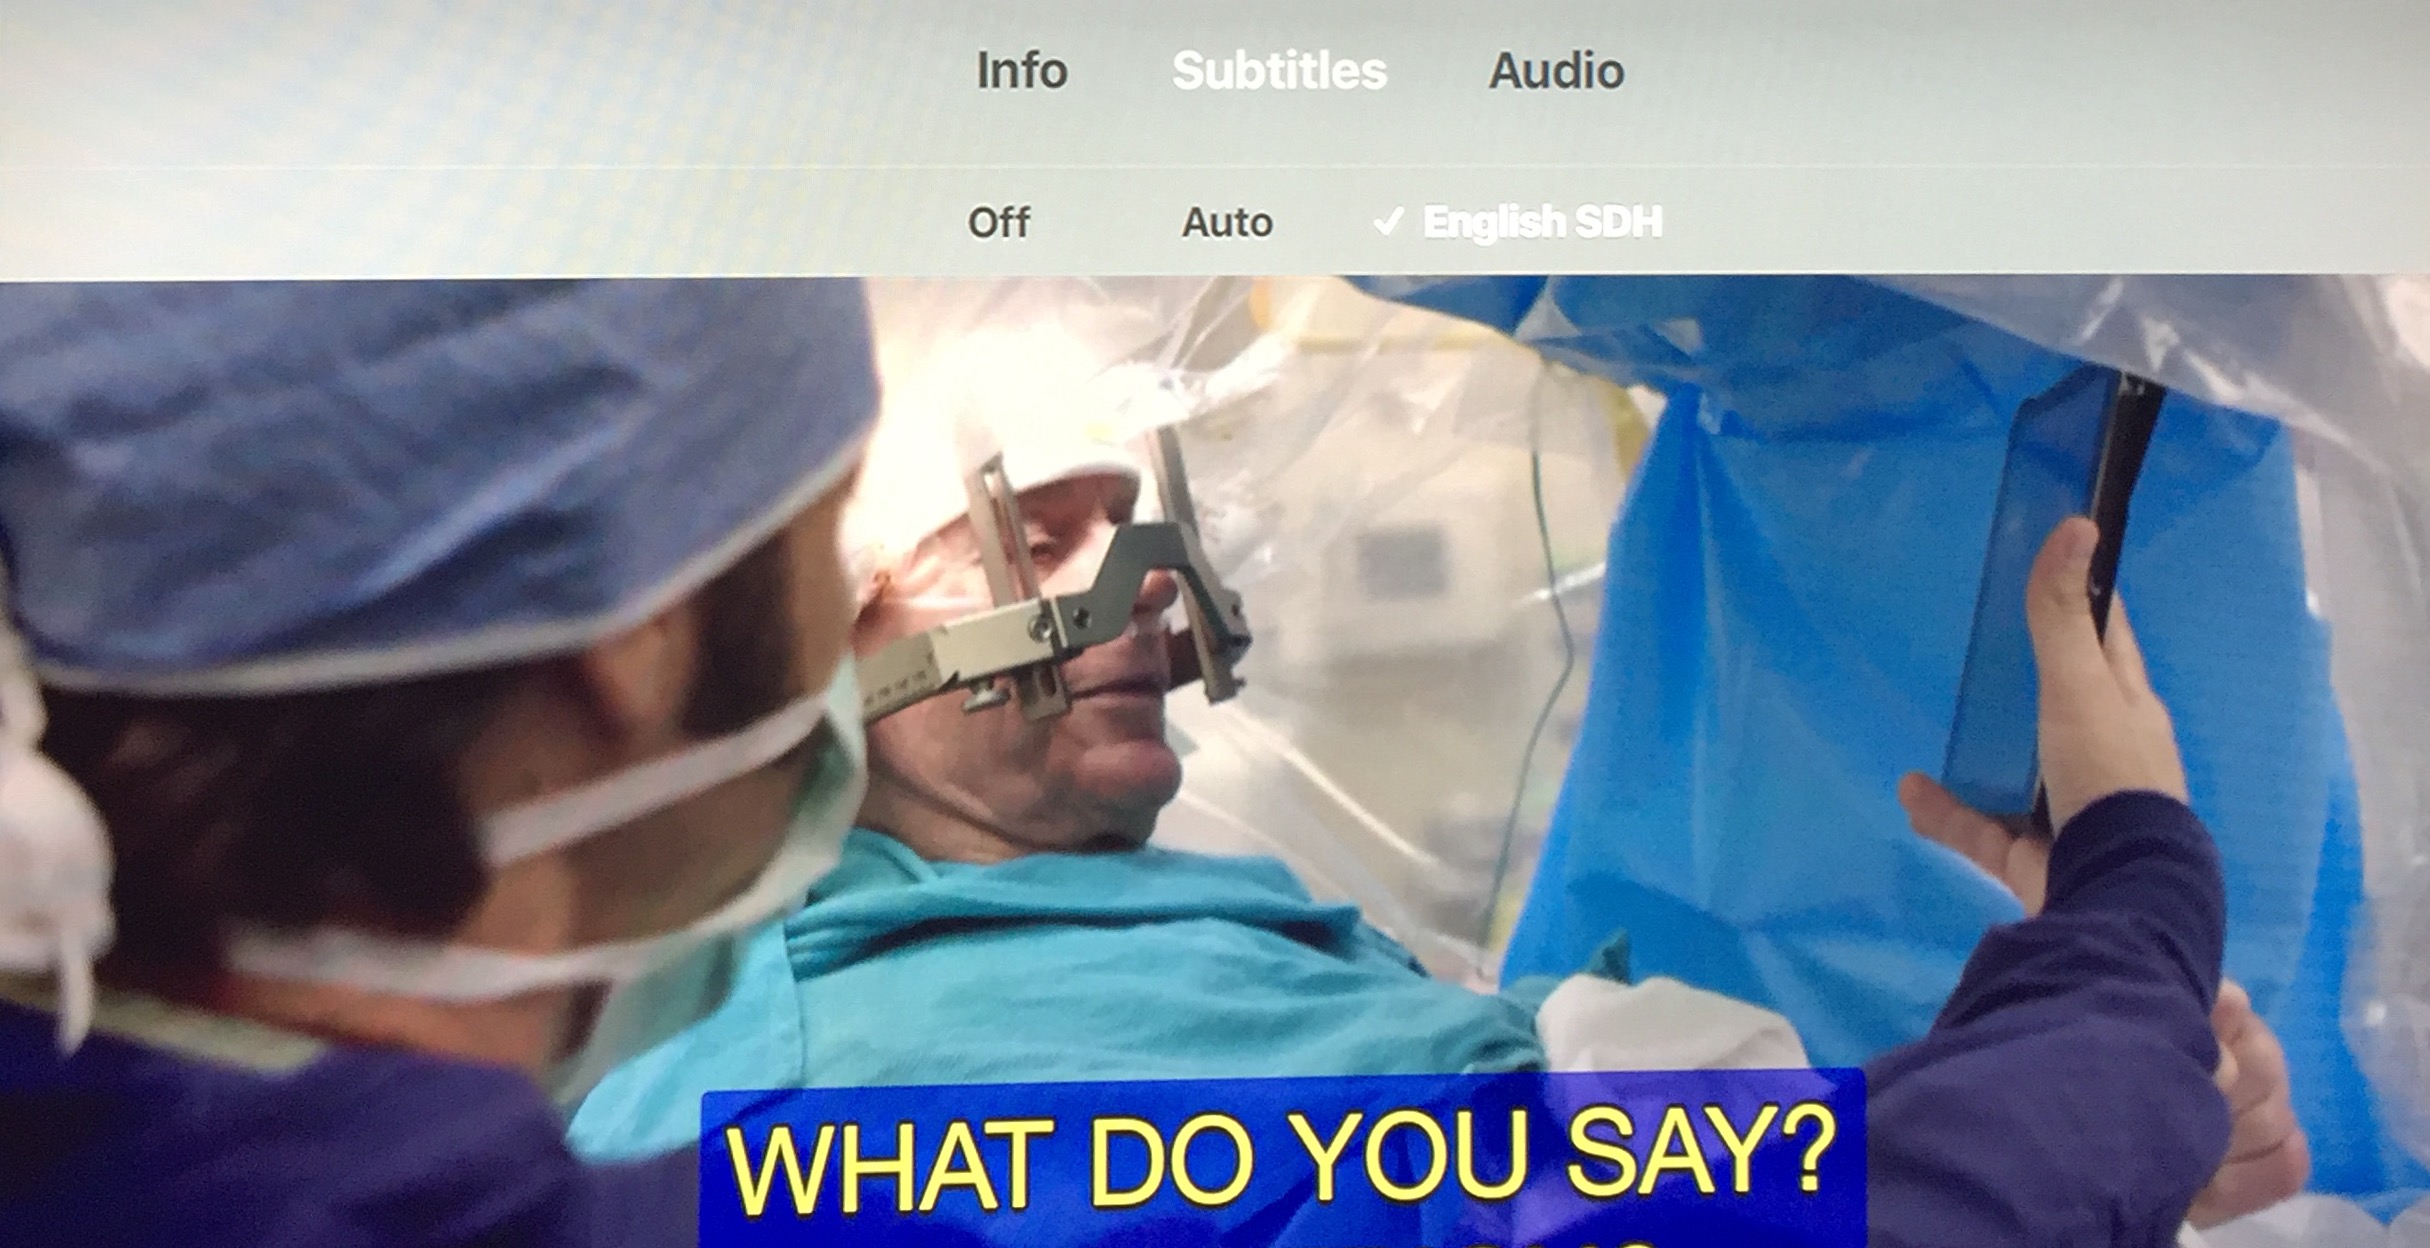
As I finish out this series of tutorials on the 4th Generation Apple TV, I want to focus on the options for customizing the playback of media and the appearance of the interface. As shown in the video, the captions and subtitles feature makes great use of the Siri remote capabilities on the 4th Generation Apple TV: you can either enable the captions for the rest of the program (“Turn on closed captions”), or you can enable them for a short time if you have missed something (just say “What did he/she say?” and after the video rewinds a few seconds the captions will come on for a short time to help you catch what you missed).
Of course this feature will only work if the content creator(s) have made the captions available. Ted Talks is one channel that does, making the great presentations on their channel accessible to a wider audience (yay for Ted Talks!).
Apple TV also supports audio descriptions. Audio descriptions provide a description of the action in a video for those who are unable to see. The audio descriptions can be enabled in the same Media section of the Accessibility Settings where Captions and Subtitles are found. As with captions, these audio descriptions will only work if the content creator has made them available.
In addition to the ways in which viewers can customize media playback, the Apple TV watchOS includes a number of options for customizing the interface: bold text, reduce motion, reduce transparency and focus style, which adds an outline around the currently selected item.
Zoom on the Apple TV provides up to 15X magnification for those who have low vision, but it can benefit anyone who has difficulty seeing the Apple TV interface on their TV. This accessibility feature should be familiar to low vision users of other Apple products. It has been available for some time on the Mac and on iOS devices, and it is also supported on the Apple Watch. With the release of the 4th Generation Apple TV, every Apple product that supports a display now also supports magnification for low vision users.
This video provides an overview of the Zoom accessibility feature. You will learn how to enable/disable Zoom in Settings, how to add Zoom to the Accessibility Shortcut for quick access, and some of the gestures supported by Zoom:
a light tap near any edge on the Siri remote will move the zoomed in area by one screen
dragging on the touch area of the Siri remote will allow you to pan in any direction (a two finger tap will stop/resume panning).
double-tapping and holding with two fingers, then dragging up/down without letting go will allow you to adjust the zoom level.
A nice feature built into Zoom is that you can double-tap the Siri remote at any time to hear the currently selected item read aloud. This works even if you are not currently zoomed in (Zoom just has to be enabled).
VoiceOver was already available on older Apple TV models, but the touchpad on the new Siri remote allows it to be an even more robust accessibility solution on the new 4th generation model. This video provides an overview of the various gestures VoiceOver supports on the new Apple TV, including the Rotor gesture that can be used to change VoiceOver settings such as the speech rate.
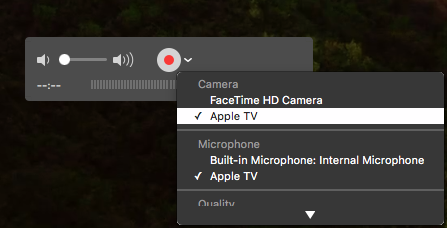
In addition to the HDMI connection for displaying content on a TV, the new Apple TV also includes a new USB-C connection.
While this connection is meant for diagnostics purposes, it can also be used to send the output from Apple TV to a Mac in order to take screenshots and record instructional videos. The key is to have the right USB-C cable to ensure that you do not damage the USB ports on your computer. According to Google engineer Benson Leung (from the Pixel team) many of the less expensive cables do not meet the USB-C standard. As a result, they might not be wired properly and can actually damage the USB port on your computer. Leung has reviewed a number of compliant cables on Amazon. After reading his reviews, I chose to go with the i-Orange-E 6.6 ft. cable.
Once you have your Apple Tv connected to your Mac with the USB-C cable, the steps for recording a video are pretty simple:
Launch QuickTime Player.
Choose File > New Movie Recording.
Select Apple TV for the Camera source from the pulldown menu next to the record button.
Choose Apple TV as the Microphone source to also record the audio from the Apple TV, and select a quality (High or Maximum).
Click the Record button and start interacting with the Apple TV using the new Siri remote.
Click the Record button one more time to finish your recording.
Choose File > Save and select the desired location to save your recording on your computer.
While you are seeing the output from the Apple TV in QuickTime Player, you can take screenshots using any of the Mac shortcuts for doing so: my favorite is Command + Shift + 4 followed by the Space Bar. This will change the mouse pointer to a Camera icon so that when I click on the QuickTime Player window a screenshot of the Apple TV output is saved to my Desktop.
If you are a Screenflow user, that app will also show the Apple TV as a source in the Configure Recording window (under the “Record Screen from” option).
In my testing, this also recorded some of the sound effects from Apple TV (such as the sound made when exiting to the Home screen, but not the click sounds made when navigating the app grid or the menu items in Settings).
Have fun recording your epic Crossy Road battles…I mean instructional videos.
Update: Today I attempted to record a tutorial focusing on VoiceOver, which is the screen reader built into tvOS. In order for the audio output from VoiceOver to be recorded by Screenflow, I had to select the option for “Record Computer Audio” in the Configure Recording window. This worked well, the only problem is that (as with QuickTime) you are not able to hear the sound from the Apple TV while recording. If you are recording a tutorial that relies on sound (like the one I did on VoiceOver) you may have to practice it a few times to make sure you are not speaking over the audio output from the Apple TV.
The Apple TV is already popular in schools that have adopted the iPad as a learning tool. Its support for AirPlay makes it possible for teachers to show apps on their iPads to the entire class, and it allows learners to show their work to their peers right from their seat. The release of the fourth generation device with access to an App Store promises to expand the possibilities for Apple TV in the classroom.
While at launch the app selection is limited, if the iOS and Mac app stores are any indication, this situation will quickly change. For now, the primary challenge is finding apps. Discovery would be greatly enhanced by an option to browse the store by categories, including one devoted specifically to education (as I was writing this, Apple a new Categories section showed up on my Apple TV so it looks like this issue should be improved soon). For now, we have to wade through the many fireplace apps. Another issue is that it is not possible to easily share apps since there is no version of Safari for the Apple TV. Thus, I can only provide a list with some brief descriptions and my experience with each app, but no links to help you quickly add the apps to your device.
A quick tip: make sure to look under Purchased when you go into the App Store on your Apple TV. It turns out that some apps are universal. This means the developer can create one version that is available on both iOS and Apple TV (the device is running a version of iOS after all). I was able to find and quickly install a couple of apps this way.
Another quick tip: Make sure you have your iOS device or computer nearby as you navigate the App Store and install apps. As an alternative to entering your login information on the Apple TV, some apps will ask you to go to a special web page on another device, where you enter a code displayed on the Apple TV.
Remember that with many of the video apps, you can use Siri to turn on the captions. Just say “turn on the captions.” You can also just flick down with one finger to display an overlay with additional information about the current program and options for captions and subtitles (as well as AirPlay).
In Settings, the captions can be customized to make them easier for all in the classroom to follow along with them. Captions are usually available for content from TED and PBS, whereas it varies on YouTube (most of the content there still relies on automatic captions which are not always accurate, unfortunately).
Without further delay, here is my list of my most useful apps so far:
YouTube: My first source for learning about a new topic. If you used this app on the old Apple TV, you will not see much of a difference with this version. Once you complete the login process, which requires you to enter a code on another device as per quick tip 2 above, you will see your subscriptions, watch history and the like.
TED: Again, there is not much difference between this offering and the other TED apps. As with YouTube, you will need to log in on a different device and enter a code in order to save talks that you want to watch later.
PBS Video: With access to a deep library of PBS video content from shows such as Nature, Frontline, NOVA and more, the PBS Video app can be helpful in a variety of subjects, from social studies and science to language arts.
PBS Kids: The Kids app features popular shows such as Sesame Street, Curious George, Arthur and more.
Coursera: This app provides access to the videos that make up most of the content for courses offered on the Coursera platform. You are not able to display the PDF documents and other resources. Even with that limitation, I have been able to find a couple of good courses that look like they will be interesting: Design Thinking from UVA and Ignite Your Every Day Creativity from SUNY). For most of these courses, you can watch for free or choose to get credit by paying a fee. I did not go through the process of enrolling for credit with the courses I am exploring, so I can’t speak to how that works.
Storehouse: This is one of my favorite story telling apps on iOS, but the Apple TV version is quite limited in my opinion. It only allows you to show the photos you have added to a story, not the quotes or captions. Even so, students can use it to create short five-frame stories that use imagery to convery a message or tell a story in a different way.
Montessory Spelling: As the name implies, this app allows young leanrers to practice their spelling. After being shown a photo that represents the word and hearing it spoken aloud, the learner sees blank lines representing the number of letters needed. Using the Apple TV remote, the learner then selects the letters in the correct order to get auditory feedback (the word is repeated and stars are shown on the screen). The Settings include options for selecting the level of difficulty, the letter placement (right space or next space) and the keyboard (capital letters, script or cursive). English, spanish, french and italian are the supported languages. Not a complicated or highly interactive app, but then again few of the learning apps I have seen so far on the new Apple TV are.
Dictionary: This is one of those things that should just be built into Siri, but it’s not, so there’s an app for that. The one thing I like is the display of photos from Flickr with each definition. That can definitely help some learners who prefer or need visuals for understanding. There is a word of the day feature, but each time I tried it I got booted to the Home Screen. Unfortunately, the text is very small even on a reaonsably sized TV, and there are no options to increase it within the app.
MyTalk Tools: For those of you who work with students with communication difficulties (or parents of kids who have such difficulties) there is at least one Augmentative and Alternative Communication (AAC) app on the Apple TV app store. I am still not sure how helpful this kind of app will be on this platform but hey, it’s available as an option. Maybe it will allow for quick communication while a child is watching a program or interacting with an app on the Apple TV (by double-tapping the Home button to switch back and forth between the AAC app and the other content or app). MyTalk is a $99 app for iOS (though a lite version is available if you want to try it as I did). It is on the iOS device that you will configure the communication boards available on the Apple TV after syncing through a MyTalk account. For each cell in the communication board, you can record your own voice and change the photo to either one you have saved to the Camera Roll or one you take with the camera of your iOS device. It looks like the free version will only allow you to replace existing cells, not create new ones.
White Noise: I didn’t really go out looking for this app. It was shown to me when I looked in my Purchased category in the App Store (because I already own it on iOS and it is a universal app). I’m thinking this would be a good app to help learners simmer down and focus if they get too rowdy. It plays soothing sounds from ocean waves, to forest sounds, to rain drops and more. Since the app will continue playing in the background even after you exit it, you can combine it with the amazing screen savers Apple has provided for the ultimate chill out experience.
You will notice I have not included any math apps. Overall, I was not too pleased with the three I tried (each was only $.99): Math Champions, Math for Kids, and Math Drills. Each of these has some drills limited to basic operations. Beyond selecting the correct answer from a list and getting the typical auditory feedback (“Correct!”) there was not much in the way of interactivty or an immersive game experience. This is an area where I hope a few developers will look to creating something that is unique to the platform and incorporates more engaging gamification elements (a story, a mission, etc.). I did find some calculator and unit conversion apps, but again I feel this is something that should be easy for Siri to perform rather than require a separate app (in fact, it can already do all this on iOS devices).
That’s it for my initial tour of the Apple TV App Store after just a couple of days of owning the device. Have you found some useful apps I have left off the list? Let me know in the comments or tweet them at me (@_luisfperez).
I was already happy with my third-generation Apple TV, but when I read that Apple was expanding the support for accessibility in the fourth generation model I knew I was going to pre-order the device as soon as it became available. Today, my 4th-generation Apple TV finally arrived, and it does not disappoint with regard to its accessibility. This post is not an in-depth review of the new Apple TV (there are plenty of those online already including a really nice one from iMore), but rather my first impressions of the set top box as someone with a visual impairment and a personal interest in accessibility. I will also just focus on the built-in features of the new Apple TV, rather than the apps that can now be installed on the device (that will make for a separate post as I explore the App Store further in the next few weeks and even more apps become available).
The new Siri remote.
In Summary
Nicely rounds out the support for accessibility across the Apple ecosystem by expanding on the support for VoiceOver in the previous model, adding Zoom and providing many of the same options for customizing the interface that are available on other Apple devices.
Major accessibility features such as VoiceOver and Zoom are responsive and perform well, with little lag.
The interface is cleaner and works better across the room: for example, it is now much easier for me to tell when an item has focus, something I struggle with on my third-generation Apple TV (especially on my smaller TV).
Other than the new Siri remote there are no other options for controlling the new Apple TV, which does have an impact on accessibility for some users. I hope this situation is addressed soon through a software update.
Setup and Interface
Setup for the new Apple TV couldn’t be easier. Once you have your power and HDMI cables connected and your new device has come on, you can triple-click the Menu button to turn on VoiceOver so that it can guide you through the rest of the setup. After you have selected your langauge and country/region, a brand new feature even allows you to place your iPhone (running iOS 9.1 or later) near the Apple TV to provide it with your network and Apple ID information.
The rest of the setup goes as expected, with selections for enabling location services and Siri, sending diagnostics data to Apple and developers, agreeing to the terms of service no one reads and so on.
Once the setup is complete, you will notice that the new interface is much brighter than the old one, with light gray backgrounds rather than black throughout.
Some people have complained about this, and I can see where it can be a problem if you have an Apple TV in your bedroom and want to use it while the other person (roommate or significant other) is trying to sleep. It would be nice to have the option of a dark theme like Invert Colors on iOS devices for those who prefer it.
Overall, I found the interface to be much easier for me to use. The item that has the focus pops out a bit, which is a more pronounced focus indidcator from in the older interface. Whether on the apps grid or in the menus I found this change made it easier for me to quickly know what item I had selected. The interface supports greater customization than on any previous Apple TV, thanks to an entire section labeled Interface in the Settings.
When you go into Settings, the first thing you will notice is that the Accessibility options are now near the top of the General pane. In fact, they are one of the first things you see, right after the optons for the screenreader. On the previous Apple TV model, you had to scroll quite a bit to locate Accessibility toward the bottom of the General pane.
Of course, you can still use the Accessibility shortcut to quickly enable and disable accessibility features without going into Settings. Whereas on the old Apple TV you invoked this Accessibility Shortcut (it was actually called the Accessibility Menu) by pressing and holding the Menu button, on the new one you do it by triple-clicking that same button (much like you triple-click the Home button on iOS devices to do the same thing). A nice touch is that VoiceOver will read the options shown by the Accessibility Shortcut even if you have it disabled in Settings.
In addition to the Accessibility Shortcut, the new Interface section of the Acccessibiliy pane includes a number of options for cusotmizing the appearance of the display (similar to options already found on iOS and Apple Watch), including:
Bold Text: a simple toggle that provides more weight to the text labels. Enabling this feature will require a quick restart just as it does on other Apple devices.
Increase Contrast: there are two options. The first reduces the transparency, while the second one changes the focus style by adding a thick outline around the currently selected item.
Reduce Motion: another toggle that removes animations throughout the interface for those who are sensitive to the extra motion.
Along with adjusting the appearance of the interface, the new Apple TV has retained the options for customizing closed captions that were available before. These are found in the Media section of the Accessibility pane, where you can also enable audio descriptions for programs that include them. In addition to turning on the captions, you can still customize the style by selecting Large Text and Classic options or creating your own style with many options for both the text and the background.
Siri
Updated 11/5/15: Siri is one of the major selling points of the new Apple TV and I’ve finally had a chance to play around with it as I have started to interact with content on the device. Apple TV’s Siri allows you to do a number of things using speech: search for movies (“show me movies with Penelope Cruz”), refine your search (“only her dramas from 2012”), navigate (“open Photos” or my favorite – “home screen”), and control playback (“pause this,” “skip forward 30 seconds,” etc.) From an accessibility perspective, it allows you to enable/disable VoiceOver, “Turn on closed captions” while you are watching content, and if you miss something you can just say “What did he/she say?” and the playback will rewind 15 seconds and temporarily turn n the captions. I love this feature because it highlights the usefulness of captions not just as an accessibility feature but as an example of design that benefits everyone (universal design). My only concern with Siri is that you have to hold down the button the entire time you are speaking your request. That could be an issue for some people with motor difficulties, especially as you start to use Siri all the time. I am hoping that eventually there is an always on feature like “hey Siri” on the iPhone.
VoiceOver and Zoom
These two features in the Vision section of the Accessibility pane are the biggest changes to the accessiiblity of the Apple TV in the new model. Zoom is brand new, and supports magnification up to 15X (the default is 5X). Once Zoom is enabled, you will zoom in and out by triple-clicking the touchpad on the new remote. While you are zoomed in, you can interact with Zoom in a variety of ways:
drag one finger over the touchpad to pan in any direction. As you pan, an overlay will let you give you an idea of what area of the interface you are zoomed in on (very similar to the indicator you get with Apple Watch when you use the Digital Crown to zoom by row).
stop panning by tapping the touchpad with two fingers. At that point, you will be able to use the usual flicking gestures to move from one item to the next without panning, but you can resume panning at any time with a second two-finger tap on the touchpad.
adjust the zoom level by double-tapping with two fingers, holding, and then swiping up or down with the two fingers without letting go. The maximum amount you can zoom will be determined by the value selected in Settings.
Update 11/5/15: In a previous version of this post I noted that I could get the labels read aloud each time I double-clicked the Siri button. The next day, I could not get my Apple TV to do it again and couldn’t figure out why. It turns out that this is a feature of Zoom. If Zoom is enabled, you can double-click the Siri button to hear an item read aloud.
VoiceOver was already available on the older model, but the touchpad allows it to be an even more robust solution on the new one. If you have used VoiceOver on an iOS device (or on a Mac laptop) you will already be somewhat familiar with how to interact with VoiceOver on the new Apple TV. However, if you do need some help, just know that you now have a VoiceOver Practice that is only shown when you have VoiceOver turned on (sound familiar, iOS users?).
VoiceOver supports the following gestures on the new Apple TV remote (all gestures are performed on the touchpad area of the new remote):
Move your finger around on the touchpad: move the focus to have VoiceOver speak the currently selected item aloud.
Flick in any direction with one finger: move the focus in a given direction.
Click on the touchpad: make a selection.
Flick down with two fingers: read from the current location to the bottom.
Flick up with two fingers: start reading from the top of the screen.
Two-finger tap: pause/resume speaking.
Again, these gestures should be familiar if you have used an iOS device or a Mac laptop with the Trackpad Commander turned on. Speaking of the Trackpad Commander, the rotor is also supported and, you guessed it, you turn the virtual dial clockwise or counter-clockwise with two fingers to select a rotor option and then flick up or down with one finger to adjust its value.
The rotor can be used to adjust the speech rate with more control (as opposed to the option in Settings that only allows you to select from a few preset values such as “Very Slow” or “Very Fast”). It also allows you hear items read by character or word, to enable or disable Direct Touch (where instead of flicking to navigate in a linear way you can just move your finger on the touchpad to move around the interface with more freedom) and more (I’m still trying to figure out a few of the options such as Navigate and Explore).
You can use Siri to turn on VoiceOver (just say “Turn VoiceOver on”) but for some reason you can’t do the same for Zoom and other settings. When I tried it all it did was open the Settings, but it didn’t take me to Zoom or turn on the feature as requested.
First Impressions
Overall, I like the new Apple TV from my limited exposure to it in the few hours since it arrived at my home. I like the updated interface, which is more cleanly laid out and designed for better visibility from across the room. From an accessibility perspective, I think Apple TV is the best game in town. None of the other set top boxes I have tried have the accessibility support Apple TV had even before the new model came out.
The new model ups the ante with more options for customizing the appearance of the interface, the addition of Zoom for those who have low vision, and an enhanced VoiceOver that is more than ready for use with apps (though how well that works will depend as always on how well developers incorporate accessibility support in their apps). Performance is a lot better too. I almost forgot just how much time I spent waiting on my older Apple TV until I switched back to compare some of the features. The new model is a lot more responsive and just performs better all around.
Having said all that, whether I end up liking this Apple TV as much as I have the previous model will depend on what happens in the next few weeks and months as updates to tvOS are released. As good as the accessibility features and performance of this new version are, there are still a number of issues that need to be addressed:
No Podcasts app: The company that basically brought us the podcast has launched a set top box without a dedicated podcast app (and as I write this, there are no Apple TV versions of Downcast or Overcast in the App Store). Aside from renting movies, podcasts are the next thing i consume the most on Apple TV. I can set them to play in the background while I do other things around the house, and I have a number of favorites I listen to on a regular basis. I’m hoping Apple is just taking a little bit more time to make sure the podcast app is done right when it is finally released.
No Remote app support: the current Remote app for iOS is not compatible with the new Apple TV. This means that someone with a motor difficulty is not able to use Switch Control on an iOS device to navigate the Apple TV interface through the Remote app. While the built in accessibility features of the new Apple TV do an excellent job of accommodating the needs of those with vision and hearing difficulties, it is important to address this omission to make sure switch users can enjoy the Apple TV along with the rest of us.
No support for external Bluetooth keyboards: Probably my biggest annoyance was having to go back to typing in user names and passwords with the onscreen keyboard. I have always used either the Remote app for iOS or an external keyboard connected over Bluetooth for this purpose, but both options are not possible at launch. Especially when entering complicated passwords, doing it on an external keyboaard is much faster and easier.
The remote: I generally like the new remote. It is lightweight and feels good in the hand. My issue is that I know there is good likelihood that I will lose the thing and it will cost me $79 to replace it (the previous remote was only $19 for comparison). I’m thinking I may buy a $25 tile and find a way to attach it to the remote just in case. I’m surprised Apple did not build the same Ping feature that is available between the Apple Watch and the iPhone, allowing us to quickly find a misplaced remote by emitting a loud ping sound. For now Tile may be my best bet ($25 is much better than $79). In the meantime, I have set up my existing TV remote to work with the Apple TV.
Most of these issues are easily fixable with a software update and as I went to publish this post I read that Apple had released a beta of tvOS 9.1, the first update for the new Apple TV. It is unclear whether this update will bring back some of the features listed above, or if it is just a bug fix release. Time will tell.
Are you planning to buy an Apple TV? If you already have it, what do you like about it? What do you think can be improved?
I love my Apple TV and use it not just for entertainment purposes but also as a learning tool that allows me to subscribe to a number of podcasts in order to stay up to date with the world of technology. Apple TV includes two great accessibility/universal design features found under Settings > General > Accessibility:
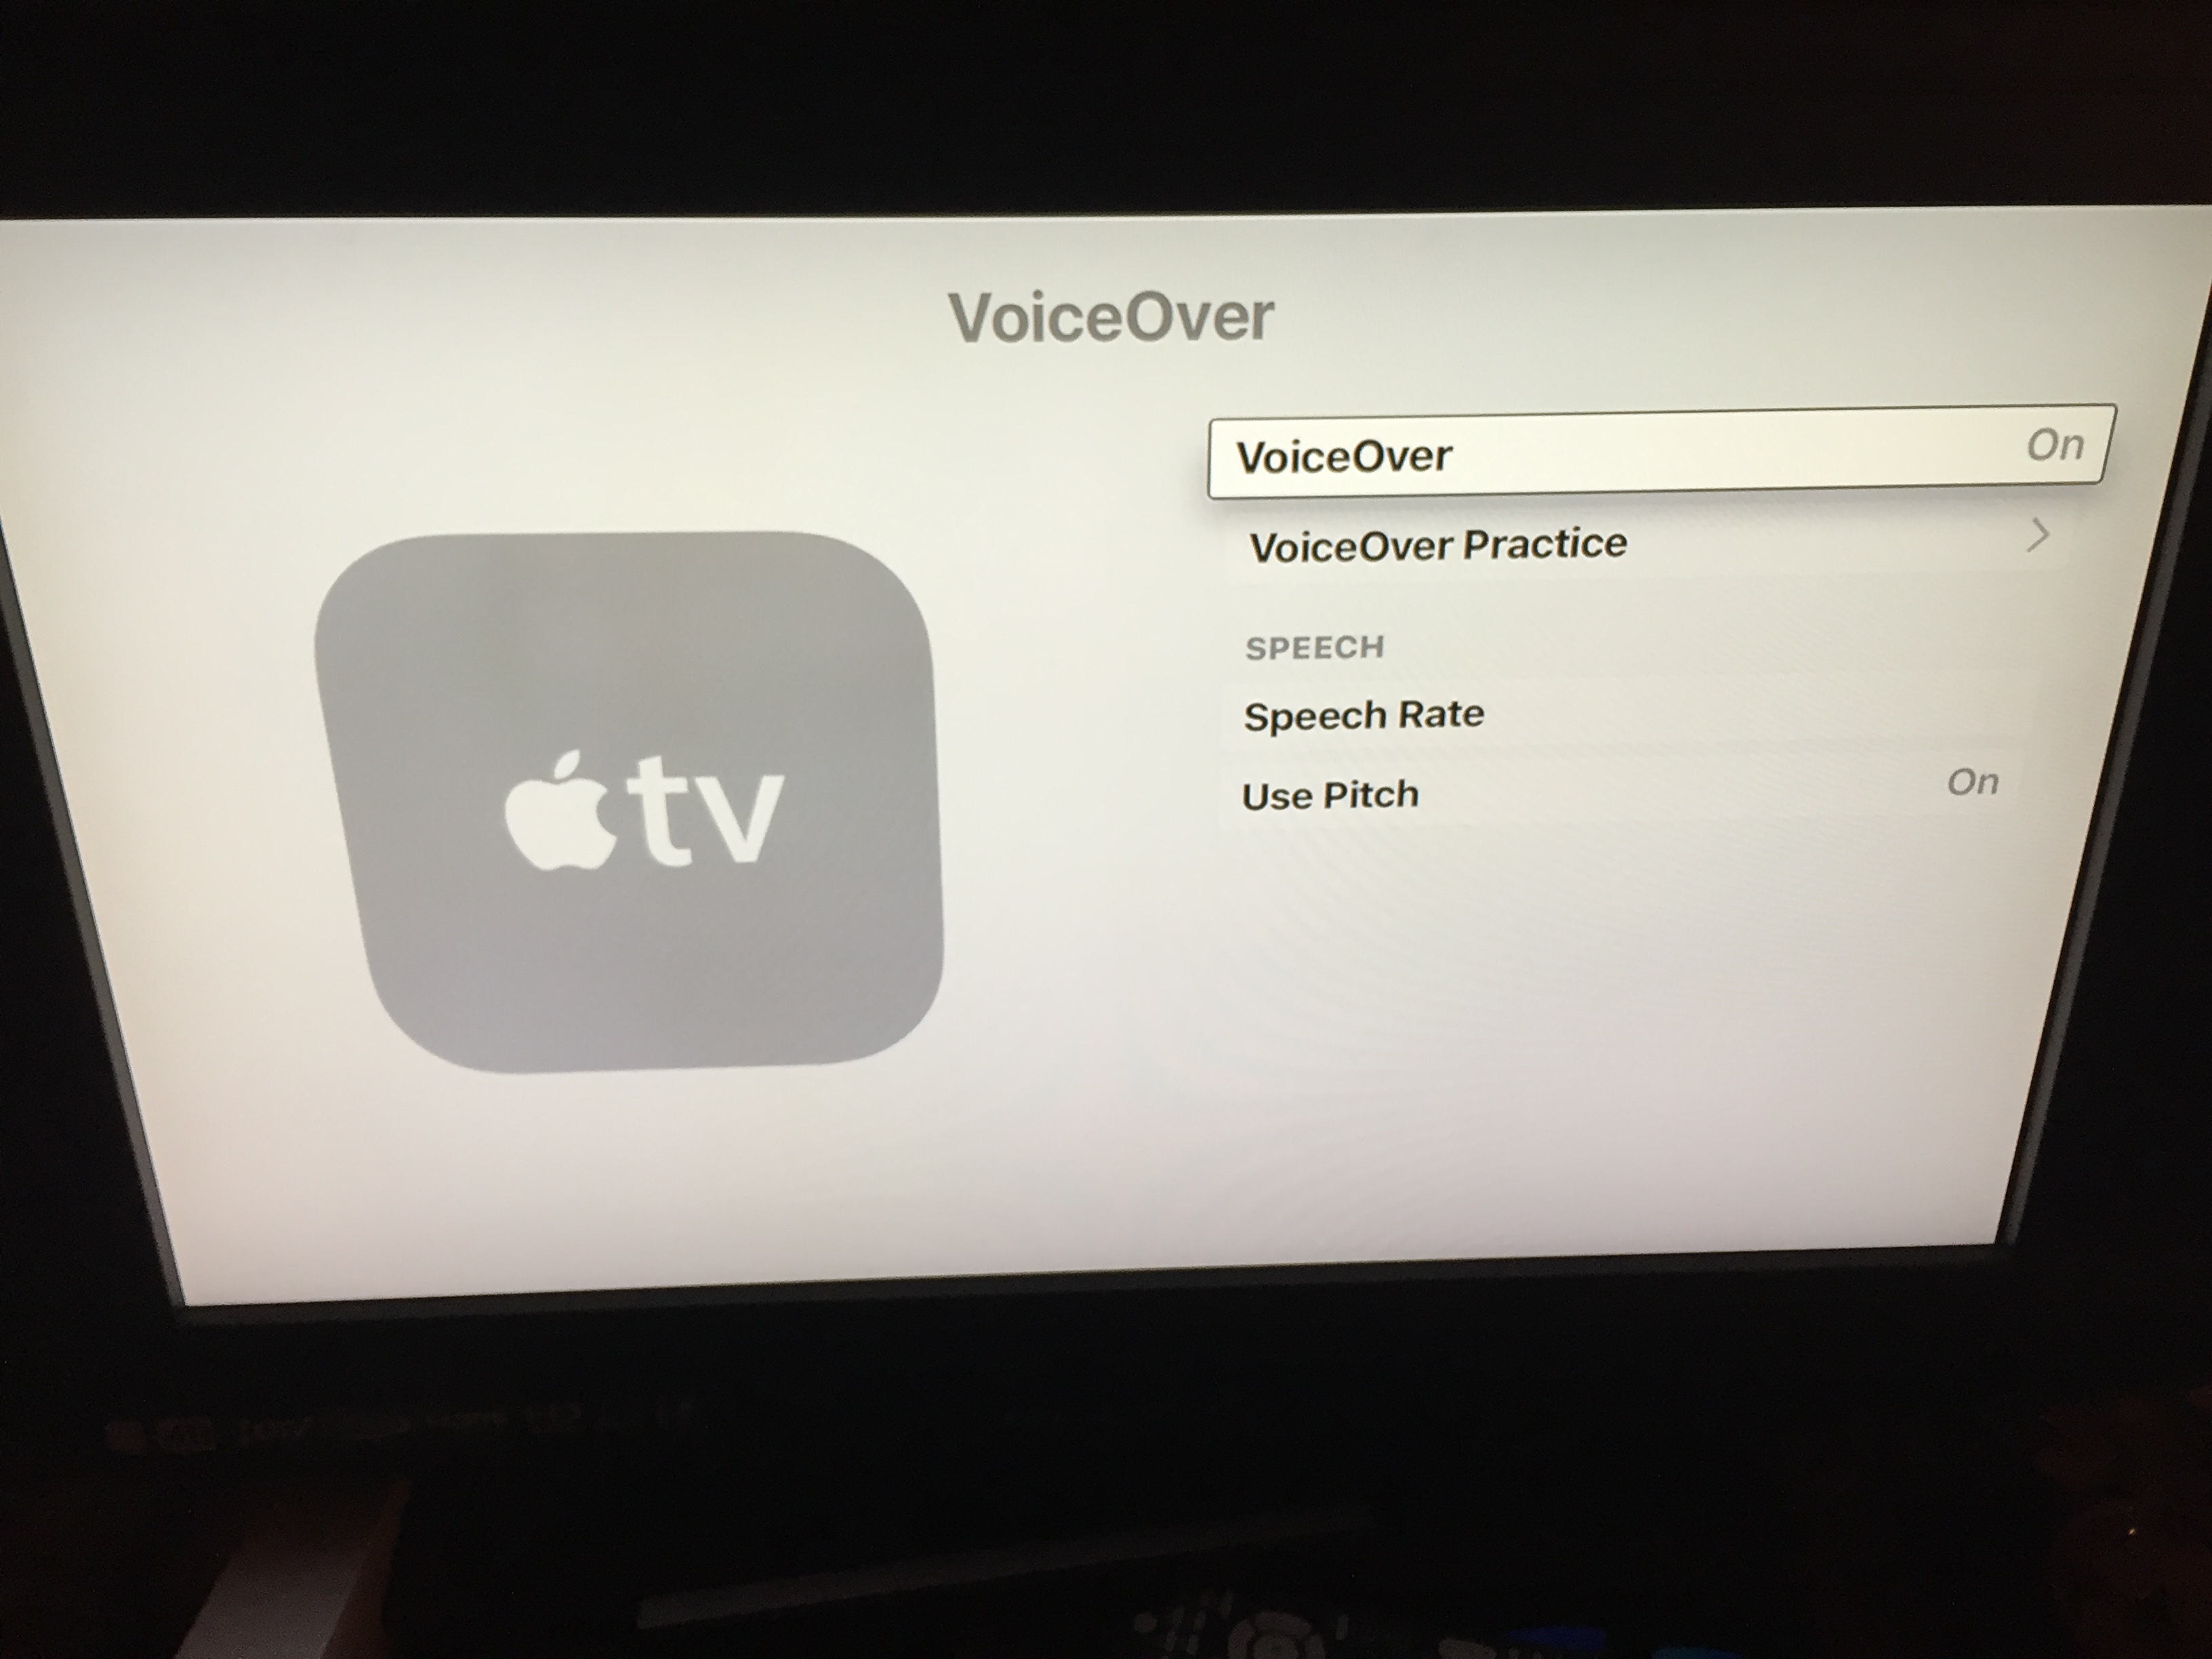
VoiceOver: the same screen reader that ships with Macs and iOS devices (and the recently released Apple Watch) is included with the Apple TV to provide spoken menus for someone who is blind or has low vision. You can adjust the speaking rate of VoiceOver, or set it to use a pitch change to indicate when you are navigating within the same screen or moving away to a different screen.
Closed Captions: as on iOS and OS X, the captions can even be customized with either preset styles or by creating your won custom styles. You can customize the text (font, color, text size), background (color and opacity) and even add special text styles such as highlighting or a drop shadow.
An accessibility menu is available as a shortcut for turning these features on and off without having to go back into Settings. Once you enable it in the accessibility settings, this accessibility shortcut involves holding down the Menu button on the Apple TV remote until the menu pops up on the screen with options for VoiceOver and Closed Captions (as well as the usual function which is to Return to the main menu).
In addition to the included remote with tactile buttons, Apple TV can be controlled with the free Remote app for iOS. This app supports the VoiceOver and Switch Control accessibility features for iOS. You can even have VoiceOver with Alex(male voice) on the iOS device and Samantha (female voice) on the Apple TV so you can tell them apart.
Here is a video from my YouTube channel that provides an overview of the accessibility options included with Apple tV: