5 Accessibility Features Every Learner Should Know

On the occasion of Global Accessibility Awareness Day (GAAD) this week (May 19th), I created this post to highlight some of the iOS accessibility features that can benefit a wide range of diverse learners, not just those who have been labeled as having a disability.

Screen Shot 2016-05-13 at 4.02.00 PM


It’s built in.

Every iOS device comes with a standard set of accessibility features that are ready to use as soon as you take the device out of the box. Let’s take a look at a few of these features that can benefit all users in the spirit of Universal Design.

Get started by going to Settings > General > Accessibility!
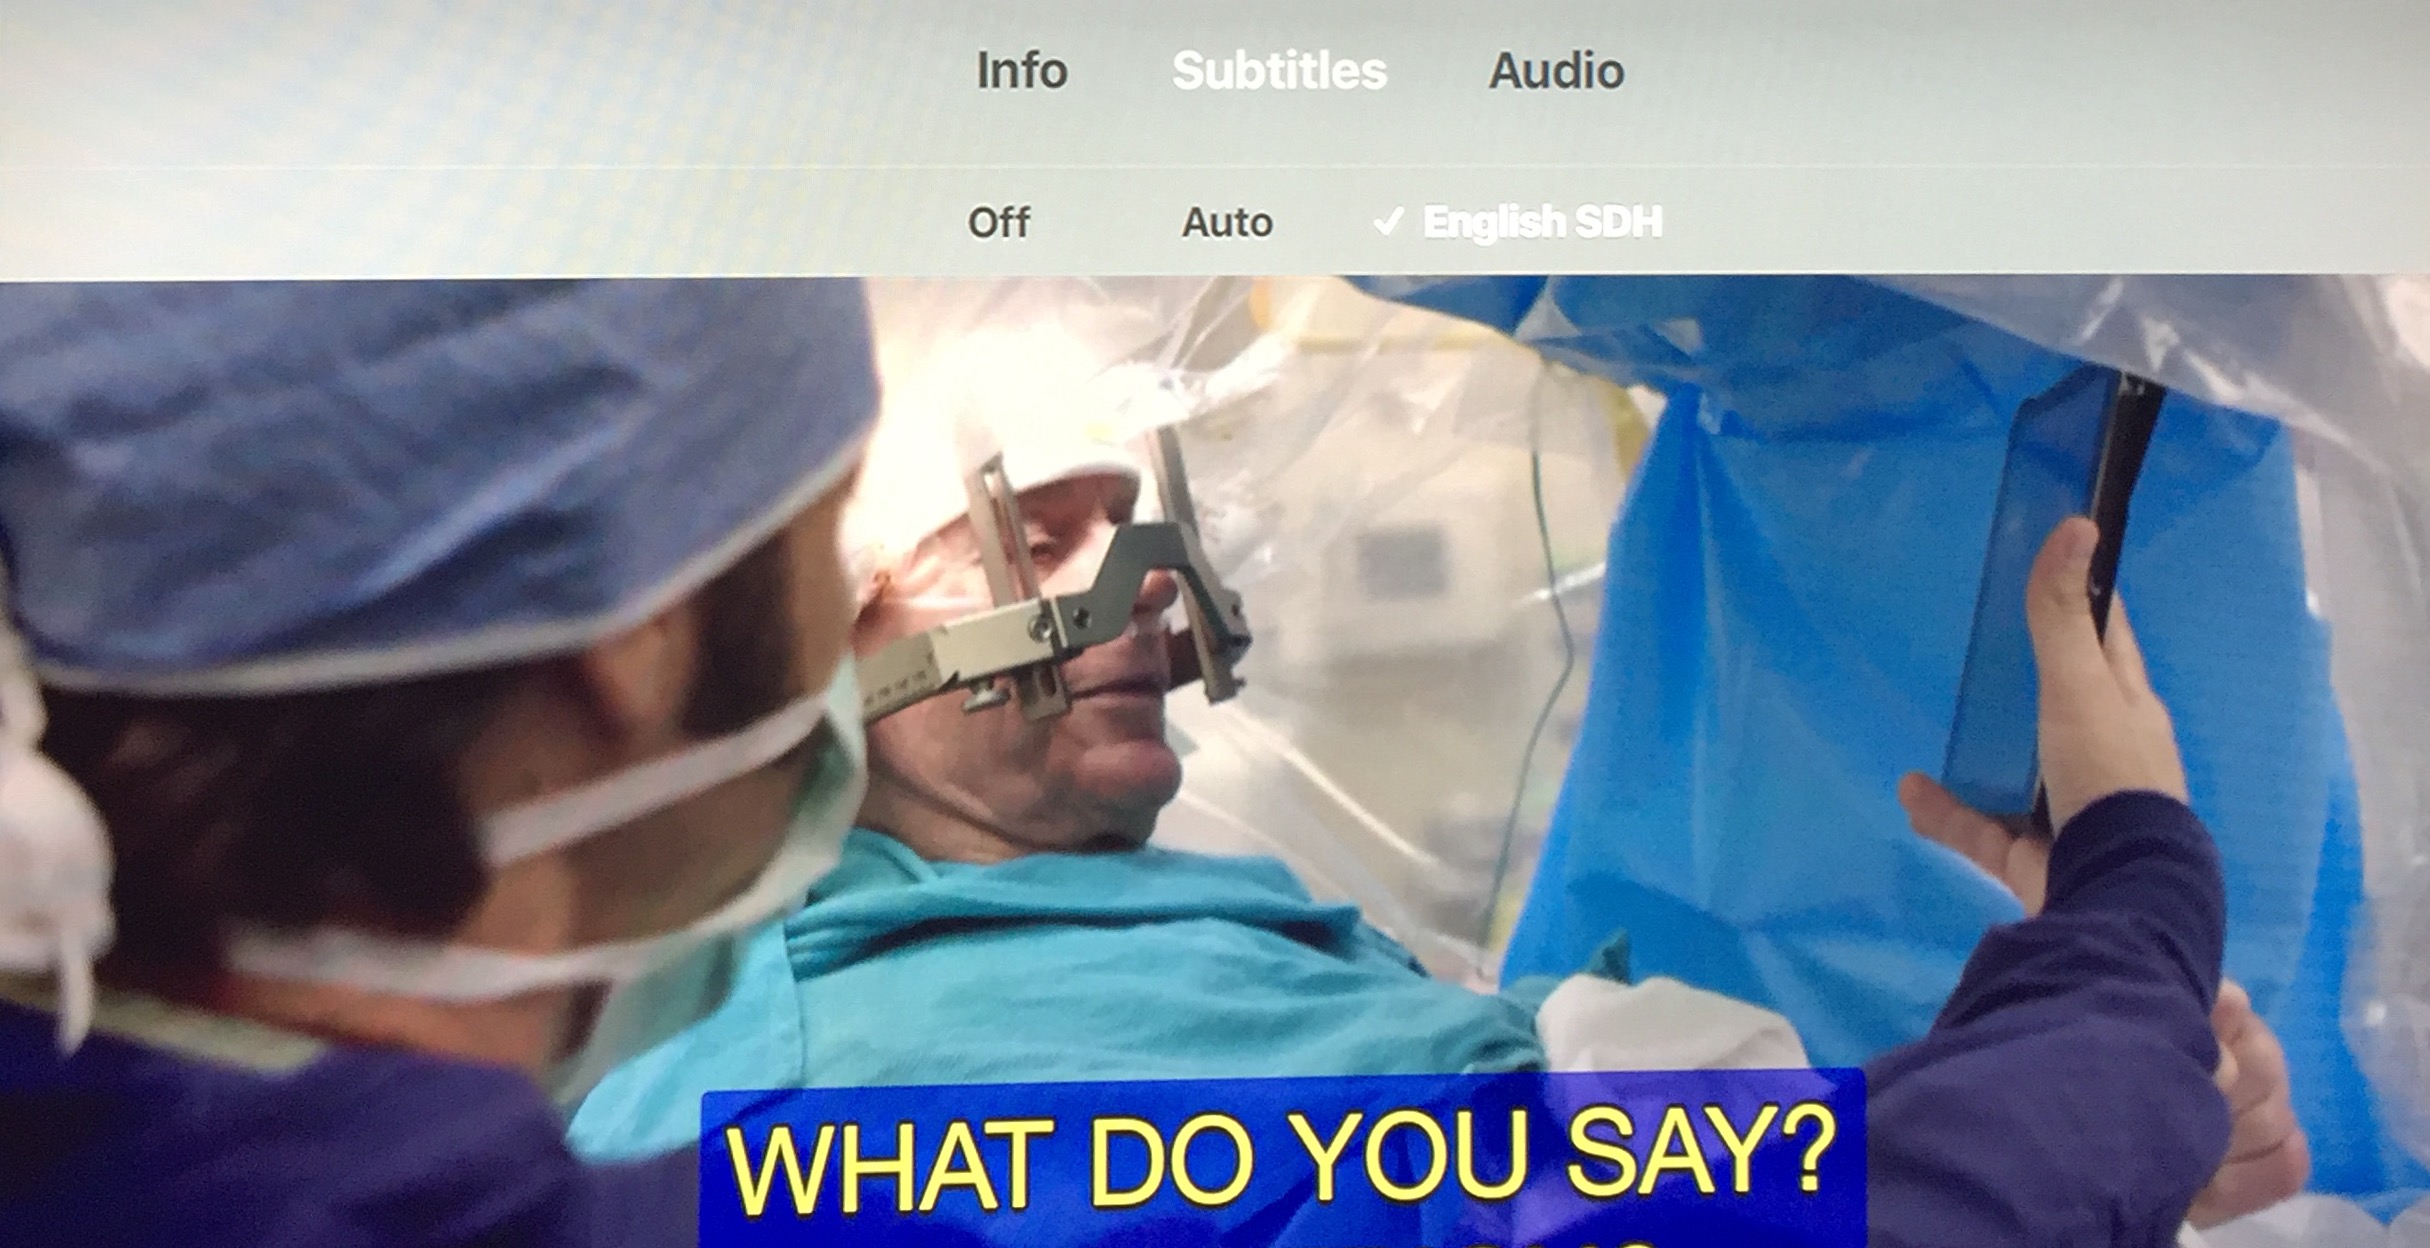
#1: Closed Captions

Closed captions were originally developed for those with hearing difficulties, but they can help you if you speak English as a second language or just need them as a support for improved processing. Captions can also help if your speakers are not working, or the sound in the video is of poor quality.

80% of caption users did not have any kind of hearing loss in one UK study.

Learn how to enable and customize closed captions on your iOS device.

#2: Speech

All iOS devices support built-in text to speech with the option to turn on word highlighting. Starting with iOS 8, it is possible to use the more natural Alex voice formerly available only on the Mac. TTS supports decoding, which frees you the reader to focus on the meaning of the text.

Breathe!: Alex takes a breath every once in a while to simulate the way we speak!

  • Learn how to enable and use Speak Selection on your iOS device.
  • Bonus tip!: Don’t want to make a selection first? No problem. Just bring up Siri and say “Speak Screen.” This will read everything on the screen!

#3: Safari Reader

Safari’s Reader is not really an accessibility feature (you will not find it in Settings) but it can help you if you find that you get distracted by all the ads when you are reading or doing research online. It is also a nice complement to the Speech features mentioned above. With iOS 9, you can now customize the appearance of the text and even change the background and font to make it easier to read when you surf the Web.

Left my heart in…San Francisco is a new system font available in iOS 9. It is designed to be easier to read, and is one of the font options available for Reader.

Learn how to use Safari Reader when you surf the Web.

#4: Dictation

Whenever you see the iOS keyboard, you can tap the microphone icon to the left of the space bar to start entering text using just your voice. This can help you get your words down on the page (or is it the screen?) more efficiently.

Try It!: Dictation can handle complex words. Try this: Supercalifragilisticexpialidocious.

Dictation supports more than just entering text. Follow the link for a helpful list of additional Dictation commands.

#5: QuickType and 3rd Party Keyboards

QuickType is Apple’s name for the word prediction feature now built into the iOS keyboard. Word prediction can help you if you struggle with spelling, and it can speed up your text entry as well. Starting with iOS 8, it is now possible to customize the built-in keyboard by installing a 3rd party app. The 3rd party keyboards add improved word prediction, themes for changing the appearance of the keys and more.

17 Seconds: World record for texting. Can you beat it?

Learn how to use QuickType and how to set up and use 3rd party keyboards.

Bonus Tips

Struggling to see the screen? – make sure to check out the Vision section in the Accessibility Settings. You can Zoom in to magnify what is shown on the screen,  Invert Colors to enable a high contrast mode, make the text larger with Dynamic Text, and much more.

Sources:

Holiday Gift Guide for Assistive Tech Professionals

Over at Closing the Gap, I have posted a gift guide focusing on some of my favorite products from this past year.  With only a few exceptions, the products listed are in the $10-50 range and they include a tablet (yes, you can apparently get a tablet for under $50 these days), and a variety of accessories such as cases, stands, and speakers.

As part of my continuing collaboration with Closing the Gap, I will be doing a webinar in the spring focusing on low vision supports on iOS devices and the Apple Watch. You can learn more about the webinar on the Closing the Gap website.

Mirroring Apple TV to a Mac

In addition to the HDMI connection for displaying content on a TV, the new Apple TV also includes a new USB-C connection.

USB-C port on back of Apple TV

While this connection is meant for diagnostics purposes, it can also be used to send the output from Apple TV to a Mac in order to take screenshots and record instructional videos. The key is to have the right USB-C cable to ensure that you do not damage  the USB ports on your computer. According to Google engineer Benson Leung (from the Pixel team) many of the less expensive cables do not meet the USB-C standard. As a result, they might not be wired properly and can actually damage the USB port on your computer. Leung has reviewed a number of compliant cables on Amazon. After reading his reviews, I chose to go with the i-Orange-E 6.6 ft. cable.

Once you have your Apple Tv connected to your Mac with the USB-C cable, the steps for recording a video are pretty simple:

  1. Launch QuickTime Player.
  2. Choose File > New Movie Recording.
  3. Select Apple TV for the Camera source from the pulldown menu next to the record button.
    Apple TV selected for Camera source in QuickTime Player
  4. Choose Apple TV as the Microphone source to also record the audio from the Apple TV, and select a quality (High or Maximum).
  5. Click the Record button and start interacting with the Apple TV using the new Siri remote.
  6. Click the Record button one more time to finish your recording.
  7. Choose File > Save and select the desired location to save your recording on your computer.

While you are seeing the output from the Apple TV in QuickTime Player, you can take screenshots using any of the Mac shortcuts for doing so: my favorite is Command + Shift + 4 followed by the Space Bar. This will change the mouse pointer to a Camera icon so that when I click on the QuickTime Player window a screenshot of the Apple TV output is saved to my Desktop.

If you are a Screenflow user, that app will also show the Apple TV as a source in the Configure Recording window (under the “Record Screen from” option).
Apple TV selected as source in Screenflow Configure Recording window.
In my testing, this also recorded some of the sound effects from Apple TV (such as the sound made when exiting to the Home screen, but not the click sounds made when navigating the app grid or the menu items in Settings).

Have fun recording your epic Crossy Road battles…I mean instructional videos.

Update: Today I attempted to record a tutorial focusing on VoiceOver, which is the screen reader built into tvOS. In order for the audio output from VoiceOver to be recorded by Screenflow, I had to select the option for “Record Computer Audio” in the Configure Recording window. This worked well, the only problem is that (as with QuickTime) you are not able to hear the sound from the Apple TV while recording. If you are recording a tutorial that relies on sound (like the one I did on VoiceOver) you may have to practice it a few times to make sure you are not speaking over the audio output from the Apple TV.

10 Apple TV Apps for the Classroom

The Apple TV is already popular in schools that have adopted the iPad as a learning tool. Its support for AirPlay makes it possible for teachers to show apps on their iPads to the entire class, and it allows learners to show their work to their peers right from their seat. The release of the fourth generation device with access to an App Store promises to expand the possibilities for Apple TV in the classroom.

App Store on Apple TV

While at launch the app selection is limited, if the iOS and Mac app stores are any indication, this situation will quickly change. For now, the primary challenge is finding apps. Discovery would be greatly enhanced by an option to browse the store by categories, including one devoted specifically to education (as I was writing this, Apple a new Categories section showed up on my Apple TV so it looks like this issue should be improved soon). For now, we have to wade through the many fireplace apps. Another issue is that it is not possible to easily share apps since there is no version of Safari for the Apple TV. Thus, I can only provide a list with some brief descriptions and my experience with each app, but no links to help you quickly add the apps to your device.

A quick tip: make sure to look under Purchased when you go into the App Store on your Apple TV. It turns out that some apps are universal. This means the developer can create one version that is available on both iOS and Apple TV (the device is running a version of iOS after all). I was able to find and quickly install a couple of apps this way.

Another quick tip: Make sure you have your iOS device or computer nearby as you navigate the App Store and install apps. As an alternative to entering your login information on the Apple TV, some apps will ask you to go to a special web page on another device, where you enter a code displayed on the Apple TV.

Remember that with many of the video apps, you can use Siri to turn on the captions. Just say “turn on the captions.” You can also just flick down with one finger to display an overlay with additional information about the current program and options for captions and subtitles (as well as AirPlay).

Overlay with access to captions and subtitles for current video program.

In Settings, the captions can be customized to make them easier for all in the classroom to follow along with them.  Captions are usually available for content from TED and PBS, whereas it varies on YouTube (most of the content there still relies on automatic captions which are not always accurate, unfortunately).

Without further delay, here is my list of my most useful apps so far:

  1. YouTube: My first source for learning about a new topic. If you used this app on the old Apple TV, you will not see much of a difference with this version. Once you complete the login process, which requires you to enter a code on another device as per quick tip 2 above, you will see your subscriptions, watch history and the like.
  2. TED: Again, there is not much difference between this offering and the other TED apps. As with YouTube, you will need to log in on a different device and enter a code in order to save talks that you want to watch later.
  3. PBS Video: With access to a deep library of PBS video content from shows such as Nature, Frontline, NOVA and more, the PBS Video app can be helpful in a variety of subjects, from social studies and science to language arts.
  4. PBS Kids: The Kids app features popular shows such as Sesame Street, Curious George, Arthur and more.
  5. Coursera: This app provides access to the videos that make up most of the content for courses offered on the Coursera platform. You are not able to display the PDF documents and other resources. Even with that limitation, I have been able to find a couple of good courses that look like they will be interesting: Design Thinking from UVA and Ignite Your Every Day Creativity from SUNY). For most of these courses, you can watch for free or choose to get credit by paying a fee. I did not go through the process of enrolling for credit with the courses I am exploring, so I can’t speak to how that works.
  6.  Storehouse: This is one of my favorite story telling apps on iOS, but the Apple TV version is quite limited in my opinion. It only allows you to show the photos you have added to a story, not the quotes or captions. Even so, students can use it to create short five-frame stories that use imagery to convery a message or tell a story in a different way.
  7. Montessory Spelling: As the name implies, this app allows young leanrers to practice their spelling. After being shown a photo that represents the word and hearing it spoken aloud, the learner sees blank lines representing the number of letters needed. Using the Apple TV remote, the learner then selects the letters in the correct order to get auditory feedback (the word is repeated and stars are shown on the screen). The Settings include options for selecting the level of difficulty, the letter placement (right space or next space) and the keyboard (capital letters, script or cursive). English, spanish, french and italian are the supported languages. Not a complicated or highly interactive app, but then again few of the learning apps I have seen so far on the new Apple TV are.
  8. Dictionary: This is one of those things that should just be built into Siri, but it’s not, so there’s an app for that. The one thing I like is the display of photos from Flickr with each definition. That can definitely help some learners who prefer or need visuals for understanding. There is a word of the day feature, but each time I tried it I got booted to the Home Screen. Unfortunately, the text is very small even on a reaonsably sized TV, and there are no options to increase it within the app.
  9. MyTalk Tools: For those of you who work with students with communication difficulties (or parents of kids who have such difficulties) there is at least one Augmentative and Alternative Communication (AAC) app on the Apple TV app store. I am still not sure how helpful this kind of app will be on this platform but hey, it’s available as an option. Maybe it will allow for quick communication while a child is watching a program or interacting with an app on the Apple TV (by double-tapping the Home button to switch back and forth between the AAC app and the other content or app). MyTalk is a $99 app for iOS (though a lite version is available if you want to try it as I did). It is on the iOS device that you will configure the communication boards available on the Apple TV after syncing through a MyTalk account. For each cell in the communication board, you can record your own voice and change the photo to either one you have saved to the Camera Roll or one you take with the camera of your iOS device. It looks like the free version will only allow you to replace existing cells, not create new ones.
  10. White Noise: I didn’t really go out looking for this app. It was shown to me when I looked in my Purchased category in the App Store (because I already own it on iOS and it is a universal app). I’m thinking this would be a good app to help learners simmer down and focus if they get too rowdy. It plays soothing sounds from ocean waves, to forest sounds, to rain drops and more. Since the app will continue playing in the background even after you exit it, you can combine it with the amazing screen savers Apple has provided for the ultimate chill out experience.

You will notice I have not included any math apps. Overall, I was not too pleased with the three I tried (each was only $.99): Math Champions, Math for Kids, and Math Drills. Each of these has some drills limited to basic operations. Beyond selecting the correct answer from a list and getting the typical auditory feedback (“Correct!”) there was not much in the way of interactivty or an immersive game experience. This is an area where I hope a few developers will look to creating something that is unique to the platform and incorporates more engaging gamification elements (a story, a mission, etc.). I did find some calculator and unit conversion apps, but again I feel this is something that should be easy for Siri to perform rather than require a separate app (in fact, it can already do all this on iOS devices).

That’s it for my initial tour of the Apple TV App Store after just a couple of days of owning the device. Have you found some useful apps I have left off the list? Let me know in the comments or tweet them at me (@_luisfperez).

New iPad Gestures for Cursor Movement and Text Selection

With iOS 9, Apple has added a new option for selecting text to the onscreen keyboard. Using a two-finger drag gesture, it is now much easier (at least for me) to place the cursor right where I want it. Another two-finger tap selects the word closest to the cursor, and another two-finger drag makes a selection.

I have found this method of text selection to be much faster than the old one where you had to tap and hold to get a magnifying glass which allowed you to place the cursor and then select from editing options from a popover menu. The new gestures work very well with the new Shortcut Bar that appears above the onscreen keyboard on the iPad. This Shortcut Bar provides shortcuts for editing and formatting options such as cut, copy, past, bold, underline and italicize. Finally, if you use Zoom, you can have it follow the cursor as you move within the text area by making sure Follow Focus is enabled in the Zoom settings (General > Accessibility > Zoom).

Here is a brief video showing the new cursor movement and text selection gestures for the iPad in action. At the end of the video I show how these gestures can work with Zoom.

Global Accessibility Awareness Day: The Need for an Ecosystems Approach to Accessibility in Education

On the occasion of Global Accessibility Awareness Day, I am excited about the many online and face to face events that will mark this important step toward ensuring a more accessible and inclusive environment for those of us who have special needs.  I will be presenting a session on the use of photography as a tool for disability advocacy as part of Inclusive Design 24, a free 24-Hour event sponsored by The Paciello Group and Adobe Systems. Photography has long been a passion of mine, and I welcome any opportunity to share how I use it as an educator and advocate to challenge perceptions of ability/disability. I will also be sharing resources and insights during a #GAADILN  twitter chat sponsored by the Inclusive Learning Network of the International Society for Technology in Education (ISTE).

I love Global Accessibility Awareness Day (or GAAD as I will refer to it from now on) but if there is one thing that I would change is the name of the event. To me it should be Global Accessibility Action Day. With many of these types of events the focus is on raising awareness of the needs of people of disabilities, as if we have not been asking for our rights for decades now (the ADA is more than two decades old, you know). GAAD gets it right by focusing on action. Organizations such as Shaw Trust Accessibility Services, Deque Systems and Accessibility Partners are offering a number of free services such as document audits, app accessibility consultations and website user testing. Many others are providing webinars and live presentations that aim at more than raising awareness by providing practical information on how to make documents, website and apps more accessible. A review of the full list of events available on the GAAD website makes it clear that this event is about more than just awareness, it is about taking the next step for accessibility.

In my own field of education, I see much progress being made but I also see a need for a more ecosystems approach to inclusion and accessibility. When I think of ecology I think about systems that have a number of parts working together as one, with the sum of these parts being greater than they are on their own.  When it comes to students with disabilities, a number of technologies are now available as built-in options on the mobile devices many of them own. While I am a witness to the impact these technologies can have on the lives of students with disabilities (having been one who used these technologies myself) I believe their impact is limited by their use in isolation rather than as part of a more comprehensive system.

What I would like to see is a change in thinking to focus on a systems approach that addresses what I see as the three As of accessibility:

  • Accessibility Features: companies such as Apple  now include a comprehensive toolkit for accessibility that is built into the core of the operating system.  This means that when I take my new Mac, iPhone or Apple Watch out of the box it will be ready for me to use without the need to purchase or install additional software. Not only that but as my vision gets worse I know that I will be able to take my device out of the box and set it up independently, without having to wait for someone with better eyesight to help me.  These built-in accessibility features have been life-changing for me. Without them I’m not sure I would have been able to pursue higher education and complete my master’s and doctoral studies. I also would not be able to do my photography that brings so much joy and beauty into my life. Unfortunately, not all educators know about even the most basic of these features that are built into the technology their districts have spent so much money to purchase. I am often surprised when I do presentations around the country (and sometimes in other parts of the world) by how little awareness there is among educators of the potential they hold literally  in their hands to change a student’s life. We need to do better in this area of professional development to allow these tools to have an even greater impact on education for all students, not just students with disabilities but any student who struggles with the curriculum and needs additional support.
  • Accessibile Apps:  the built-in accessibility features provide a great baseline for addressing the needs of people with disabilities, but they can’t do it all. There is just too much diversity and variability for that to be the case: not just in the traits and needs of users, but in the settings and tasks where technology is used. For this reason, it is often necessary to extend the capabilities of the built-in accessibility features by installing apps that provide greater customization options. A great example is the Voice Dream Reader app. While iOS has a robust text to speech feature with word highlighting that now supports a high quality Alex voice, Voice Dream Reader allows for even greater customization. The user can adjust the color of both the word and sentence highlighting, something which cannot be done with the built-in Speak Selection feature of iOS.  For those who are blind and use the VoiceOver screen reader, the developer has done an excellent job of labeling all of the app’s controls.   A companion Voice Dream Writer app even provides a special mode for VoiceOver users to make it easier for them to enter and edit text, showing an strong commitment to usability for all users on the part of this developer. Other examples of developers who are doing exemplary work when it comes to creating accessible apps include AssistiveWare ( developers of Proloquo2Go, Proloquo4Text and Pictello, all apps with excellent support for VoiceOver and Switch Control) and Red Jumper  (developers of the popular Book Creator app). The latter added an Accessibility option for images and other objects to help students and educators create accessible content with the app. Unfortunately, these developers are still the exception rather than the rule. With too many apps, swiping through with VoiceOver results in hearing “button” over and over with no indication of what the button actually does. Worse, many of the buttons for key actions sometimes can’t even be selected. Without attention to accessibility from app developers, the accessibility features can’t work to their full potential. No matter how good the voice built into VoiceOver is (and Alex is pretty good) it does me no good if I can’t select the buttons within an app and determine what they do.
  • Accessible Content: the same problems that exist with apps that are inacessible comes into play with much of the content that is available online for students. Too many videos lack captions (or include only automatic computer generated captions that contain too many errors to be useful), and too many ebooks include images that are not labeled with accessibility descriptions  for those who can’t see them. Without these accessibility descriptions, which can be easily added in authoring tools such as iBooks Author, a blind student taking a science class or an economics class will not be able to access the diagrams and other graphics that are so often used in these fields. Again, adding in features such as accessibility descriptions allows the built-in accessibility feature, in this case VoiceOver, to work to its full potential. There are many wonderful examples of books that include accessibility, as well as resources to help educators develop their own accessible books with easy to learn and use tools such as iBooks Author. These include Creating Accessible iBooks Textbooks with iBooks Author from the National Center for Accessible Media and Inclusive Design for iBooks Author by my friend and fellow Apple Distinguished Educator Greg Alchin. For a great example of an engaging and accessible book, one need not look any further than Reach for the Stars, a  multi-touch book from SAS that makes astronomy come alive not only for blind students but anyone who wants to learn about our universe using all of their senses.

As shown by the following diagram, when the three components are present (robust accessibility features, accessible apps, and accessible content) we get a synergy that results in an even greater impact than each tool or feature can have on its own: this is the sweet spot for accessibility in education.

Three overlapping circles labeled as Accessibility Features, Apps and Accessible Content, with the spot where they converged labeled as Sweet Spot.

To ensure accessibility in education we all must work together to realize the advantages of an accessibility ecosystem: companies such as Apple and others who are building accessibility into their products, app developers and content authors. As AssistiveWare’s David Niemeijer so nicely stated in his own GAAD post when we  take accessibility into account we really are designing for everyone because we all one day get old and require the ability to customize the text size and other features of our devices to account for our aging vision and hands.

Furthermore, to quote from a recent Apple commercial, “inclusion promotes innovation.” Thinking about accessibility from the start, in line with the principles of universal design, requires us to be even more creative as we seek to solve problems of access that may someday result in usability improvements for everyone.

A great example of that is the recently released Apple Watch.  Since it has a small screen that makes it difficult to enter text, much of the interaction with the Apple Watch takes place through the Siri personal assistant. The voice recognition technology that makes Siri possible actually had its origins in the disability community, but now it  can be used to account for the constraints of a smart watch and its small screen.

The Apple Watch is also a  great example of an ecosystems approach to accessibility and  its benefits. This device includes many of the same accessibility features that are available on the iPhone and the iPad, which are the same features I can use on my Mac. What this means is that if I get a new Apple Watch I will already know how to use these features, with a few modifications to account for the smaller screen. Similarly, a blind student who has been using his or her iPhone can easily transfer the use of many VoiceOver gestures to the trackpad built into Mac laptops or the Magic Trackpad used on iMacs.

Why is an ecosystems approach like this so important? Ultimately it is because I as a person with a disability need accessibility 24/7, 365 days a year, most likely for the rest of my life (unless a cure is found for my condition). My need for accessibility doesn’t stop when I get up from my desk at home and walk out the door. I need accessibility as I order a ride from a ride sharing service from my smart phone (which has Zoom and VoiceOver built in) , as I take and share the photos that bring so much joy to my life and capture the beauty I encounter in the places I am lucky to visit (through accessible apps such as Instagram) and as I continue to develop my skills and knowledge base by reading ebooks about my field I download from the iBookstore and read with iBooks (accessible content) . For someone like me, accessibility is needed across a number of settings and situations if I am to be independent and continue to make a valuable contribution to society. Only an ecosystems approach can provide the kind of comprehensive accessibility I and many others who have disabilities need to live a fulfilling life.

We Have the Will, Do You?

I generally devote my posts on this blog to the sharing of videos, tips and other resources related to accessibility and universal design, rather than addressing political issues related to disability and society. Today I am going to make an exception.

As I was going through my Twitter feed and looking at posts from my excellent PLN, I came across the following Tweet from star ed tech blogger Vicki Davis:

You can read the referenced blog post for yourself, but the gist of it is that we now have the technology to allow students who have special needs to shine if only we had the will to take advantage of it. I  agree with this idea (we do have some amazing built-in accessibility features that every student, not just those who have special needs, can use to enjoy greater access to information). You can learn all about these technologies by watching the many videos on my YouTube channel.  However, what I had a problem with was the assumption the post was based on, which the author makes plain early into the piece:  “Like Hawking, many students are trapped in the prison of a body that does not unleash their capability.”

For those of you who are not familiar with it and don’t have to deal with it on a regular basis (as I do) this is an example of the “medical model of disability” at work. This is a model that holds that people with disabilities experience life through a “broken” body that has to be normalized through the use of modern medicine (through pills, surgeries or prosthetics ). Now, the decision to avail yourself of any of these interventions is a personal one and I try not to judge anyone who makes such a choice. What I do take issue is the narrative of disability that such a model supports, a narrative that revolves around shame and pity (as mentioned in an excellent comment to the post submitted by Anna, a parent of a child with disability).

On the one hand, I am happy to see that the mainstream ed tech community is finally starting to engage with this topic and recognizing the usefulness of assistive technology and accessibility for everyone. When popular and influential  bloggers like Vicki Davis focus on a topic it brings attention to it because of their large audience  (she has more than 98,000 followers on Twitter, about 95,000 more than me if you are counting). On the other hand, when popular bloggers share messages based on faulty assumptions, those assumptions are given even more life and staying power.

Fortunately, one of the beauties of blogging  is that people can engage in dialogue (sometimes civil and sometimes not)  through comments. Unfortunately, not everyone reads the comments and most leave the blog only with the ideas presented in the post as their takeaway. In the case of this post, I was happy to read a very articulate response from Anna that called out the author on her assumptions, and did so in a very respectful way. I hope that I am doing the same here. My intent is not to single out Vicki Davis. I follow her and see all the good she does through her work. My intent is to show that the ed tech community as a whole needs to change its assumptions and long-held beliefs about people like me. The same community that creates and uses many of the tools that can do the most to empower people with disabilities is also one of the most exclusionary when it comes to disability. If you want to see that at work, just submit a conference proposal that mentions universal design, accessibility or similar terms and see how well that goes. But I digress, that’s a topic for another post.

As Anna suggests, there is another way of thinking about this issue, one that is inspired by a different set of assumptions. Instead of focusing only on people with disabilities and their bodies, a “social model of disability” focuses on the environment as the source of significant barriers for people like me. For example, one of the major issues I deal with is the lack of transportation in my home area. If I had access to good transportation, my ability to get to a job, to doctor’s appointments and even to leisure activities like going to the gym would not require so much planning and effort.

Rather than “letting the caged bird sing” from a social model perspective we wouldn’t build a cage in the first place. The social construction of disability  is at work when a class website is built without any thought for how a parent with low vision (not just a person with a disability, but also someone who is older or who has had an eye injury) can use it, or when a classroom has too little space between tables for someone who uses a wheelchair to get around the room comfortably and without too much effort. People with disabilities are too familiar with the social construction of disability. It is often those who don’t have disabilities who are not, because as Vicki Davis states in a response to Anna’s comment, they don’t have to live it every day.

I agree with Vicki Davis on a key point. It is a matter of will. But it is not a willingness to take advantage of technology that will make a difference going forward. Rather it will be a willingness to question assumptions about the nature of ability/disability. No matter how much technology there is (and how good it is) as long as people’s thinking doesn’t change then we are not really moving the needle on this issue. People with disabilities recognize the social construction of disability (as evidenced by years of struggle leading to legislation such as the Americans with Disabilities Act).  The question is does the rest of society (including the ed tech community)  have a similar willingness to reflect on and change the way it portrays and discusses disability. It is much easier to retreat into “inspiration porn“. It takes a lot more will to do the long term work of changing  assumptions through ongoing reflection. Will you have that will?

New webinar setup with Reflector, iPhone and iPevo Stand

I have had great success using Reflector on my Mac to mirror the screen from my iPad when I do webinars. However, after some feedback  I received from a recent webinar on switch access I decided to look into improving my setup.One of the viewers suggested that I show my interaction with the switch interface (the tapping of the buttons, etc.) along with the mirrored iPad screen. I agree that this would be helpful when showing off not only Switch Control but also VoiceOver. With VoiceOver, there are many gestures (flicks, swipes and the like) that don’t translate well during a webinar if you are only mirroring the device screen. I had a chance to try a new setup when I did a webinar on VoiceOver and Zoom this past week, and I was very pleased with the results.

I took advantage of Reflector’s ability to mirror multiple devices as follows:

  •  Device 1: iPad mini mirroring the screen to Reflector as usual.
  • Device 2: iPhone mounted on an iPevo iPhone stand ($69) and running the iPevo presenter app.

The iPevo presenter app is a free app designed for use with iPevo’s iPhone stand. It has the option to hide all controls and show a very minimal interface so that there are no distractions. Below is a photo of my setup where you can see the split screen effect I got on my computer display, which I then shared with my webinar participants using the screen sharing feature of our webinar platform.

Webinar setup: iPad mini and iPhone mounted on iPevo stand on the left, Mac showing mirrored devices on the right.

I tried a similar setup with iPevo’Ziggi HD document camera, but I found it could not keep up with the motion whenever I performed a gesture on the iPad with VoiceOver. In the end, the iPhone camera did much better in keeping up with the motion of my hands during the VoiceOver demos.

My one concern is that having the two screens up could be distracting, so we’ll see what the feedback says on that point. For now I plan to use this setup for any of my upcoming webinars that involve VoiceOver or Switch Control.

Update: iPevo suggested lowering the resolution while using the Ziggi HD camera to see if that would work better for capturing the motion. I found that a resolution of 1024X768 worked well on my 11 inch Macbook Air. I also made sure to let the camera focus on my iPad screen and then selected Focus Lock in the Presenter app on my Mac (pressing the letter M will also lock focus). I will probably use that setup when doing a Switch Control webinar where it is nice for people to see the hardware and the iPad at the same time. Thanks for the suggestion, iPevo.

Accessibility Options in Voice Dream Writer App

This week, Winston Chen and the Voice Dream team released a new Voice Dream Writer app,. I am highlighting the new app here not only because Voice Dream Reader is one of my favorite apps for students who need reading supports such as text to speech, word highlighting and customized text, but also for the attention to accessibility from the Voice Dream team in this new app. Not only are the controls and the interface in the app nicely labeled for VoiceOver users, but there are even a few features specially designed to make things easier for VoiceOver users.

Screenshot of Voice Dream Writer interface on iPad with VoiceOver controls highlighted.

When VoiceOver is turned on the app can recognize this and adds three buttons for editing text to the interface (they appear in the toolbar located just above the onscreen keyboard, on the left side). These buttons are:

  • Cursor:  allows the user to move the cursor by flicking up or down with one finger.
  • Cursor movement unit: changes how the cursor movement takes place by allowing the user to choose from characters, words or sentences.
  • Select text: selects text based on the cursor movement unit. For example, flicking up with sentences as the cursor movement unit will select the text one sentence at a time.

All of these controls are adjustable. A flick up or down with one finger will change the value (for the cursor movement unit) or navigate to/select the next item (for the cursor and select text buttons).

A three-finger swipe gesture is also supported for cursor movement and selection: a three-finger swipe up will move the cursor to the beginning of the document and a three-finger swipe down to the end, and three-finger swipes up or down will select the text from the cursor position to the beginning or end of the document.

Another nice feature of the app is the way it makes it easy to find misspelled words by opening Tools in the upper right and choosing Find Misspelled Words. You can then flick down with one finger to navigate the misspelled words in your document. When you get to a word you want to fix you have two options: you can double-tap with one finger to edit it with the onscreen keyboard or you can swipe from the right with three fingers to use the Word Finder with a phonetic search. The phonetic search will bring up a list of words that closely match the one that is misspelled in your document.  You can then choose the correctly spelled word from the list and double-tap with one finger to make the correction.

I did a short video to demonstrate some of these options in the Voice Dream Writer app. I hope you find it helpful. For more information about the app, make sure to check out the Voice Dream website.

Two New Options for Recording Your iPad Screen

When recording my iOS tutorials my setup has consisted of mirroring my iPad to my Mac with the Reflector app, then using the Screenflow app to record the mirrored iPad display. For audio I use a Blue Snowflake mic. This setup works well and I get the added benefit of an iPad frame around the mirrored display for a nice aesthetic.

With Yosemite, I have two more options for recording my iPad screen. First, I can select the iPad as a camera source in QuickTime Player. To create a new recording of your iPad screen with QuickTime:

  1. Make sure you have your iPad connected to your Mac with a Lightning cable.
  2. Launch QuickTime Player.
  3. Select File > New Movie Recording.
  4. Select your iPad as the camera from the pulldown menu to the right of the Record button.
    iPad selected as camera source in QuickTime Player.
  5. Perform the actions you wish to record on the iPad.
  6. Press Stop in QuickTime Player on your Mac.
  7. Choose File > Export and select your desired resolution. Another option is to choose File > Share (or the Share icon to the right of the QuickTime controls) to upload your iPad recording directly to a site such as YouTube or Vimeo.

This workflow will work well in situations where you are not able to use AirPlay to connect to Reflector or another mirroring app (I also use Air Server on occasion).

With the release of Screenflow 5, TeleStream has built on this support for recording the iPad screen in Yosemite. As with QuickTime Player, you can now choose the iPad as a camera source when configuring a new Screenflow recording session.
iPad selected as camera source in Screenflow new recording pane.
Screenflow adds a nice touch (literally): you can add touch callouts that show many of the iOS gestures (taps, swipes, zoom gestures) at specific points in your video recording. This is helpful for pointing out where a user should tap or perform a gesture while you demo apps and built-in features on the iPad.
Touch callouts menu in Screenflow.

Along with the other editing features included with Screenflow ($99 or $34 to upgrade from a previous version) I think this makes it the ideal solution for those who need to record the iPad screen on a regular basis (educators, app developers who need to demo new apps, or anyone with a passion for teaching on a public forum like YouTube or Vimeo).