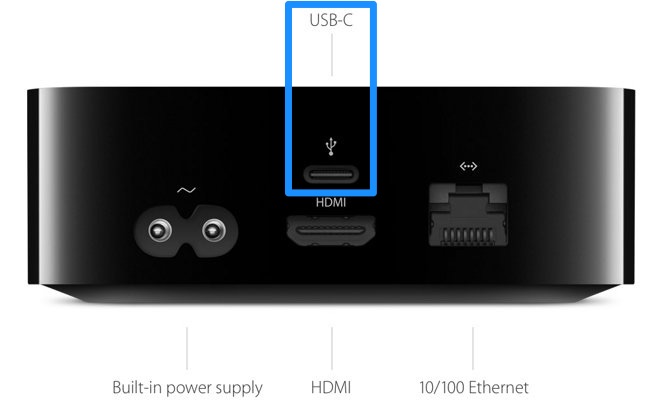
In addition to the HDMI connection for displaying content on a TV, the new Apple TV also includes a new USB-C connection.

While this connection is meant for diagnostics purposes, it can also be used to send the output from Apple TV to a Mac in order to take screenshots and record instructional videos. The key is to have the right USB-C cable to ensure that you do not damage the USB ports on your computer. According to Google engineer Benson Leung (from the Pixel team) many of the less expensive cables do not meet the USB-C standard. As a result, they might not be wired properly and can actually damage the USB port on your computer. Leung has reviewed a number of compliant cables on Amazon. After reading his reviews, I chose to go with the i-Orange-E 6.6 ft. cable.
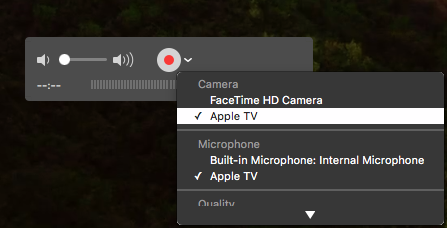
Once you have your Apple Tv connected to your Mac with the USB-C cable, the steps for recording a video are pretty simple:
- Launch QuickTime Player.
- Choose File > New Movie Recording.
- Select Apple TV for the Camera source from the pulldown menu next to the record button.

- Choose Apple TV as the Microphone source to also record the audio from the Apple TV, and select a quality (High or Maximum).
- Click the Record button and start interacting with the Apple TV using the new Siri remote.
- Click the Record button one more time to finish your recording.
- Choose File > Save and select the desired location to save your recording on your computer.
While you are seeing the output from the Apple TV in QuickTime Player, you can take screenshots using any of the Mac shortcuts for doing so: my favorite is Command + Shift + 4 followed by the Space Bar. This will change the mouse pointer to a Camera icon so that when I click on the QuickTime Player window a screenshot of the Apple TV output is saved to my Desktop.
If you are a Screenflow user, that app will also show the Apple TV as a source in the Configure Recording window (under the “Record Screen from” option).

In my testing, this also recorded some of the sound effects from Apple TV (such as the sound made when exiting to the Home screen, but not the click sounds made when navigating the app grid or the menu items in Settings).
Have fun recording your epic Crossy Road battles…I mean instructional videos.
Update: Today I attempted to record a tutorial focusing on VoiceOver, which is the screen reader built into tvOS. In order for the audio output from VoiceOver to be recorded by Screenflow, I had to select the option for “Record Computer Audio” in the Configure Recording window. This worked well, the only problem is that (as with QuickTime) you are not able to hear the sound from the Apple TV while recording. If you are recording a tutorial that relies on sound (like the one I did on VoiceOver) you may have to practice it a few times to make sure you are not speaking over the audio output from the Apple TV.
