5 Easy Accessibility Tips for Book Creator Authors

On the occasion of the Book Creator Chat (#BookCreator) focusing on accessibility, this post focuses on five easy to implement accessibility tips for Book Creator authors. By taking the time to consider the variability of readers from the start, you can ensure your books work for more of your potential audience.

1: Choose Text Size and Fonts Wisely

While Book Creator exports to the industry standard ePub format, the kind of ePub document it creates is of the fixed layout variety. This means that readers are not able to resize the text or change its appearance when they open the book in iBooks  (yes they can use the Zoom feature to magnify what is shown on the screen and Invert Colors to enable a high contrast view, but not everyone is familiar with these iOS accessibility features). At a minimum, I would recommend a text size of 24px as a good starting point to ensure the text is large enough to be easily read without too much effort.

When comes to the processing of the text, some readers may have dyslexia or other reading difficulties. While there are special fonts for dyslexic readers that can be installed on the iPad, there is limited research on their impact on reading speed and comprehension.

Instead, the consensus appears to be that clean, sans-serifs fonts, which are good for all readers, can also help readers who have dyslexia. In Book Creator, you can choose from a number of sans-serif fonts such as Cabin, Lato and Noto Sans, or you can use system fonts installed on your device such as Arial, Helvetica and Verdana. You should definitely avoid fonts in the Handwriting and Fun categories, as these are more difficult to decode even for people who do not have dyslexia.

Other tips for improving legibility include:

  • Left justify text. Fully justified text can result in large gaps in the text that can be distracting to readers who have dyslexia.
  • Use  bolding (instead of italics or ALL CAPS) to highlight text. The latter are more difficult to decode.
  • Use shorter sentences and paragraphs.
  • Use  visual aids to reinforce information in the text (but make sure to include an accessibility descriptions as noted later in this post).
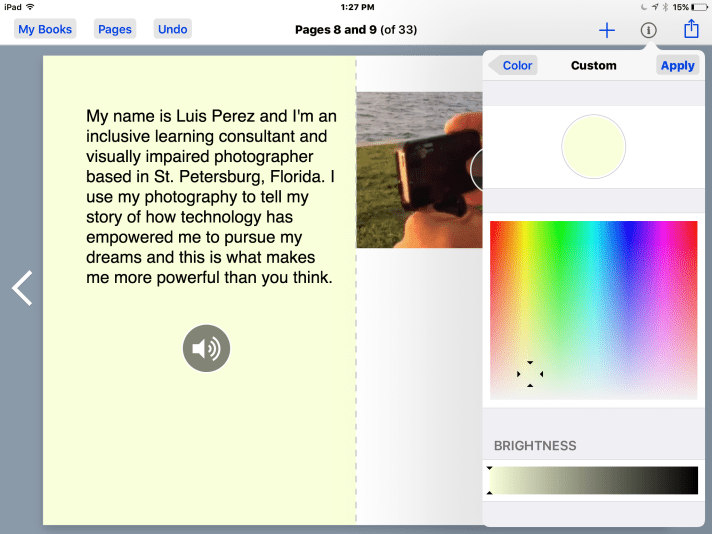
  • Use an off-white  background. For some readers, an overly bright (all white) background can result in significant visual stress. To reduce this stress, you can choose a more dim background color in Book Creator. With no item on the page selected, tap the Inspector (i) button and choose a page under Background, then tap More under Color. A color toward the bottom of the color picker should work well.

    Custom color picker in Book Creator with light yellow color selected.

2. Add Descriptions to Images

Readers who are blind will rely on assistive technology (screen readers) to access the content in your books. Screen readers are only able to describe images to readers who are blind when they include a text alternative. Adding a text alternative is straightforward in Book Creator:

  1. With the image selected, tap the Inspector (i) button in the toolbar.
  2. Tap in the Accessibility field.
  3. Enter text that describes what the image represents rather than its appearance. WebAIM has an excellent article on how to create more effective alternative text for images.

    Accessibility field in the Book Creator Inspector.

    This video shows you how to add accessibility descriptions (alternative text) to images in Book Creator. 

3. Create Descriptive Links

Some of your readers will be listening to the content because they are not able to see the display. They will be using a screen reader (VoiceOver on the iPad) to hear the text read aloud. When the screen reader comes across a link that reads as “click here” or “learn more” the person listening to the content will not have sufficient information to determine if the link is worth following or not. Instead of using “click here” or “learn more” as the link text, select a descriptive phrase (“Learn more about adding accessibility descriptions) and make that the link text – as with the following example:

How to add a hyperlink in Book Creator.


4. Supplement Text with Audio

While the iPad has built-in text to speech features (Speak Selection and Speak Screen) and the quality of the voice continues to improve, some readers will still prefer to hear an actual human voice reading the text. Fortunately, adding a recording of the text is an easy task in Book Creator:

  1. Tap the Add (+) button in the toolbar.
  2. Choose Add Sound.
  3. Tap the Start Recording button (the red disk).
  4. Read the text and tap the Stop Recording button when finished.
  5. Tap Yes to use the recording.
  6. Move the Speaker icon to the desired location on the page (it should be right below the corresponding text).

5. Remember Bits are Free!

The only limitation to the length of your book is the amount of storage on your device. Feel free to spread it out! Too much content on a single page can be overwhelming for some readers. A better approach is to use white space to present a clean layout with information organized  into easy to digest chunks. This may require you to create more pages, but that’s ok – remember bits are free!

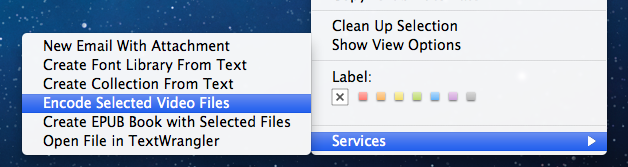
One limitation of Book Creator, from an accessibility perspective, is that it removes the closed caption track when it recompresses videos to be included in a book. This means the content in those videos is not accessible to those who are Deaf or hard of hearing (or other readers such as English Language Learners who can also benefit from captions). My current workaround is to upload the videos to my YouTube channel and then edit the auto captions created by YouTube so that they are accurate . This is not an ideal solution, as it requires the reader to exit iBooks to view the video in another app (Safari or YouTube), but it is the best workaround I have for now.


Accessibility in iBooks 2 and iBooks

Today’s post will focus on some of the lessons I have learned about the accessibility of ebooks created with iBooks Author and accessed on the iPad with iBooks 2.

I was pleasantly surprised to learn that Apple included an option for adding a description for images and other objects when it released iBooks Author. I don’t remember this feature being discussed much at the event where Apple unveiled iBooks 2 and iBooks Author, and only found out about it while test driving the software.

An even better surprise was learning that closed captions are now supported for any video that is embedded in an iBook. This is a great feature that will benefit a range of different learners (not only those with hearing disabilities). I think these new accessibility features of iBooks Author and iBooks 2 will go a long way toward facilitating the adoption of iBooks in the schools by meeting legal requirements for accessibility set by the U.S. government (for a summary of the legal requirements, please see the Dear Colleague letter and the follow-up clarification from the U.S. Department of Education).

Apple has published a support document  with  advice for making iBooks created with iBooks Author more accessible.  However, the article focuses mostly on the accessibility of images and other visual content, and does not include any information about closed captions. I would add a couple of bullet points to the advice given in the Apple support document:

  • the article suggests adding descriptions for all images, including background images. Web accessibility guidelines state that decorative images should have a null or empty alt attribute so that they are skipped by a screen reader, but there is currently no way in iBooks Author  to indicate that an image should be skipped by VoiceOver on the iPad. In my testing, I found that when you leave the description field for an image empty in iBooks Author, VoiceOver will read the entire file name when it comes across the image in iBooks 2. This is a problem because most people don’t use very descriptive file names before they add their images to a document. In my test iBook, I forgot to add a description for one of the placeholder images included in the iBooks Author template I selected. When I accessed the iBook on my iPad, VoiceOver read the following: “1872451980 image”. Imagine how confusing this would be to someone who is blind and relies on the VoiceOver screen reader to access content in iBooks.  For the time being, I would suggest following the guidance from Apple and marking up all images, including those that are used for decorative purposes, but I would recommend marking up  decorative images (those that don’t add any content that is essential for understanding) with the word “Background” in the description. By default, VoiceOver will say the word “image” so it is not necessary to add that to the description. While it would be better for the image to be skipped by VoiceOver if it is not essential, I would rather hear a quick, single-word announcement that is much easier to ignore than a long number read aloud in its entirety by VoiceOver, or an unnecessary description for an image that does not add in any way to my understanding of the content.
  • as much as possible, image descriptions should focus on the function of each image rather than its visual appearance. Writing descriptions (or alternative text as it is more commonly known in the web accessibility world) is as much an art as it is a science, and much of it is subjective. There are many sites that provide information on how to write good alt text for images on websites, but I have found very little guidance on how to write descriptions for other online content such as ebooks. My recommendation would be to focus on three C’s when writing descriptions for images in iBooks Author: Context, Content and Conciseness. First, I would ask myself if the image is properly described in the surrounding text. If it is, then it might be more appropriate to mark it up as a decorative image (“Background”). Next, I would ask myself “what information does this image convey?” and focus on the key idea or concept supported by the image rather than its visual details. There could be a few exceptions where you might need to focus on the visual details of the image, but these cases should be the exception rather than the rule. The final consideration is to keep the description as brief and concise as possible. I would try to keep it to no more than 8-10 words if possible.

The second aspect of accessibility supported in iBooks Author is closed captioning. If a movie added to an iBook in iBooks Author has been captioned, you can view the captions in iBooks 2 on the iPad by going to Settings, Video and making sure Closed Captions is set to On. If you know a file has been captioned and you don’t see the captions on the iPad, you may need to go into the Settings app and turn the captions off and then on for the captions to show up. This appears to be a bug that will likely get fixed in a future update to iBooks or IOS.

To create a captioned file, I have found that a workflow using MovieCaptioner and Compressor has worked well for me. I like MovieCaptioner for creating the captions because it is affordable and easy to learn. To learn more about how to create captions with MovieCaptioner you can view this tutorial I have made available on the Tech Ease website at the University of South Florida.

The only difference with my current workflow is that rather than exporting a captioned QuickTime video file from MovieCaptioner I’m only using the software to create the SCC file that has the caption text and timecodes. I then use Compressor to make sure the video file is in the correct format for the iPad and to add the captions. I found that when I exported the movie from MovieCaptioner I would get an error message in iBooks Author and the software would refuse to import the movie. Once I have exported my SCC file (Export > SCC in MovieCaptioner), I use Compressor to combine the two as follows:

  1. Open Compressor and choose Add File from the toolbar, then locate the desired video on your hard drive.
  2. In the Settings pane (Window > Settings) choose the Destinations tab, then find Desktop (or your preferred destination ) and drag it into the Batch window.Drag Destination from Settings pane to Batch window.
  3. Switch to the Settings tab and choose Apple Devices, H.264 for iPad and iPhone, then drag that setting on top of the destination in the Batch window.
    Drag H.264 for IPad and iPhone setting into the Batch window
  4. With your movie selected, open the Inspector (Window > Inspector or click the Inspector button on the toolbar), select the Additional Information tab and then Choose to find the SCC file on your computer.
    Select Choose from the Additional Information tab in the Inspector
  5. Select Submit to start the export process.

Once your movie has been exported from Compressor you should be able to drag it right into your iBook in iBooks Author to add it as a widget. As with images, make sure you provide a description in the Inspector.

Students with disabilities have traditionally had a difficult time with access to textbooks. iBooks Author provides a platform for making textbooks more accessible for all learners as long as a few accessibility principles are kept in mind. What an exciting time to be working in educational technology and accessibility!

Authoring ePub documents for the iPad with Automator, TextEdit and Text to Speech

The website Mac OS  X Automation has a great tutorial on how to use some of the new text to ePub automator actions that are available in Mac OS X Lion, and they have even put together a few automator workflows to make the process easier. I was inspired by the information they had on their website to see if I could create my own ePub document using the information they provided, but I added a twist: I added a recording of the text at the beginning of each chapter and this recording was created using the excellent Alex voice available with the Text to Speech feature in Mac OS X. The tutorial is now available on YouTube (and it is closed captioned). I think having an audio version could be beneficial for students with learning disabilities by providing the content in another modality. While the iPad and other IOS devices already include a great screen reader in VoiceOver, the voice available on those devices is not as good as Alex is, so this is why I decided it might be a good idea to provide the text to speech recording created on the Mac. Along the way to making this tutorial, I also learned about  new automator actions for converting video and audio files into the correct formats for ePub (and iTunes U). To use these actions, select your file(s), right-click on them and choose Services, Encode Selected Video (or Audio) Files. For audio this will result in an .m4a file saved to the same location as the original, and for video the format of the converted file will be .m4v.

Services, Encode Selected Video Files option when you right-click on a video file.

5 tips for ePub accessibility

Closeup of iBooks app on iPad.I was scheduled to present at a workshop on ePub at ISTe 2011 along with a group of fellow Apple Distinguished Educators, but since I was not able to go to the conference this year, I decided to create this ebook to be distributed to the participants instead.  The ebook is in ePub format and can only be read on the iPad or another IOS device, or by using a desktop reader application such as Adobe Digital Editions or Calibre.  It is an enhanced ebook that includes a few embedded video tutorials. This means it is on the large size, so please be patient with the download time on your device.

This was my first time using Apple’s template for ePub creation with Pages, and I must say that it made it pretty easy to create the ePub. In the past, I created the ePub documents from scratch using my own styles for headings. The Apple template, which can be downloaded here, saved me some time and the resulting ePub document looks great.

To summarize the key points of the ebook:

If you are implementing new technologies at a college or university, you really should read the Department of Education’s Dear Colleague letter to college and university presidents regarding ereader devices, along with their follow up guide.  The follow up guide clarifies the following:

  • it is not just ereader devices that are covered by laws such as the ADA and Section 504 of the 1973 Rehabilitation Act, but any emerging technology. The new guide clarifies that online programs are also covered.
  • it is not just students with visual disabilities that are protected, but any student who has a specific learning disability or who otherwise has difficulty getting information from text sources (students with print disabilities).
  • the laws apply to elementary and secondary schools as well.
To make ePub documents more accessible, I presented the following 5 tips which are explained in more detail in the ebook:
  • use headings to split up long documents and provide structure and additional navigation in iBooks. The headings will be used to display a table of contents for navigating long ebooks.
  • provide captions or alternative text for images. At the very least provide a text caption underneath each image or video. This text should provide a concise description of the image’s content for those who use the VoiceOver screen reader.
  • provide a link to a captioned version of each video if you are creating an enhanced ebook that includes multimedia. iBooks does not currently read the captions when the video is embedded into the ebook. For this reason, you will need to link to a captioned version that can be accessed through the Mobile Safari web browser.
  • emphasize cognitive interactivity rather than just interface interactivity. Cognitive interactivity can be emphasized by asking questions and asking students to reflect on what they have read using the Notes feature of iBooks.
  • keep up with the ePub standard and become familiar with the new features available in ePub 3, such as media overlays.