Let’s Get Cooking with Recipes for Switch Control

In my last post I focused on Recipes, a feature of Switch Control for iOS devices that can help switch users more efficiently perform repetitive actions such as flipping the pages of a book. This week, I will focus on how to set up these Recipes with step by step directions.

The first step to get the most of recipes is to connect a switch interface to your device. While iOS allows you to use the screen as a switch source (tapping on the screen will be recognized as a switch press), having a switch interface with at least two switches will provide more options: for example, you can set up one switch to flip the page in one direction, the other to flip it in the opposite direction.  Some of my favorite switch interfaces are as follows:

Each of these switch interfaces will allow you to connect at least two switches (typically a round button you press to perform an action on your device). The wireless switch interfaces will connect to your device over a Bluetooth connection. Pairing instructions will vary by device, but if you have paired a Bluetooth keyboard or headset to your device before the steps will be familiar. The wired switch interfaces will typically use a Lightning connection.

Once you have your switch interface connected and you have configured at least two switch sources, you can proceed to create a new Recipe for flipping the pages in a book (Important: I highly recommend setting up the Accessibility Shortcut before trying these steps – this will allow you to triple-click the Home button if you get stuck at any time and need to turn off Switch Control):

  1. Go to Settings > General > Accessibility and choose Switch Control (under Interaction).
    IMG_0766
  2. Tap Recipes and choose the Turn Pages option.
    IMG_0767IMG_0768
  3. Tap Assign a Switch and follow the onscreen prompts to select one of your switches and assign the desired action (a Right to Left Swipe or a Left to Right Swipe).
    IMG_0769IMG_0770IMG_0771
  4. Repeat step 3 to assign the second action to a different switch (a swipe in the opposite direction).
  5. Navigate back to the screen listing your switches and their actions, then choose one of the switches and assign its Long Press action to Exit Recipe. This will allow you to switch back to the typical mode of operation for Switch Control when you are ready to step out of the Recipe.
    IMG_0772IMG_0773

That’s it. Your switches will be ready to use. Recipes are accessed through the Scanner Menu that pops up by default when you make a selection. You can review last week’s post to see this Recipe in action.

Want to learn more about Switch Control? You should really check out Handsfree on the iBookstore. This is a book I co-authored with switch master Christopher Hills. The book has more than 20 closed captioned videos and step by step instructions for every aspect of using Switch Control for access and inclusion.

A small action with a big impact (Recipes for Switch Control)

Sometimes accessibility is about making small changes that bring about a big impact in people’s lives. Take the act of flipping the pages in a book. This is probably an action most of us take for granted.  For some people with motor challenges, though, the ability to flip the pages of a book is the difference between being able to enjoy a favorite book or being locked out of that experience.

In the past, the only way to accomplish this action (flipping the page of a book) was through the use of a cumbersome mechanical device. My friend and colleague Christopher Hills illustrates the use of such a device in a short YouTube video.


Description: As dramatic music plays, the video begins with the words “In the not too distant past…” then cuts to Christopher sitting in his powered wheelchair while a relative reads a book next to him. As Christopher looks on, his dad Garry brings in a large, industrial looking device that needs to be wheeled into the room. Garry proceeds to plug in the device and place a book on it. An external switch box has options for the various page flip actions. Christopher flips the pages of the book with this device, which uses a roller to turn the pages each time Christopher presses a head mounted switch that is connected to the external switch box. The video then cuts to “Now…”  and we see the same relative as in the opening scene sitting down at the kitchen table with his iPad, ready to read a book. With an over the shoulder shot, we see the relative turn the pages on his iPad as Christopher performs the same action next to him  by pressing a head mounted switch that is connected to his iPad via Switch Control.

With digital content and assistive technology, the cumbersome, mechanical device shown in Christopher’s video is no longer needed. Devices like the iPad now include built-in switch access (Switch Control) that can be combined with external switches to make flipping the pages of a book a much simpler task. In the embedded video, I demonstrate the use of Recipes to flip the pages of a book I created with the Book Creator app on my iPad. The book is I Am More Powerful Than You Think.


Want to learn more about Recipes and Switch Control?  You should check out a free book I co-authored with Christopher Hills – Handsfree: Mastering Switch Control on iOS . This interactive book has more than 20 closed captioned videos that go over every aspect of using Switch Control – from how to connect a switch interface to your iOS device, to how to control your Apple TV with a switch.


A Workflow for Independence – Logan’s Story

Recently I had the pleasure of meeting Logan Prickett, a second year student at Auburn University at Montgomery. Logan is an academically gifted STEM student and the inspiration behind The Logan Project at AUM, an initiative to develop software that will enable students who are blind or who have low vision to fully participate in all college-level math courses.

Luis and Logan.

At age 13, Logan suffered an anaphylactic reaction to the contrast dye in an MRI. His heart stopped beating on its own which left him without oxygen for 45 minutes. Logan believes that “a prayer chain that reached around the world was active during those 45 minutes and I credit God and those prayers for the heartbeat that brought me back to life.”

His time without oxygen left Logan blind, a wheelchair user, with fine motor control difficulties, and unable to speak above a whisper due to damage to his vocal cords that occurred during life saving measures. Logan has the cognitive ability to do the work in his courses, he just needs a few technology supports in place to ensure his vision and motor challenges do not get in the way and prevent him from tapping his full potential. The goal of the Logan Project is thus to eliminate barriers for students with complex needs like Logan so that they can not only complete required math coursework but pursue a career in a STEM field if they desire. This is worthy goal given the underrepresentation of people with disabilities in STEM fields. You can learn more about it by typing The Logan Project into the search bar on the AUM website (aum.edu).

The Goal: Independent Communication

When I met with Logan and his team the expressed goal was to get Logan started on the journey to independent communication, beginning with the ability to send and receive short messages with his family and those close to him. Logan had just acquired an iPhone 6 Plus and we considered the use of Switch Control since Logan has enough motor control to press a switch. To accommodate his visual impairment, we decided that Logan would use Switch Control with manual scanning and the speech support turned on. This way he would be able to hear the items on the screen as he presses the switches to scan through them at a pace that works for him. The one problem with this setup is the possibility of fatigue from repeated switch presses. Siri seemed like a possibility for getting around this issue, but unfortunately Siri is not able to recognize Logan’s low whisper to allow him to quickly send a text message or initiate a FaceTime call. Surprisingly, FaceTime can pick up Logan’s whisper well so that it can be understood on the other end of the call. Although he can be heard with an actual phone call as well, the audio with a FaceTime call is much better. Thus, if we could find a way to activate FaceTime with a minimum of effort we would go a long way toward giving Logan an option for communication while he develops his Switch Control skills. That’s where the Workflow app comes in.

Workflow to the Rescue

I knew about the Workflow app because it made history as the first app to get an Apple design award for its attention to accessibility. In fact, at the Design Awards, members of Apple’s engineering team who are blind were the ones who actually did the demo of the app to show how well it works with the VoiceOver screen reader built into Apple’s mobile devices. You can watch the demo on Apple’s WWDC 2015 site (the Workflow demo starts at 35 minutes and goes through the 42 minute mark.)

As the name suggests, Workflow is a utility for creating workflows that allow the user to chain together a series of actions to complete a given task. For example, as I often do tutorials with screenshots from my Apple Watch, I have created a workflow that automatically takes the latest Apple Watch screenshot saved to my Camera Roll on the iPhone and shares it to my computer using Airdrop so that I can quickly add it to a blog post or a presentation. This kind of workflow can save a lot of time and effort for tasks that you perform several times over the course of a day.

Workflow already includes many actions for built-in iOS apps such as Contacts, FaceTime and Messages. These actions can be chained together to create a workflow, with the output from one action used as the input for the next one in the chain. Thus, a workflow can consist of selecting an entry in the Contacts app and feeding its information into the FaceTime app to start a new call with the selected contact. In much the same way, the entry from the Contacts app can be combined with a Text action to start Messages, pre-fill the message body and automatically address the message. For Logan this kind of workflow would reduce the amount of work he would have to perform and allow him to send quick messages to his team, such as “I’m ready for pick up” or “class is running late.” There is even the possibility of sharing his location so that other team members can get an idea of where Logan is at different points in the day.

Once a workflow has been created it is possible to add it as a shortcut on the Home Screen, with its own descriptive name, icon and color. By organizing these shortcuts on the Home Screen it is possible to create a simple communication system for Logan, giving him the ability to use Switch Control to independently start FaceTime calls, send quick messages and more.

Going Forward

The ultimate goal is to develop Logan’s ability to communicate independently and this will require building up his skills as a new switch user. With time and practice, I have no doubt after getting to know Logan that he will become a proficient user of Switch Control. In the meantime, Workflow is a good option for building his confidence and giving him some good reasons to use those skills: communicating with those who are important to him with a minimum of effort. When he is ready, he could then add an alternative and augmentative communication (AAC) app such as Proloquo4Text to his arsenal of communication tools, as well as keyboards such as Keeble and Phraseboard that make it easier for switch user to enter text. Logan has demonstrated that he has the ability to do well in higher education; now we just have to figure out how to eliminate a few barriers that are standing in his way and preventing him from letting his ability shine.

What’s New in iOS 9 for Accessibility

With iOS 9, Apple continues to refine the user experience for those who have disabilities or just need additional supports to effectively interact with their iPhones and iPads. While there are only two new accessibility features in iOS 9 (Touch Accommodations and a new Keyboard pane for improved support of external Bluetooth keyboards), the existing features have received a number of enhancements. Probably the one that received the most attention in this update is Switch Control, which now includes a new scanning style, the ability to set separate actions for long presses, and Recipes for more easily performing repetitive actions such as turning the pages in a book in iBooks.

The first change you will notice when you go into the Accessibility pane in Settings is that things have been moved around just a bit. Really the only change is that the options for Interaction now follow those for Vision. Everything else then follows the same order as before. I like this change as I think both VoiceOver and Switch Control significantly change how the user interacts with the device and  this change should make it easier to navigate to Switch Control in the Accessibility pane. The change also works to highlight the new Touch Accommodations feature by placing it near the top of the Accessibility pane.

This post is a short summary of each accessibility feature that is either brand new or enhanced in iOS 9, starting with the new Touch Accommodations feature.

Touch Accommodations

This brand new feature is largely targeted at people with motor difficulties who may have problems with the accuracy of their touches as they interact with the touchscreen on an iOS device. Touch Accommodations consists of three options: Hold Duration, Ignore Repeat and Touch Assistance. Before you start experimenting with these options, I would recommend setting up your Accessibility Shortcut so that Touch Accommodations is the only option listed. This way if you get stuck while using Touch Accommodations you can quickly triple-click the Home button on your device to exit out of the feature.

Hold Duration will require the user to touch the screen for a given duration before a touch is recognized. This can be helpful for someone who struggles with accidental presses. When Hold Duration is turned on, touching the screen will display a visual cue with a countdown timer. If the user lifts the finger before the countdown runs out, the touch is not recognized. With Ignore Repeat, multiple touches within the specified duration are treated as a single touch. This can be specially helpful when typing with the onscreen keyboard. A user with a tremor may end up tapping repeatedly on the same spot, resulting in many unwanted keypresses.

Tap Assistance can be set to use the Initial Touch Location or the Final Touch Location.  The two options determine the spot on the screen where the touch is performed when you let go with your finger. With Initial Touch Location, you can tap and then move your finger around on the screen while a timer is displayed. If you let go with your finger during the countdown (which you can customize using the Tap Assistance Gesture Delay controls) the tap is performed where you first touched the screen. After the countdown expires, you can perform a gesture (a flick, swipe and so on) the way you are used to with iOS. With Final Touch Location, the touch is performed at the spot where you let go as long as you do it within the countdown time. This can be a different spot than where you first touched the screen.

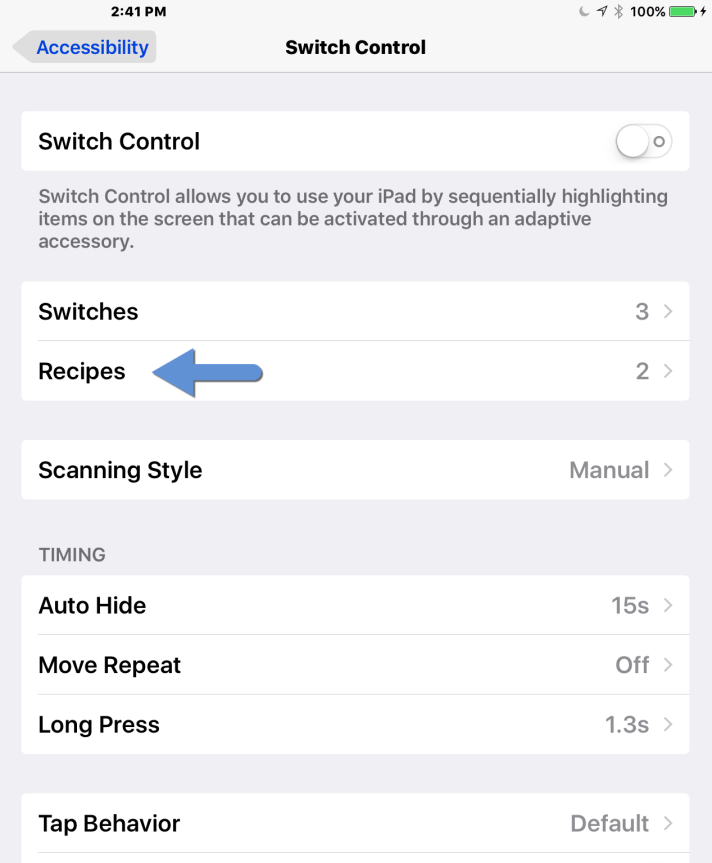
Additions to Switch Control

Switch Control is an iOS feature introduced in iOS 7 that provides access to touchscreen devices for a number of people who rely on external assistive devices. My friend Christopher Hills, with whom I am co-authoring a book on this feature (stay tuned on that front),  is a good example of an expert user of Switch Control. Christopher has cerebral palsy and uses external switches to perform many of the gestures someone with typical motor functioning could do with their fingers on the touchscreen.

In iOS 9, Apple has continued the development of Switch Control with a number of new features:

  • A new Single Switch Step Scanning style: this new style requires the switch source to be continuously pressed until the user gets to the desired item. Letting go of the switch then will highlight that item and give it focus. With the default tap behavior, the next tap will bring up the scanner menu then within the scanner menu letting go of the switch will immediately select the option that has focus. A Dwell Time timing option determines how long it will take before an item is highlighted and the user can make a selection.
  • A new Tap Behavior: the Always Tap option is similar to Auto Tap in that it allows the user to make a selection with the first tap of the switch. However, with Always Tap, the scanner menu is available from an icon at the end of the scanning sequence instead of through a double-tap of the switch.
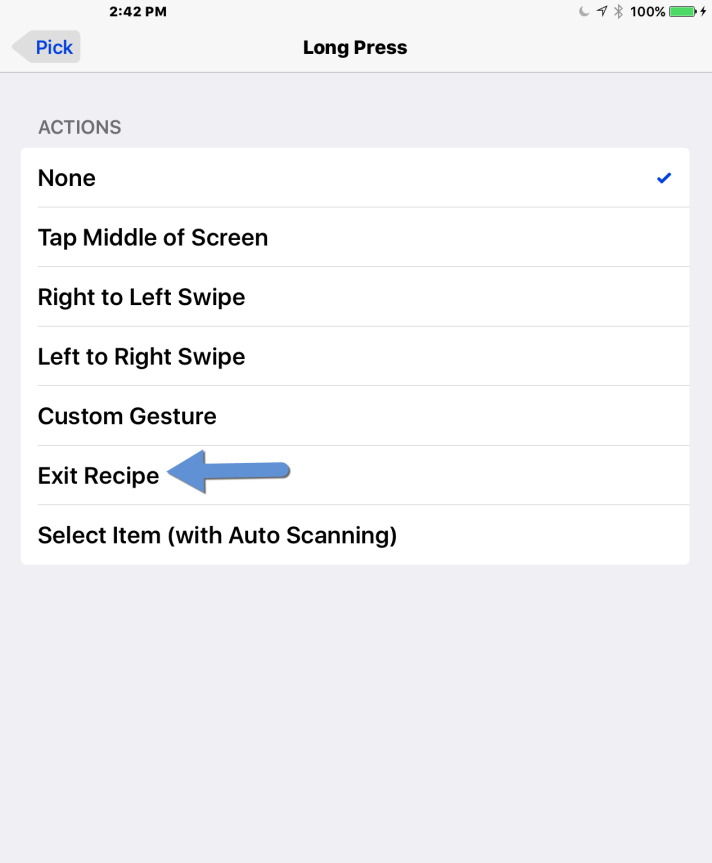
  • A Long Press action: the user an specified a separate action that can be performed when the switch is held down for a specified duration. This is a great way to exit out of the Recipes feature.
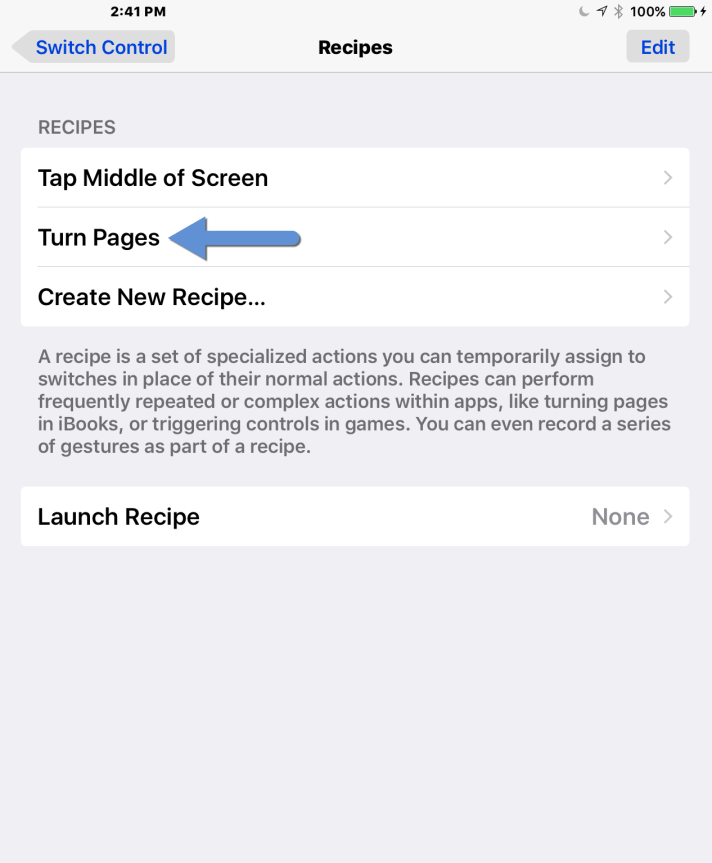
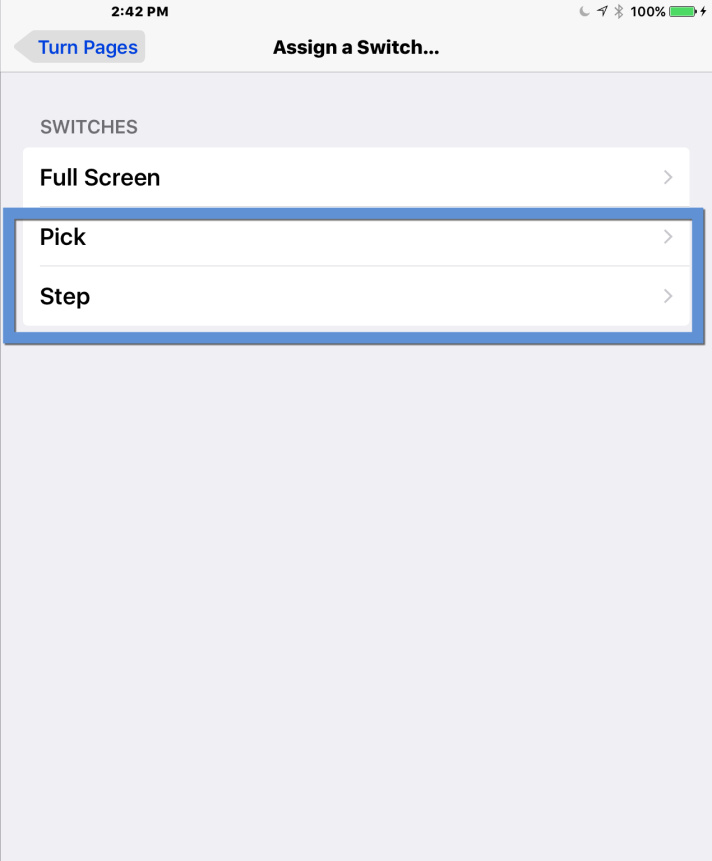
  • Recipes: the user can invoke a special mode for Switch Control where each press of the switch can perform the same action. A couple of actions are already included, such as tapping the middle of the screen or turning the pages in a book. These are primarily intended for use in iBooks. Creating a new recipe is as easy as giving it a name, assigning the switch that will be used to perform the action that will be repeated with each press, and choosing one of the built in actions or creating a custom one. Custom actions for Recipes can include a series of gestures and their timings. To exit out of the Recipe, the user has two options: setting a timeout after which the recipe will be ended if no switch presses take place, or setting the action for a long press of the switch to Exit Recipe.

A new option allows the switch user to combine tap behaviors when using the onscreen keyboard. With the Always Tap Keyboard Keys option, the keys will be selected with a single press of the switch even if the tap behavior is set to the default of showing the scanner menu at the first tap of the switch.


Customizable AssistiveTouch Menu

The layout of the AssistiveTouch menu can now be customized, with options for changing the number of items that appear on the top level shown and swapping out icons for features on secondary menus that are used more often. The number of icons on the top level menu can be set to as few as one and as many as eight. Tapping on any of the icons in the Customize Top Level Menu pane will open a list of all of the features supported by AssistiveTouch. Selecting an item from the list will move that option to the top level menu. Change your mind? No problem, a Reset option is available (in fact, I would love to see similar Reset options for other features such as VoiceOver and Switch Control).

Better Support for Bluetooth Keyboards

Under Interaction, you will find a new Keyboard option. Tapping that option will open a separate pane with options intended for those who use an external Bluetooth keyboard with their iOS devices:

  • Key Repeat: turns off the key repeat (it is enabled by default) in order to prevent multiple characters from being entered when a key is held down on the keyboard. The options for customizing this feature include adjustments for the delay before a key that is held down starts repeating, as well as how quickly the key repeat will take place.
  • Sticky Keys: allows the user to press the modifier keys for a keyboard shortcut in sequence rather than having to hold them down all at once. The options for this feature include a quick way to turn it on by pressing the Shift key quickly five times, as well as playing a sound to alert the user when it has been turned on.
  • Slow keys: changes how long the user has to hold down a key before it is recognized as a keypress (essentially a hold duration). The only option for this feature is to adjust the length the key has to be pressed before it is recognized.

The one option for the onscreen keyboard in the Keyboard pane addresses a usability problem by making the switch between lower case and upper case more prominent. By default, the keys on the onscreen keyboard are in lower case and only switch to uppercase when the shift key is pressed.

Tweaks to VoiceOver and Zoom

The Rotor in iOS 9 has two new options available: Text Selection and Typing Mode. The former is not a new feature or input mode, it just now can be changed through the rotor. With the latter, the user can more easily select text by character, word, line, or page (or select all) by flicking up or down with one finger after selecting Text Selection in the Rotor. A flick to the right will then select the text by the chosen granularity (word, line, etc.).

A new option allows the users of external Bluetooth keyboards to change the VoiceOver keys from Control + Option to the Caps Lock. Finally, users can now adjust the Double-tap Timeout at the bottom of the VoiceOver settings pane. This feature may be helpful to a VoiceOver user who also has motor difficulties and can’t perform the double-tap as quickly.

For Zoom, the only change is that the option for choosing different Zoom Filters is now available from the Zoom settings panel where before it could only be selected from the Zoom menu available after tapping the controller or the handle on the Zoom window.

Other Options

iOS 9 includes options for disabling the Shake to Undo feature as well as all system vibrations, both of which can be found under Interaction in the Accessibility pane.

As is often the case with iOS updates, a number of features that are not explicitly labeled as a accessibility features can benefit those who use assistive technologies. One example is the new Siri suggestions feature, which can be displayed with a swipe to the right from the Home screen. The suggestions include frequently contacted people, recently used apps, locations and more. Anything that puts less distance between users of VoiceOver and Switch Control and the information they need is a good thing in my book.

That’s it for this high level overview of the major (and some minor) changes in iOS 9 that impact those who rely on the accessibility features. I hope you have found it helpful.