Today’s post will focus on some of the lessons I have learned about the accessibility of ebooks created with iBooks Author and accessed on the iPad with iBooks 2.
I was pleasantly surprised to learn that Apple included an option for adding a description for images and other objects when it released iBooks Author. I don’t remember this feature being discussed much at the event where Apple unveiled iBooks 2 and iBooks Author, and only found out about it while test driving the software.
An even better surprise was learning that closed captions are now supported for any video that is embedded in an iBook. This is a great feature that will benefit a range of different learners (not only those with hearing disabilities). I think these new accessibility features of iBooks Author and iBooks 2 will go a long way toward facilitating the adoption of iBooks in the schools by meeting legal requirements for accessibility set by the U.S. government (for a summary of the legal requirements, please see the Dear Colleague letter and the follow-up clarification from the U.S. Department of Education).
Apple has published a support document with advice for making iBooks created with iBooks Author more accessible. However, the article focuses mostly on the accessibility of images and other visual content, and does not include any information about closed captions. I would add a couple of bullet points to the advice given in the Apple support document:
- the article suggests adding descriptions for all images, including background images. Web accessibility guidelines state that decorative images should have a null or empty alt attribute so that they are skipped by a screen reader, but there is currently no way in iBooks Author to indicate that an image should be skipped by VoiceOver on the iPad. In my testing, I found that when you leave the description field for an image empty in iBooks Author, VoiceOver will read the entire file name when it comes across the image in iBooks 2. This is a problem because most people don’t use very descriptive file names before they add their images to a document. In my test iBook, I forgot to add a description for one of the placeholder images included in the iBooks Author template I selected. When I accessed the iBook on my iPad, VoiceOver read the following: “1872451980 image”. Imagine how confusing this would be to someone who is blind and relies on the VoiceOver screen reader to access content in iBooks. For the time being, I would suggest following the guidance from Apple and marking up all images, including those that are used for decorative purposes, but I would recommend marking up decorative images (those that don’t add any content that is essential for understanding) with the word “Background” in the description. By default, VoiceOver will say the word “image” so it is not necessary to add that to the description. While it would be better for the image to be skipped by VoiceOver if it is not essential, I would rather hear a quick, single-word announcement that is much easier to ignore than a long number read aloud in its entirety by VoiceOver, or an unnecessary description for an image that does not add in any way to my understanding of the content.
- as much as possible, image descriptions should focus on the function of each image rather than its visual appearance. Writing descriptions (or alternative text as it is more commonly known in the web accessibility world) is as much an art as it is a science, and much of it is subjective. There are many sites that provide information on how to write good alt text for images on websites, but I have found very little guidance on how to write descriptions for other online content such as ebooks. My recommendation would be to focus on three C’s when writing descriptions for images in iBooks Author: Context, Content and Conciseness. First, I would ask myself if the image is properly described in the surrounding text. If it is, then it might be more appropriate to mark it up as a decorative image (“Background”). Next, I would ask myself “what information does this image convey?” and focus on the key idea or concept supported by the image rather than its visual details. There could be a few exceptions where you might need to focus on the visual details of the image, but these cases should be the exception rather than the rule. The final consideration is to keep the description as brief and concise as possible. I would try to keep it to no more than 8-10 words if possible.
The second aspect of accessibility supported in iBooks Author is closed captioning. If a movie added to an iBook in iBooks Author has been captioned, you can view the captions in iBooks 2 on the iPad by going to Settings, Video and making sure Closed Captions is set to On. If you know a file has been captioned and you don’t see the captions on the iPad, you may need to go into the Settings app and turn the captions off and then on for the captions to show up. This appears to be a bug that will likely get fixed in a future update to iBooks or IOS.
To create a captioned file, I have found that a workflow using MovieCaptioner and Compressor has worked well for me. I like MovieCaptioner for creating the captions because it is affordable and easy to learn. To learn more about how to create captions with MovieCaptioner you can view this tutorial I have made available on the Tech Ease website at the University of South Florida.
The only difference with my current workflow is that rather than exporting a captioned QuickTime video file from MovieCaptioner I’m only using the software to create the SCC file that has the caption text and timecodes. I then use Compressor to make sure the video file is in the correct format for the iPad and to add the captions. I found that when I exported the movie from MovieCaptioner I would get an error message in iBooks Author and the software would refuse to import the movie. Once I have exported my SCC file (Export > SCC in MovieCaptioner), I use Compressor to combine the two as follows:
- Open Compressor and choose Add File from the toolbar, then locate the desired video on your hard drive.
- In the Settings pane (Window > Settings) choose the Destinations tab, then find Desktop (or your preferred destination ) and drag it into the Batch window.

- Switch to the Settings tab and choose Apple Devices, H.264 for iPad and iPhone, then drag that setting on top of the destination in the Batch window.

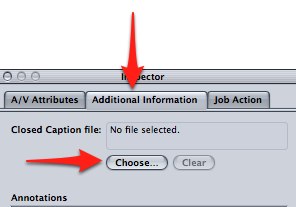
- With your movie selected, open the Inspector (Window > Inspector or click the Inspector button on the toolbar), select the Additional Information tab and then Choose to find the SCC file on your computer.
- Select Submit to start the export process.
Once your movie has been exported from Compressor you should be able to drag it right into your iBook in iBooks Author to add it as a widget. As with images, make sure you provide a description in the Inspector.
Students with disabilities have traditionally had a difficult time with access to textbooks. iBooks Author provides a platform for making textbooks more accessible for all learners as long as a few accessibility principles are kept in mind. What an exciting time to be working in educational technology and accessibility!