I finally got an iPhone 4S after waiting in line for almost two hours at my local Apple Store. Entering text with VoiceOver is a lot easier on the new iPhone because I can now use the dictation feature available with the onscreen keyboard. To use dictation with VoiceOver, I move my finger on the screen until I find the dictation button, then double-tap with one finger anywhere on the screen and start my dictation. When I’m finished, I can double-tap with two fingers or move the phone away from my face and it will stop the dictation. This is such a great feature that will be a huge productivity boost for those of us who use VoiceOver on IOS devices. This quick YouTube video shows how the feature works:
Authoring ePub documents for the iPad with Automator, TextEdit and Text to Speech
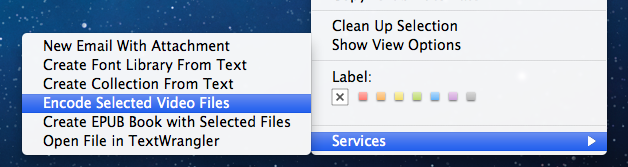
The website Mac OS X Automation has a great tutorial on how to use some of the new text to ePub automator actions that are available in Mac OS X Lion, and they have even put together a few automator workflows to make the process easier. I was inspired by the information they had on their website to see if I could create my own ePub document using the information they provided, but I added a twist: I added a recording of the text at the beginning of each chapter and this recording was created using the excellent Alex voice available with the Text to Speech feature in Mac OS X. The tutorial is now available on YouTube (and it is closed captioned). I think having an audio version could be beneficial for students with learning disabilities by providing the content in another modality. While the iPad and other IOS devices already include a great screen reader in VoiceOver, the voice available on those devices is not as good as Alex is, so this is why I decided it might be a good idea to provide the text to speech recording created on the Mac. Along the way to making this tutorial, I also learned about new automator actions for converting video and audio files into the correct formats for ePub (and iTunes U). To use these actions, select your file(s), right-click on them and choose Services, Encode Selected Video (or Audio) Files. For audio this will result in an .m4a file saved to the same location as the original, and for video the format of the converted file will be .m4v.
Overview of new accessibility features in IOS 5
With IOS 5, Apple has introduced a number of features to make their mobile devices even more accessible to people with disabilities:
- VoiceOver enhancements: IOS 5 includes an updated voice for VoiceOver, the built-in screen reader for people who have visual disabilities. I have found the new voice to be a great improvement over the old one, especially when reading long passages of text in apps such as iBooks. Another improvement is that the triple-click home option is set to toggle VoiceOver by default. Along with the PC-free setup introduced with IOS 5, this small change has made it possible for someone with a visual disability to independently configure his or her IOS device out of the box, without any help from a sighted person. The Mac-cessibility website has an excellent overview of the many new changes in VoiceOver that I highly recommend reading.
- Camera app compatibility with VoiceOver: this is a neat feature that will make photography more accessible to people with low vision and those who are blind. With VoiceOver on, if you launch the Camera app it will announce how many faces are in the frame. In my testing this worked pretty well, and I’ve used it successfully on the iPad and the iPod touch. It should work even better on the iPhone, which has a better sensor and optics. Combined with the ability to turn on the camera app from the lock screen on some devices (iPhone and iPod touch) by double-tapping the home button and the fact that you can use the volume up button as a shutter release, Apple has done a lot to make photography more accessible to people with visual disabilities.
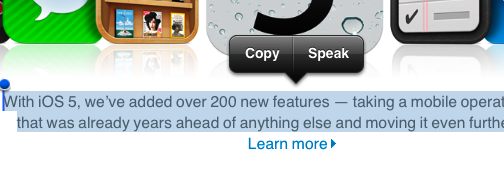
 Speak selection (text to speech): This is one of my favorite features introduced with IOS 5. It provides another modality for students with learning disabilities who can benefit from hearing the text read aloud to them. To use it, go into Settings, General, Accessibility, tap Speak Selection and choose On. Once you’ve enabled this feature, when you select text a popup will show the option to Speak the text using the VoiceOver voice. Note that you can control the speaking rate for the speak selection feature independently from VoiceOver.
- Balance controls for audio: In addition to mono-audio, which combines both channels of stereo audio into a single mono channel, there is now an option for controlling the left/right balance for stereo sound. On the iPhone, there is now also a special Hearing Aid mode that is supposed to make the device more compatible with hearing aids.
- Handling of incoming calls: you can choose to automatically route incoming calls to the speaker phone feature of the phone, or to a headset.
- New alert types: on the iPhone, you can use one of five unique vibration patterns to identify who is calling if you have a hearing disability, or you can create your own pattern by tapping it on the screen. These custom vibration patterns can be assigned in the Contacts app by opening a contact’s information, choosing Edit, Vibration and then Create New Vibration. There is also an option to have the LED flash go off when you get a notification, a new message, and so on.
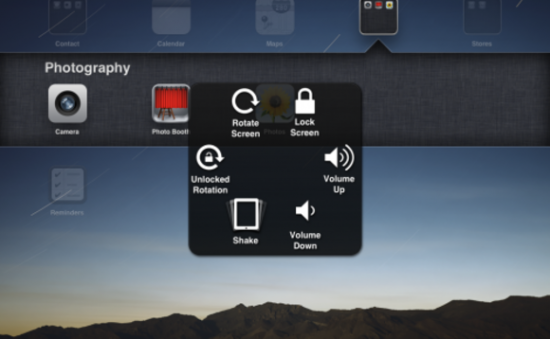
- Assistive touch: this was one of the most anticipated accessibility features in IOS 5. Assistive touch was designed to make IOS devices easier to use for people with motor difficulties. For example, someone who is not able to tap the Home button to exit an app can now bring up an overlay menu with icons for many of the hardware functions of their device, including the Home button.
 Assistive touch also includes options allowing for single finger use of many of the multi-touch gestures (including the new four finger gestures available only for the iPad and the pinch gesture used for zooming). To use assistive touch, choose Settings, General, Accessibility and turn on Assistive Touch. You will know assistive touch is enabled when you see a floating circular icon on the screen. Tapping this icon will open the overlay menu with the assistive touch options. Note that you can move the assistive touch icon to another area of the screen if it gets in the way. Please note that Assistive Touch is not compatible with VoiceOver. I really wish the two features could work in tandem. This would be helpful to users with multiple disabilities.
 - Custom gestures: assistive touch includes an option to create your own gestures. Update: I was able to create a few useful gestures after watching this video from Cult of Mac. I created one for scrolling up on a page and one for scrolling down. Now when I’m reading a long web page, instead of having to swipe up or down to scroll I can bring up the assistive touch overlay menu, select the new gesture from the Favorites group and tap once on the screen to scroll.
- Typing shortcuts: under Settings, General, Keyboard you can create shortcuts for common phrases. For example, you could create a shortcut that would enable you to enter an email signature by simply typing the letters “sig” and pressing the space bar. This feature should provide a big productivity boost to anyone who has difficulty entering text on their mobile device.
- Siri and dictation (iPhone 4S only): the new personal assistant uses voice recognition and artificial intelligence to respond to a range of user queries that can be made using everyday language rather than preset commands. The Apple website has a video that demos some of the capabilities of Siri. One of the amazing things about Siri is that it works without any training from the user. Along with Siri, the iPhone 4S also includes an option to dictate text by tapping a microphone button on the keyboard. The ability to use your voice to control the device can be helpful to many different types of disabilities, including those who have disabilities that make it difficult to input text. One of the things I have found especially frustrating when using VoiceOver on IOS devices is inputting text, so I hope this new dictation feature makes that easier. I will have a chance to test it out more thoroughly once I get my own iPhone 4S (currently out of stock in my area). Update: I finally got my hands on an iPhone 4 and I tried using the dictation feature with VoiceOver. It is working really well for me. I find the microphone button on the onscreen keyboard by moving my finger over it, double-tap to start dictation (as indicated by a tone) and then I double-tap with two fingers to stop it. Even better, after I’m done dictating the text, if I move the phone away from my mouth, it automatically stops listening! I love this feature.
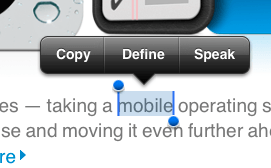 Dictionary: While it is not listed as an accessibility feature, having a system dictionary is a new feature that is great for providing additional language supports to students with learning disabilities. To use this feature, select a word and a popup will show the Define option that will allow you to look it up using the same dictionary that has been previously available only in iBooks.
- iMessages: a new add-on for the Messages app makes it possible to send free MMS messages to any owner of an IOS device. Many people with hearing disabilities rely on text messaging as a convenient means of communication. The iMessages will be especially helpful to those who are on a limited text messaging plan.
- Reminders app: The new Reminders app has a simple interface that will make it a nice app for people who need help with keeping track of assignments and other tasks. On the iPhone 4 or iPhone 4S, tasks can be tied to a location using the phone’s GPS capabilities. One use of this feature could be to set up a reminder for a person to take their medication when they get to a specific location, for example.
- Airplay mirroring (iPad 2, requires an Apple TV): along with IOS 5, a recent firmware update for the Apple TV enables mirroring to a projector or TV using Airplay. I can see this option being helpful in a class where there are students in wheelchairs who have difficulty moving around the room. Using air mirroring, the teacher could bring the iPad 2 to the student and the rest of the class could still see what is displayed by the projector or TV.

The new accessibility features make IOS 5 a must-have update for anyone who has a disability, as well as for those who work with individuals with disabilities. For schools and other educational institutions, the accessibility features of IOS make Apple mobile devices an ideal choice for implementing mobile learning while complying with legal requirements such as Section 504, Section 508 and the Americans with Disabilities Act.
Disclosure: I am an Apple Distinguished Educator.
5 tips for ePub accessibility
 I was scheduled to present at a workshop on ePub at ISTe 2011 along with a group of fellow Apple Distinguished Educators, but since I was not able to go to the conference this year, I decided to create this ebook to be distributed to the participants instead. The ebook is in ePub format and can only be read on the iPad or another IOS device, or by using a desktop reader application such as Adobe Digital Editions or Calibre. It is an enhanced ebook that includes a few embedded video tutorials. This means it is on the large size, so please be patient with the download time on your device.
This was my first time using Apple’s template for ePub creation with Pages, and I must say that it made it pretty easy to create the ePub. In the past, I created the ePub documents from scratch using my own styles for headings. The Apple template, which can be downloaded here, saved me some time and the resulting ePub document looks great.
To summarize the key points of the ebook:
If you are implementing new technologies at a college or university, you really should read the Department of Education’s Dear Colleague letter to college and university presidents regarding ereader devices, along with their follow up guide. The follow up guide clarifies the following:
- it is not just ereader devices that are covered by laws such as the ADA and Section 504 of the 1973 Rehabilitation Act, but any emerging technology. The new guide clarifies that online programs are also covered.
- it is not just students with visual disabilities that are protected, but any student who has a specific learning disability or who otherwise has difficulty getting information from text sources (students with print disabilities).
- the laws apply to elementary and secondary schools as well.
To make ePub documents more accessible, I presented the following 5 tips which are explained in more detail in the ebook:
- use headings to split up long documents and provide structure and additional navigation in iBooks. The headings will be used to display a table of contents for navigating long ebooks.
- provide captions or alternative text for images. At the very least provide a text caption underneath each image or video. This text should provide a concise description of the image’s content for those who use the VoiceOver screen reader.
- provide a link to a captioned version of each video if you are creating an enhanced ebook that includes multimedia. iBooks does not currently read the captions when the video is embedded into the ebook. For this reason, you will need to link to a captioned version that can be accessed through the Mobile Safari web browser.
- emphasize cognitive interactivity rather than just interface interactivity. Cognitive interactivity can be emphasized by asking questions and asking students to reflect on what they have read using the Notes feature of iBooks.
- keep up with the ePub standard and become familiar with the new features available in ePub 3, such as media overlays.
Favorite Free Apps on the new Mac App Store.
When the new Apple Mac App Store launched on January 6th, I was at first really disappointed with the choice of free software available. However, there was a lot about the App Store itself to like. One thing I really like about the Mac App Store is that it simplifies the software update process by making it extremely easy to update all of your purchased/downloaded software with one click (much the same way you update apps on an iPad or iPhone). I also like that it is tied to your iTunes account so that you can install the same software across several machines and keep them in sync without having to spend endless hours downloading the same software on each machine.
Now, I have not had a chance to do an extensive review of the accessibility of the app (it is not part of iTunes but it’s own app accessed through the Apple menu or the Dock) but so far it appears to be good. The secret appears to be using the rotor to quickly move between the different sections. In any case, I would think that a single app that supports VoiceOver, even if not perfectly, would be a much better option for someone with a visual impairment than having to visit each individual website to purchase/download individual apps.
Of the paid apps, the standouts are Rapidweaver (a web design program I used to design my own website), Pixelmator (a graphic editor that should have most of the features needed by the average person who doesn’t want to mortgage their house for Photoshop) and the unbundled iLife ’11 and iWork ’09 apps (don’t use Numbers, fine don’t buy that one). Some of the software is available at a reduced price (Pixelmator is half price on the App Store). If you are a photographer, Aperture for only $80 (instead of $200) is a steal.
But this post is about the free apps, so here are the ones I have installed so far that I like:
- Caffeine is a tiny program that runs in the menu bar and allows you to suspend your energy settings. It is perfect for when you’re doing a presentation or watching web video and don’t want to be interrupted by the screen reader, screen dimming and other energy saving features. Using the menu bar icon is much faster than opening the display preferences.
- DropCopy allows you to copy files between any Apple devices, including your laptop or desktop and your iPad, iPhone or iPod touch (you will need to install a free companion app).
- MindNode for Mac is a simple brainstorming/concept mapping app for those who are visual learners. The app doesn’t have all the bells and whistles of other programs such as Inspiration, but it presents a simple interface that is perfect for brainstorming ideas.
- Alfred is now my favorite way to search my Mac and launch applications. It works much like Quicksilver. Press a key and a text box will open in the middle of the screen where you can type in your search term. I like that it is much simpler and appears faster than Quicksilver, which never really caught on with me.
- TextWrangler is a pretty good text editor with features usually found on much more expensive editors (search and replace across multiple files, FTP and SFTP support, etc.).
So far the only program I’ve downloaded that I was not happy with has been Smart Recorder. I just didn’t find it that useful or easy to use. However, it is still on my list of Purchases, so if I change my mind and find a use for it, it will be there waiting for me to install it with just one click.
You will notice that my list has a heavy focus on utilities. Your list may be different depending on how you use your Mac.
VoiceOver language rotor in IOS 4
As a result of a Twitter conversation this past week, I learned (thanks to Pratik Patel) a neat new feature that has been added to VoiceOver for the iPod touch and iPhone with the release of IOS 4. When you go into the VoiceOver settings of these devices, you should find a new option: Language Rotor. The Language Rotor allows you to quickly change the language used by VoiceOver by turning an imaginary dial on the touchscreen. This feature has been available on some Mac laptops, where you can use the rotor gesture to navigate web pages by headings, links and the like. It was good to see that this gesture has been added for language selection in IOS 4. This should really benefit anyone who wants to use VoiceOver to read back a book in a different language with iBooks, or when you access a web page from overseas that is in a language other than English (I suppose language students would be helped out by this feature too).
By going into the VoiceOver preferences on an iPod touch or iPhone (Settings, General, Accessibility, VoiceOver) you can select Language Rotor and then choose the languages that will be available when you use the Language Rotor. There were 34 languages available on my device, and a nice touch is that for some languages you have some dialects available as well (Spanish from Mexico as opposed to Mexico, or French from Canada as opposed to France).
To use the Language Rotor, use the dial turning gesture on the iPod touch or iPhone touchscreen until you hear Language, then flick up and down to select from the languages you have selected to make available in the settings. Another nice touch is that there is a visual indicator as you turn the dial. This feature was added to help out sighted users when they work with people who have visual disabilities and use VoiceOver.
The Language Rotor should be available on the iPad when that device gets an update to IOS 4 in November.
Testing for accessibility with screen readers.
Accessibility NZ had a provocative blog post on whether sighted web developers should use screen reading software to test the accessibility of their sites. Based on a conversation I had with a fellow instructional designer, it appears that the blog post might be misunderstood.
The point the author is making is not that sighted developers should skip doing accessibility testing with screen readers and only rely on testing with people who are actually blind, but rather that accessibility testing should not end with the tools. It can, and should, include both. The first past with testing tools can help you identify the most glaring problems and save you both time and money by letting you focus on the more difficult problems when you test with end users (which cost money to recruit)
Testing with a representative sample of people in the target demographic is just good instructional design anyway. The only difference in this case that we should not test with just the average user, but keep in mind legal requirements such as Section 508 and include a variety of people in the testing before we can say a site is accessible. The more diversity the better. This will provide not only good accessibility information, but good usability information that will benefit everyone who visits the site.
The author on Accessibility NZ made another good point: there are other disabilities out there. Yes, it is true that the web tends to present the biggest challenge to those who are visually impaired, but even within that population there are a range of needs. Someone like me who still has some sight will not use the same site in the same way as someone who is completely blind. I’m probably more like a sighted developer than someone who is completely blind, yet I could say a site is accessible based on my disability, but my assessment would not be representative of most people who are bind. When testing, we need to consider a range of different needs.
This is one post where reading the comments is actually something I would recommend. I was impressed by the reasonable and civil way in which the people in the comments conducted the discussion around this topic, and the range of perspectives they brought to the table.
oMoby for iPod touch
Alena Roberts recently featured oMoby on her Blind Perspective blog. oMoby is intended as a shopping app, but as Alena has suggested it can have other uses for people with visual impairments. oMoby uses the iPhone/iPod touch 4G camera to snap a picture of any product you come across while shopping. The picture is then compared against a database and oMoby will provide you with a list of possible products/items. The fact that you don’t have to scan a bar code for this app to work makes it easier fo use for someone with low vision who might not be able to properly locate the bar code.
I had to try oMoby for myself to see how it works, and I was blown away with how well this app performs. Just like Alena, I wanted to see if I could use the app as a replacement for a currency identifier. I tried the app with both $1 and $5 bills and both times it accurately identified them. It had a more difficult time with coins (it could not correctly identify a quarter, only telling me that it was a silver coin). While not perfect for this purpose, oMoby is pretty good consideirng it is a free app.
The other thing to point out about oMoby is that I found it to work well with VoiceOver, the screen reader now included with all new iPod touch and iPhone models. So, to sum up, oMoby is a shopping app that has the potential to replace a much more expensive currency identifier used by those with visual impairments, and it can do it for $0 dollars. Not a bad deal.
Here is the link for it on the Apple Store.
Awareness app for iPod touch
Cost: $4.99
iTunes URL: http://itunes.apple.com/us/app/awareness-the-headphone-app/id389245456?mt=8
Awareness bills itself as the “headphone app for the iPhone.” It is an app that lets you listen to music and other audio content on an iPod touch/iPhone while also picking up on ambient sound.
I have wanted an app like this because I really like listening to music on my iPod touch/iPhone (I have both) but I also need to be aware of my surroundings since I have limited vision. I could not believe how well this app worked. At first I thought the price was kind of high for a one-trick pony, but given how well it works I think it’s worth it. It actually freaked me out a bit the first time I used the app while walking around my college campus. It was weird that I could hear people talking before they came into view. For a while, I felt “bionic”. The app is so sensitive (you can adjust this in the settings) that it even picked up the sound of my cane as I tapped on different surfaces during my walk.
This app would definitely be a big help to anyone who has a hearing impairment (including those who are losing their hearing due to old age and need some help hearing the tv, etc.). The cost and convenience would make it a great alternative for providing accommodations to students with hearing impairments in educational settings (it could replace a sound amplification system).
Text to Voice
Free
Link: https://addons.mozilla.org/en-US/firefox/addon/91405/
Text to Voice is a Firefox plug-in that adds text to speech to any web page. After you install the add-on, you will see a small speaker icon in the lower right corner of the Firefox window. To use the extension, select some text on a web page and click once on the speaker icon. You will then hear the selected text.
This extension currently supports two voices (Male and Female). Of the two, I found the female voice to be the best in terms of clarity and pacing. The preferences can be accessed by right-clicking on the speaker icon.
You can also use the extension by selecting some text on the page, right-clicking on the selection, and choosing Speak It!. This should bring up a small window (your popup blocker might need to be disabled). One of the options on the popup window will be a link you can click on to download an MP3 version of the selected text.
